

- nano / vi
- ls -la
- python3 examples/python3/fibonacci.py
- gcc -o helloworld examples/c/helloworld.c && ./helloworld
- objdump -d ./helloworld | much less -M
- vim examples/c/helloworld.c
- curl –max-time 15 parrot.dwell # requires networking
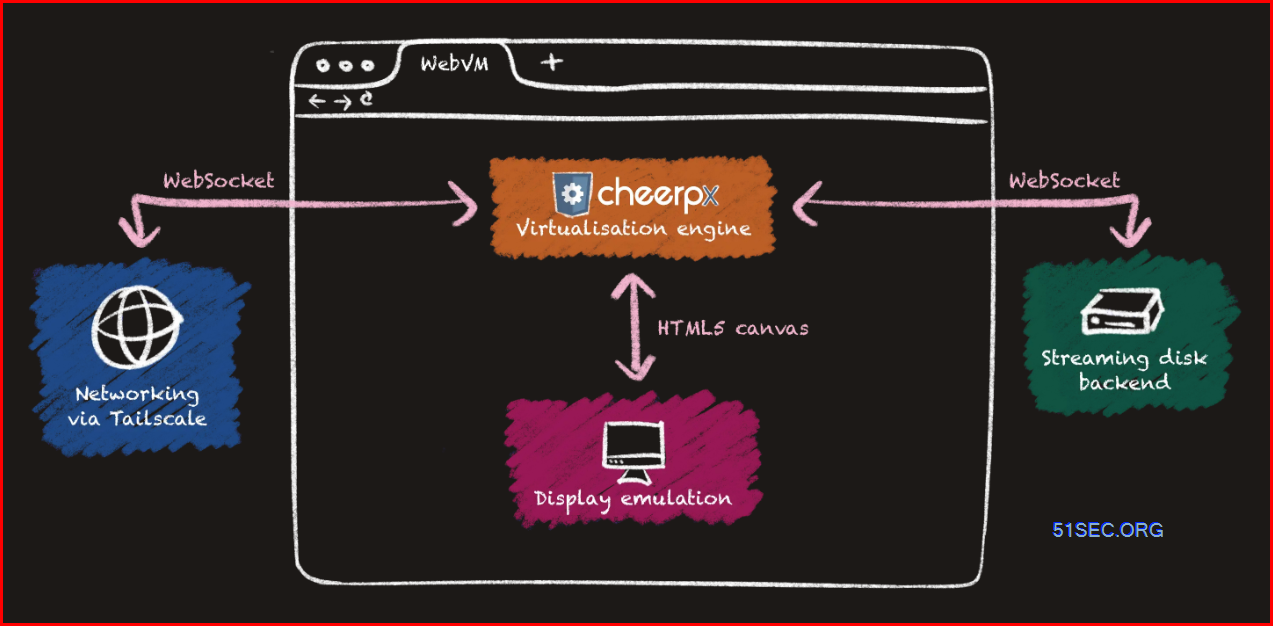
WebVM consists of 4 essential constructing blocks: The CheerpX virtualization engine, a digital storage backend, a networking layer, and the emulated graphical gadget.
CheerpX is a novel WebAssembly-based virtualization engine for x86 binary code. This engine is predicated on an environment friendly Simply-In-Time compiler from x86 directions into WebAssembly, plus an emulation layer for Linux system calls. This mix makes it potential to run unmodified Linux x86 binaries within the browser, and it’s sturdy and scalable sufficient to run complete Linux distributions.
The second essential element of WebVM is its streaming disk backend. One of many key benchmarks of success of WebVM is to have the ability to boot full, unmodified Linux distributions, with out requiring the preloading of the total file system. This suggests the power to assist 1GB+ root filesystems and to dynamically load disk blocks with low-latency, a vital concern for the general efficiency of the VM.
Lastly, the image is accomplished by the personal networking layer, carried out by way of Tailscale![]() and Xorg assist utilizing the KMS Linux API. Extra on these in later sections.
and Xorg assist utilizing the KMS Linux API. Extra on these in later sections.
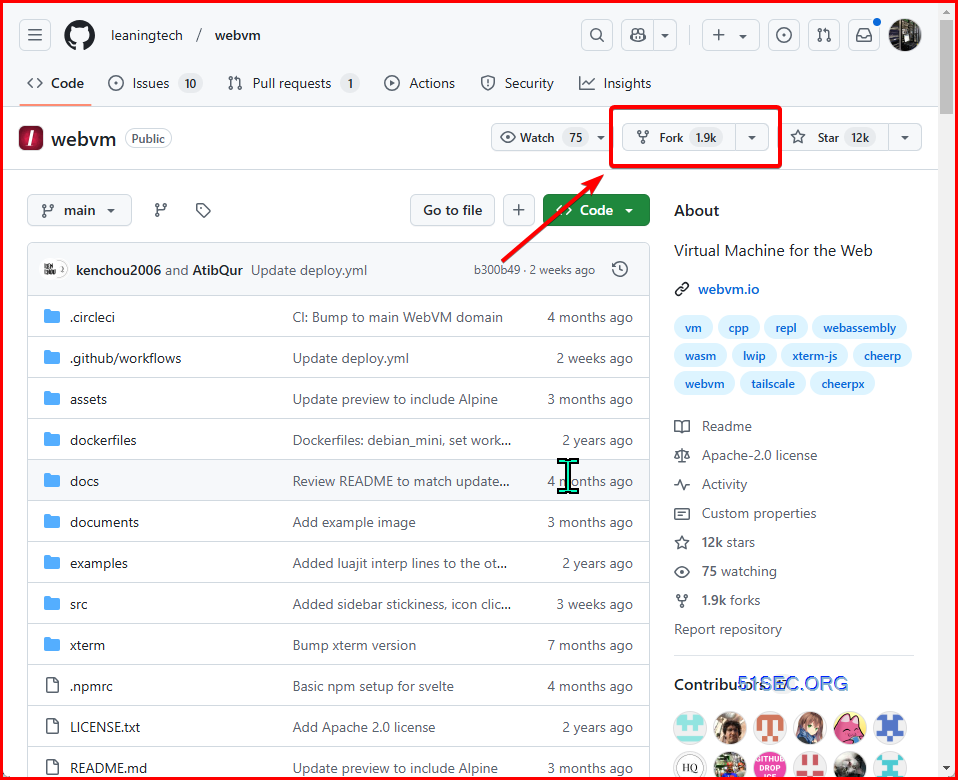
Create Your Personal Webvm in Github
My cloned repository and up to date repository: https://github.com/51sec/webvm
- I solely up to date the deployment information which may make the entire course of accomplished with out an error.
Demo: https://51sec.github.io/webvm/
Primary steps:
1 Fork the repository from https://github.com/leaningtech/webvm
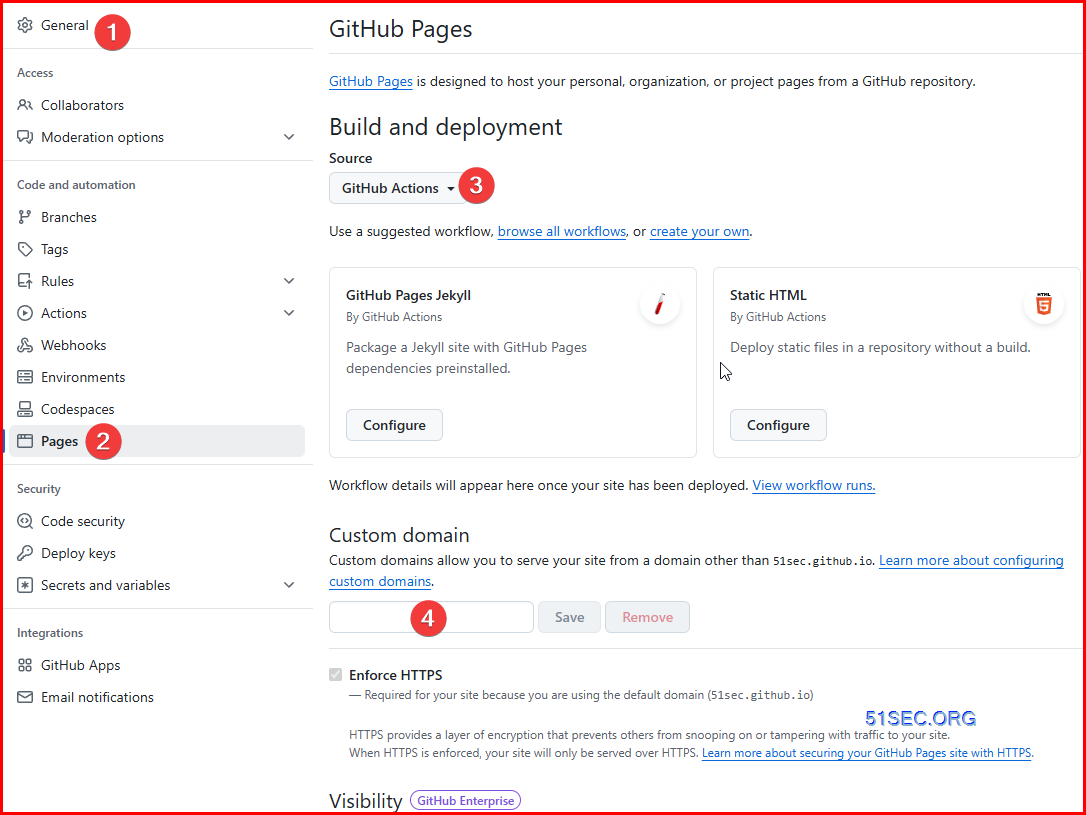
2 Allow Github pages in settings.
- Click on on
Settings. - Go to the
Pagespart. - Choose
Github Actionsbecause the supply. - In case you are utilizing a customized area, guarantee
Implement HTTPSis enabled.
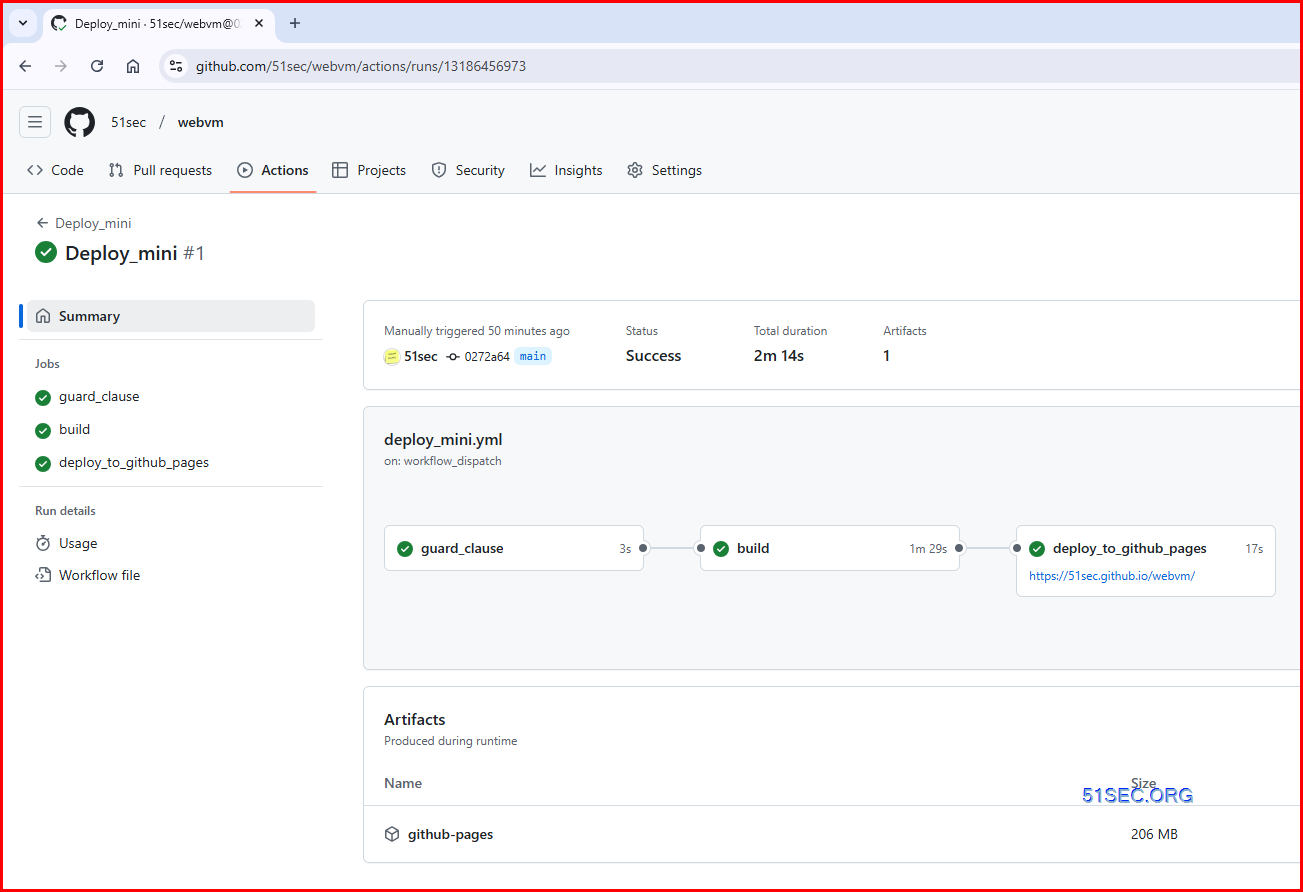
3 Run the workflow.
- Click on on
Actions. - Settle for the immediate. That is required solely as soon as to allow Actions in your fork.
- Click on on the workflow named
Deploy. - Click on
Run workflowafter which as soon as extraRun workflowwithin the menu.
4 After just a few seconds a brand new Deploy workflow will begin, click on on it to see particulars.
5 After the workflow completes, which takes a couple of minutes, it’s going to present the URL under the deploy_to_github_pages job.
Linux Instructions:
- $ cat /and so on/os-release
- $ lsb_release -a
- $ hostnamectl
Use your individual area in your Github web page:
Native Deployment (Your Personal Server or VPS)
1 Clone the challenge
- git clone https://github.com/leaningtech/webvm
- cd webvm
- wget https://github.com/leaningtech/webvm/releases/obtain/ext2_image/debian_large_20230522_5044875331.ext2
- this one is from unique github repository, su account password was not set.
- https://github.com/JohnnyNetsec/webvm/releases/obtain/ext2_image/debian_mini_220250206_13186456973.ext2
- su password has been set as password.
3 Edit config_github_terminal.js

4 Construct WebVM utilizing npm, output might be positioned within the construct listing
apt set up npmnpm set upnpm run construct
5 Begin NGINX, it mechanically factors to the construct listing simply created
apt set up nginxnginx -p . -c nginx.conf
Put Nginx into backend to run
apt set up display
display -S ngcd webvm
nginx -p . -c nginx.conf
ctrl + A + D (detach from the display, going again to unique session)
Different Display screen instructions
- Set up display (Will depend on the Linux Distribution if it got here pre put in or not) : yum set up display or apt set up display
- Provoke a Display screen : display or display -S
- Detach from the display : "CTRL+A,D" not "CTRL+A+D"
- Listing all of the display at the moment working : display -ls
- Reattach to a display : display -r
or display -r - Kill particular display: display -X -S
give up - Kill all screens : pkill display
- Reattach to display : display -x -r
. root@instance-webvm:~# display -x There are a number of appropriate screens on: 64262.ng (02/02/25 23:59:16) (Indifferent) 63983.pts-1.instance-webvm (02/02/25 23:46:53) (Indifferent) 18301.nginx (01/28/25 21:11:25) (Connected) Kind "display [-d] -r [pid.]tty.host" to renew one in all them. root@instance-webvm:~# display -x -r 64262.ng
http://127.0.0.1:8081 and revel in your native WebVM
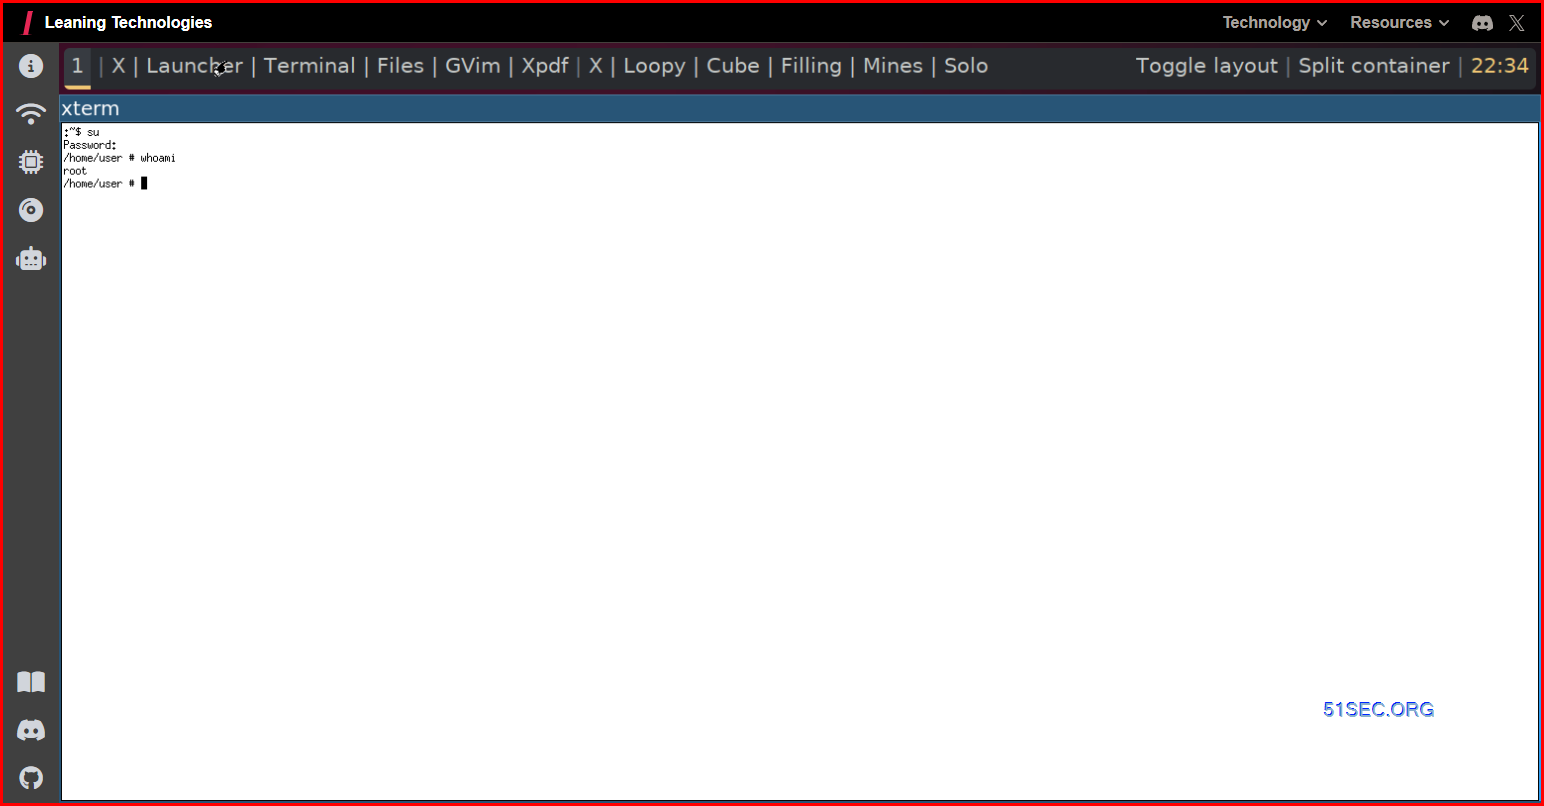
Default root password is password.
person@:~$ su Password: password root@:/dwelling/person#Command checklist:
- git clone https://github.com/leaningtech/webvm
- cd webvm
- wget https://github.com/JohnnyNetsec/webvm/releases/obtain/ext2_image/
- nano config_github_terminal.js
- apt set up npm
- npm set up
- npm run construct
- display -S nginx
- nginx -p . -c nginx.conf
- ctrl+A+D
Allow HTTPS with Customized Area
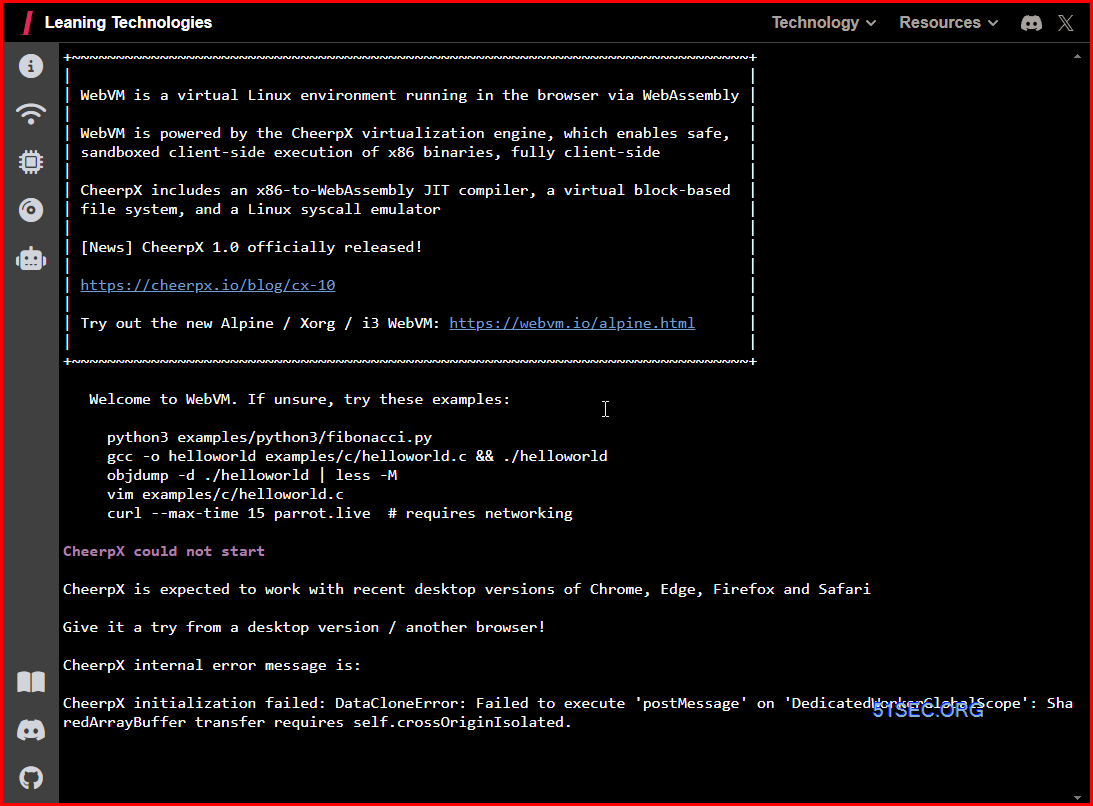
You may get an erro “CheerpX initialization failed: DataCloneError: Didn’t execute ‘postMessage’ on ‘DedicatedWorkerGlobalScope’: SharedArrayBuffer switch requires self.crossOriginIsolated.”
+~~~~~~~~~~~~~~~~~~~~~~~~~~~~~~~~~~~~~~~~~~~~~~~~~~~~~~~~~~~~~~~~~~~~~~~~~~~~~+
| |
| WebVM is a digital Linux atmosphere operating within the browser by way of WebAssembly |
| |
| WebVM is powered by the CheerpX virtualization engine, which allows secure, |
| sandboxed client-side execution of x86 binaries, totally client-side |
| |
| CheerpX consists of an x86-to-WebAssembly JIT compiler, a digital block-based |
| file system, and a Linux syscall emulator |
| |
| [News] CheerpX 1.0 formally launched! |
| |
| https://cheerpx.io/weblog/cx-10 |
| |
| Check out the brand new Alpine / Xorg / i3 WebVM: https://webvm.io/alpine.html |
| |
+~~~~~~~~~~~~~~~~~~~~~~~~~~~~~~~~~~~~~~~~~~~~~~~~~~~~~~~~~~~~~~~~~~~~~~~~~~~~~+
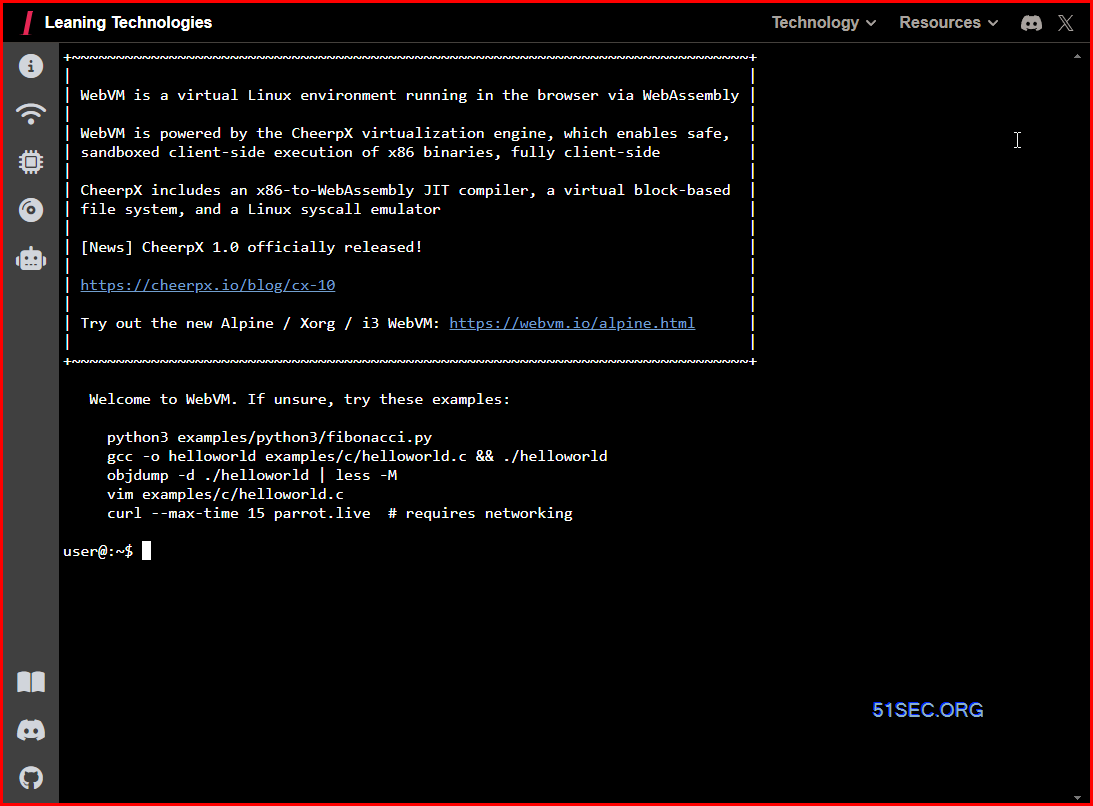
Welcome to WebVM. If uncertain, attempt these examples:
python3 examples/python3/fibonacci.py
gcc -o helloworld examples/c/helloworld.c && ./helloworld
objdump -d ./helloworld | much less -M
vim examples/c/helloworld.c
curl –max-time 15 parrot.dwell # requires networking
CheerpX couldn’t begin
CheerpX is anticipated to work with latest desktop variations of Chrome, Edge, Firefox and Safari
Give it a attempt from a desktop model / one other browser!
CheerpX inner error message is:
CheerpX initialization failed: DataCloneError: Didn’t execute ‘postMessage’ on ‘DedicatedWorkerGlobalScope’: SharedArrayBuffer switch requires self.crossOriginIsolated.
Primarily based on faq https://cheerpx.io/docs/faq,
In case you encounter the next error message:
Uncaught CheerpX initialization failed: DataCloneError: DedicatedWorkerGlobalScope.postMessage: The SharedArrayBuffer object can’t be serialized. The Cross-Origin-Opener-Coverage and Cross-Origin-Embedder-Coverage HTTP headers can be utilized to allow this.
This error happens as a result of CheerpX depends on SharedArrayBuffer![]() , which requires the location to be cross-origin remoted
, which requires the location to be cross-origin remoted![]() . To activate cross-origin isolation, guarantee your website is served over HTTPS and embody the next headers in your responses:
. To activate cross-origin isolation, guarantee your website is served over HTTPS and embody the next headers in your responses:
We are going to allow a customized area and make it working over https.
Cloudflare add an A file.
NPM add a brand new proxy host with https enabled.
Now it ought to be working as proven under.
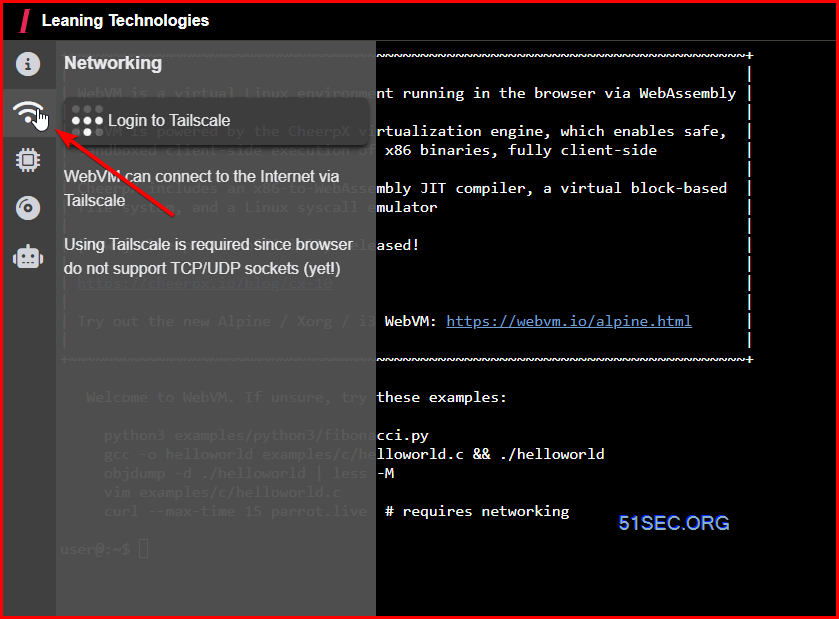
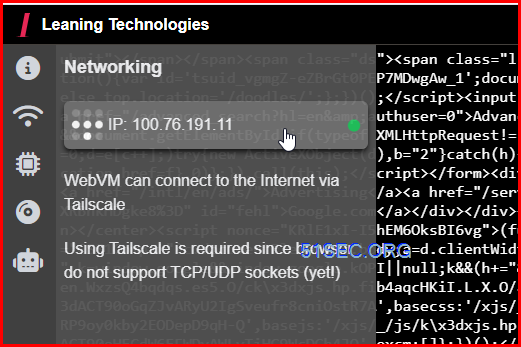
Allow Networking
Fashionable browsers don’t present APIs to instantly use TCP or UDP. WebVM offers networking assist by integrating with Tailscale, a VPN community that helps WebSockets as a transport layer.
- Open the “Networking” panel from the side-bar
- Click on “Connect with Tailscale” from the panel
- Log in to Tailscale (create an account should you don’t have one)
- Click on “Join” when prompted by Tailscale
- In case you are unfamiliar with Tailscale or would love extra info see WebVM and Tailscale.
Click on the wi-fi community icon on the left panel to login to Tailscale:
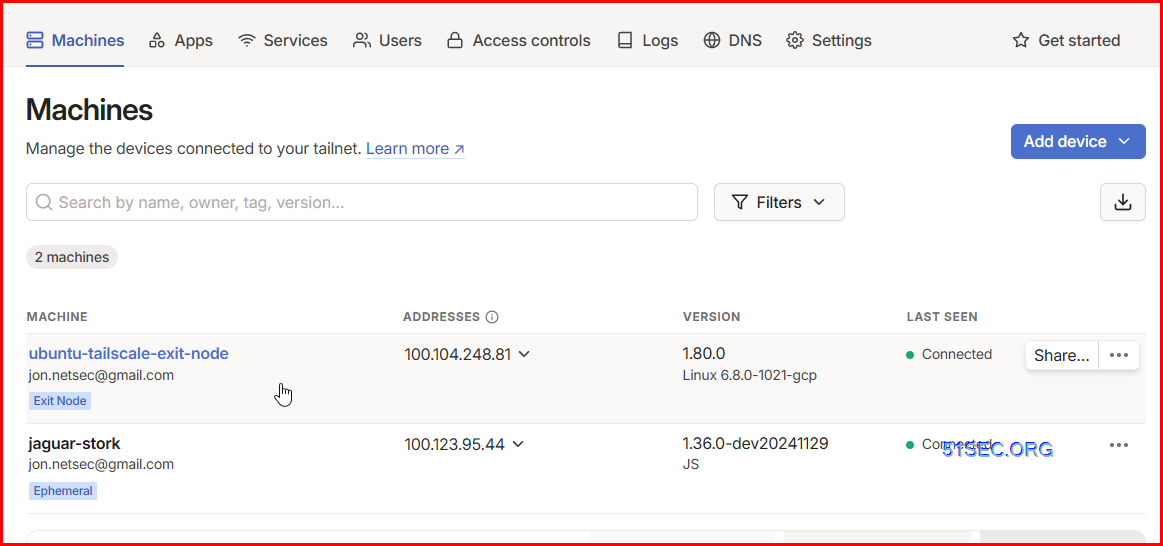
As soon as linked , you will notice an ip handle has been assigned to the vm.
Now you are able to do
- curl www.google.ca
- curl ip.sb
- curl –max-time 15 parrot.dwell
- ssh
However no ping, no tracert
Listing of free on-line SFTP servers
| Internet | Test | Hostname | Login | Observe |
|---|---|---|---|---|
| internet | verify | take a look at.rebex.internet:22 | demo/password | Additionally helps SSH, FTP/SSL, FTP, IMAP, POP3 and Time protocols. Learn-only. |
| internet | verify | itcsubmit.wustl.edu:22 | – | Just for connection take a look at. No public username/password obtainable. |
| internet | n/a | demo.wftpserver.com:2222 | demo/demo | Additionally helps FTP/SSL and FTP. |
ssh itcsubmit.wustl.edu
Wing FTP Server On-line Demo
We arrange an internet demo server so that you can discover the brand new options obtainable in Wing FTP Server. You’ll be able to discover each Internet-based Administration and Internet-based Shopper.
Safe Internet-based Administration:
Safe Internet-based Shopper:
Login utilizing your individual consumer with FTP, FTPS, SFTP protocol:
- Location: demo.wftpserver.com
- Username: demo
- Password: demo
- FTP Port: 21
- FTPS Port: 990
- SFTP Port: 2222
Observe: all of the demo accounts are read-only accounts, so you cannot change server settings.
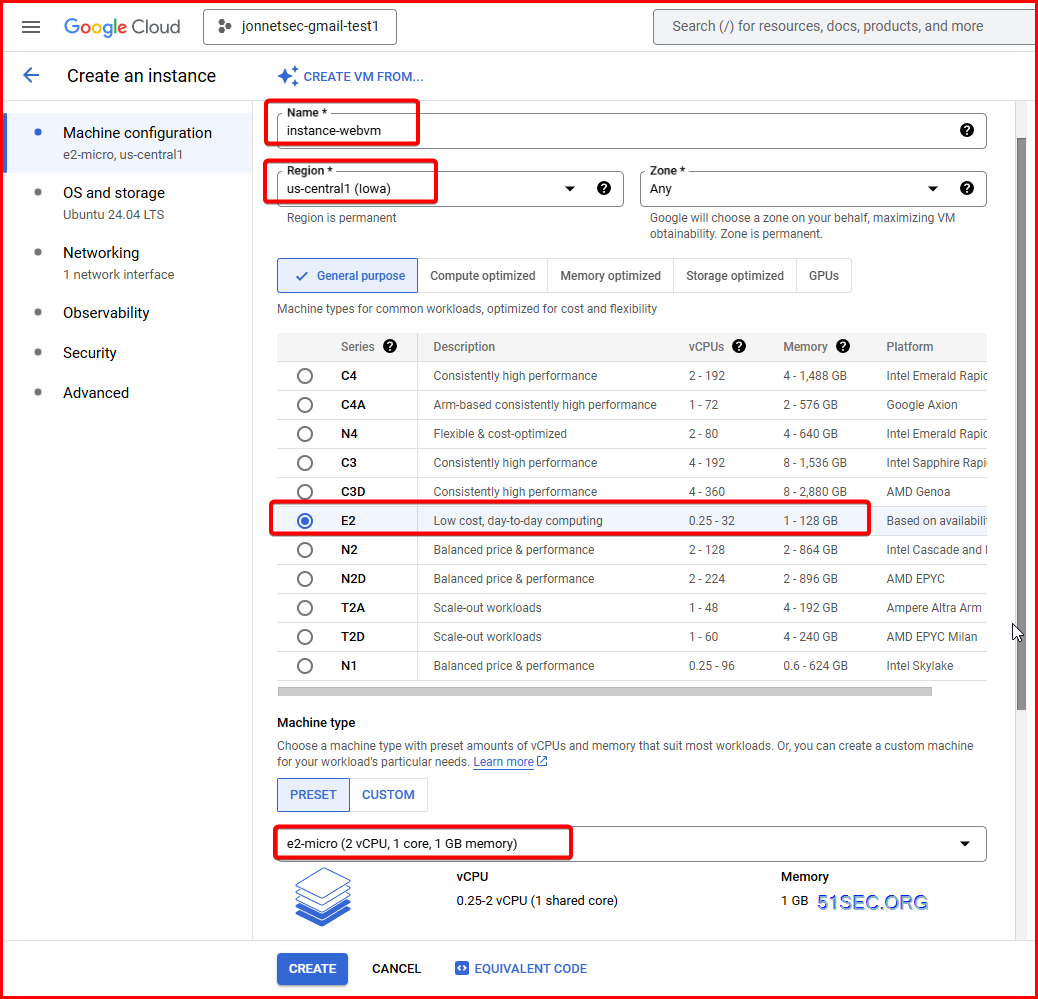
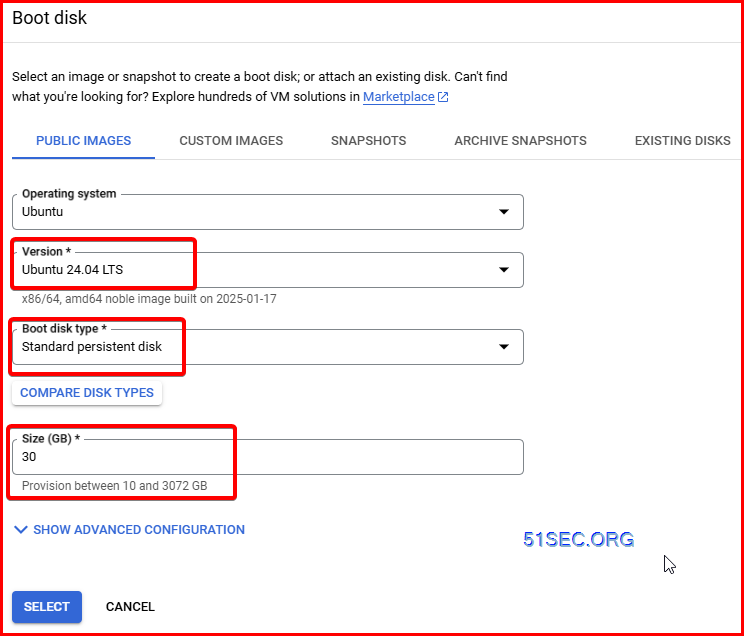
Free GCP Occasion
Necessities for Free Tier Compute Engine
- 1 non-preemptible
e2-microVM occasion per 30 days in one of many following US areas:- Oregon:
us-west1 - Iowa:
us-central1 - South Carolina:
us-east1
- Oregon:
- 30 GB-months normal persistent disk
- 1 GB of outbound information switch from North America to all area locations (excluding China and Australia) per 30 days
Make your individual picture file
For instance, lets use debian_mini file as an exampe.
FROM --platform=i386 i386/debian:buster
ARG DEBIAN_FRONTEND=noninteractive
RUN apt-get clear && apt-get replace && apt-get -y improve
RUN apt-get -y set up apt-utils gcc
python3 vim unzip ruby nodejs
fakeroot dbus base whiptail hexedit
patch wamerican ucf manpages
file luajit make lua50 dialog curl
much less cowsay netcat-openbsd
RUN useradd -m person && echo "person:password" | chpasswd
COPY --chown=person:person ./examples /dwelling/person/examples
RUN chmod -R +x  /dwelling/person/examples/lua
# We set WORKDIR, as this will get extracted by Webvm for use because the cwd. That is elective.
WORKDIR /dwelling/person/
# We set env, as this will get extracted by Webvm. That is elective.
ENV HOME="/dwelling/person" TERM="xterm" USER="person" SHELL="/bin/bash" EDITOR="vim" LANG="en_US.UTF-8" LC_ALL="C"
RUN echo 'root:password' | chpasswd
CMD [ "/bin/bash" ]
Instructions checklist:
- git clone https://github.com/leaningtech/webvm
- cd webvm
- mv dockerfiles/debian_mini Dockerfile
- docker construct -t mywebvm .
root@instance-webvm:~/webvm# mv dockerfiles/debian_mini Dockerfile
root@instance-webvm:~/webvm# docker construct -t mywebvm .
DEPRECATED: The legacy builder is deprecated and might be eliminated in a future launch.
            Set up the buildx element to construct photos with BuildKit:
            https://docs.docker.com/go/buildx/

Sending construct context to Docker daemon  3.584kB
Step 1/11 : FROM --platform=i386 i386/debian:buster
buster: Pulling from i386/debian
webvm desktop
https://webvm.io/alpine.html
Connect with tailscale’s community first. Please ensure you have exit node configured.
- https://youtu.be/LHYBu3y_0Rs
Launcher – Terminal – su
Password is password
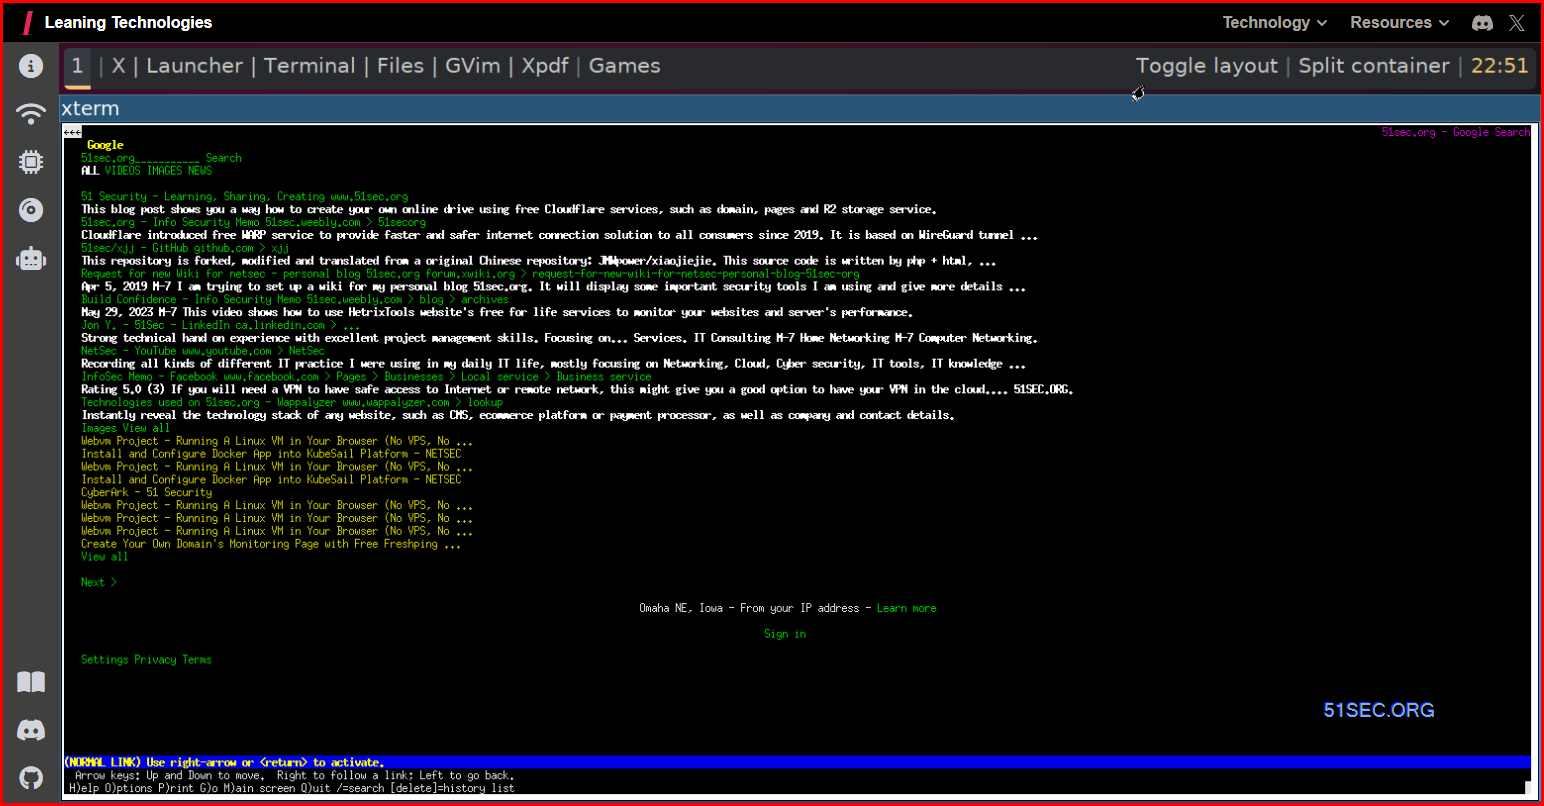
Lynx is the textual content internet browser. Now, lets set up it. Different browsers are too heavy for this small vm.
apk replace
apk add lynx
lynx www.google.ca
Due to useful resource limitation, Firefox might be put in efficiently on the linux, however not in a position to launch.
Movies
References
- https://the-walking-fish.com/p/webvm/
- https://www.youtube.com/watch?v=JtknHXoXXX0
- https://sredevops.org/en/how-to-run-a-linux-desktop-in-your-browser-webvm-2-0-webassembly-is-the-answer/
- https://www.youtube.com/watch?v=TgJqmfxW1Jo


