
Let’s think about this: you’re an information engineer working for a corporation that depends closely on knowledge. Your on a regular basis job? Extract knowledge, remodel it, and cargo it someplace, perhaps a database, perhaps a dashboard, perhaps a cloud storage system.
At first, you in all probability set all this up in your native machine. You write a script that scrapes knowledge, one other one which cleans and transforms it, and one more that uploads it to a vacation spot like Amazon S3. Sounds manageable, proper?
However quickly, issues begin piling up:
- The information supply retains altering — you have to replace your script usually.
- The machine shuts down — you must restart duties manually.
- You neglect to run it — and the information’s old-fashioned.
- A minor bug crashes your transformation step — and your complete pipeline fails.
Now, you’re caught in a endless ETL loop. Each failure, each delay, each replace falls again on you. It’s exhausting, and it’s not scalable.
However what if the cloud might run this whole pipeline for you — robotically, reliably, and 24/7?
In our earlier tutorials, we explored what cloud computing is, the completely different service fashions (IaaS, PaaS, SaaS), deployment fashions, and cloud suppliers like AWS. Now, it’s time to place all that principle into follow.
On this tutorial, we’ll start constructing a easy knowledge pipeline utilizing Apache Airflow, with duties for extracting, remodeling, and loading knowledge into Amazon S3. This primary half focuses fully on growing and testing the pipeline domestically utilizing Docker Compose.
Within the second half, we’ll configure the required cloud infrastructure on AWS — together with an S3 bucket for storage, RDS PostgreSQL for Airflow metadata, IAM roles and safety teams for safe entry, and an Utility Load Balancer to reveal the Airflow UI.
The ultimate a part of the collection walks you thru operating Airflow in containers on Amazon ECS (Fargate). You’ll learn to outline ECS duties and providers, push your customized Docker picture to Amazon ECR, launch background parts just like the scheduler and triggerer, and deploy a totally functioning Airflow net interface that runs reliably within the cloud.
By the top, you’ll have a production-ready, cloud-hosted Airflow setting that runs your workflows robotically, scales along with your workload, and frees you from handbook job orchestration.
Why Apache Airflow — and Why Use Docker?
Earlier than we leap into constructing your first ETL venture, let’s make clear what Apache Airflow is and why it’s the suitable instrument for the job.
Apache Airflow is an open-source platform for authoring, scheduling, and monitoring knowledge workflows.
As a substitute of chaining collectively standalone scripts or counting on fragile cron jobs, you outline your workflows utilizing Python — as a DAG (Directed Acyclic Graph). This construction clearly describes how duties are related, in what order they run, and the way they deal with retries and failures.
Airflow offers a centralized method to automate, visualize, and handle advanced knowledge pipelines. It tracks each job execution, offers detailed logs and statuses, and presents a robust net UI to work together along with your workflows. Whether or not you are scraping knowledge from the online, remodeling recordsdata, importing to cloud storage, or triggering downstream techniques — Airflow can coordinate all these duties in a dependable, scalable, and clear manner.
Conditions: What You’ll Want Earlier than You Begin
Earlier than we dive into establishing Airflow venture, make sure that the next instruments are put in and dealing in your system:
- Docker Desktop – Required to construct and run your Airflow setting domestically utilizing containers.
- Code editor, e.g Visible Studio Code – For writing DAGs, enhancing configuration recordsdata, and operating terminal instructions.
- Python 3.8+ – Airflow DAGs and helper scripts are written in Python. Be sure that Python is put in and obtainable in your terminal or command immediate.
- AWS CLI – We’ll use this later partly two of this tutorial to authenticate, handle AWS providers, and deploy assets from the command line. Run
aws configureafter putting in to set it up.
Working Airflow Utilizing Docker
Alright, now that we’ve bought our instruments prepared, let’s get Airflow up and operating in your machine.
We’ll use Docker Compose, which acts like a conductor for all of the Airflow providers — it ensures every part (the scheduler, API server, database, DAG processor, triggerer) begins collectively and may talk correctly.
And don’t fear — this setup is light-weight and ideal for native improvement and testing. In a while, we’ll transfer the whole pipeline to the cloud. ****
What Is Docker?
Docker is a platform that allows you to bundle purposes and their dependencies into moveable, remoted environments known as containers. These containers run constantly on any system, so your Airflow setup will behave the identical whether or not you are on Home windows, macOS, or Linux.
Why Are We Utilizing Docker?
Have you ever ever put in a instrument or Python bundle that labored completely… till you tried it on one other machine?
That’s precisely why we’re utilizing Docker. It retains every part — code, dependencies, config — inside remoted containers so your Airflow venture works the identical regardless of the place you run it.
Step 1: Let’s Create a Mission Folder
First, open VS Code (or your most popular terminal), and arrange a clear folder to carry your Airflow recordsdata:
mkdir airflow-docker && cd airflow-dockerThis folder will finally maintain your DAGs, logs, and plugins as you construct out your Airflow venture.
Step 2: Get the Official docker-compose.yaml File
The Apache Airflow group offers a ready-to-go Docker Compose file. Let’s obtain it:
curl -LfO 'https://airflow.apache.org/docs/apache-airflow/3.0.1/docker-compose.yaml'This file describes every part we have to run: the scheduler (which triggers your duties primarily based on the DAG schedule), the API server (your net UI), a SQLite database, the triggerer (used for deferrable duties and environment friendly wait states), and the DAG processor (which parses and displays your DAG recordsdata within the background). You possibly can affirm this by exploring the docker-compose.yaml file generated in your airflow-docker venture listing.
Fairly neat, proper?
Step 3: Create the Wanted Folders
Now we want to ensure Airflow has the folders it expects. These shall be mounted into the Docker containers:
mkdir -p ./dags ./logs ./plugins ./configdags/— the place you’ll put your pipeline codelogs/— for job logsplugins/— for any customized Airflow pluginsconfig/— for further settings, if wanted
Step 4: Set the Consumer ID (Linux Customers Solely)
In case you’re on Linux, this step avoids permission points when Docker writes recordsdata to your native system.
Run:
echo -e "AIRFLOW_UID=$(id -u)" > .envIn case you’re on macOS or Home windows, you could get a warning that AIRFLOW_UID just isn’t set. To repair this, create a .env file in the identical listing as your docker-compose.yaml and add:
AIRFLOW_UID=50000Step 5: Initialize the Database
Earlier than something works, Airflow must arrange its metadata database. That is the place it tracks duties, runs, and logs. Be sure that Docker Desktop is launched and operating within the background (simply open the app, no terminal instructions wanted).
Run:
docker compose up airflow-initYou’ll see a bunch of logs scroll by — as soon as it finishes, it’ll say one thing like Admin person airflow created.
That’s your default login:
- Username:
airflow - Password:
airflow
Step 6: Time to Launch!
Let’s begin the entire setting:
docker compose up -d
It will begin all providers — the api-server, scheduler, triggerer and dag-processor.
As soon as every part’s up, open your browser and go to:
http://localhost:8080It’s best to see the Airflow UI. Go forward and log in. And that’s it! You now have Apache Airflow operating domestically.
It’s best to additionally see all of your containers operating — and hopefully marked as wholesome.
If one thing retains restarting or your native localhost web page fail to load, you in all probability must allocate extra reminiscence to Docker—no less than 4 GB, however 8 GB is even higher. You possibly can change this in Docker Desktop beneath
Settings > Sources. On Home windows, in case you don’t see the reminiscence allocation possibility there, you could want to change Docker to make use of Hyper-V as an alternative of WSL.Earlier than switching, press Home windows + R, kind
optionalfeatures, and guarantee each Hyper-V and Digital Machine Platform are checked—click on OK and restart your laptop if prompted.Then open Docker Desktop, go to Settings → Basic, uncheck “Use the WSL 2 primarily based engine”, and restart Docker when prompted.
Now that Airflow is up and operating, let’s customise it a bit — beginning with a clear setting and setting it as much as match our wants.
Once you first open the Airflow UI, you’ll discover a bunch of instance DAGs. They’re useful, however we gained’t be utilizing them. Let’s clear them out.
Disable Instance DAGs and Swap to LocalExecutor
First, shut every part down cleanly:
docker compose down -v
Subsequent, open your docker-compose.yaml and discover the road beneath setting::
AIRFLOW__CORE__LOAD_EXAMPLES: 'true'
Change 'true' to 'false'. This disables the default instance DAGs.
Now, we’re not utilizing CeleryExecutor on this venture , we’ll preserve issues easy with LocalExecutor. So change this line:
AIRFLOW__CORE__EXECUTOR: CeleryExecutorto:
AIRFLOW__CORE__EXECUTOR: LocalExecutorTake away Celery and Redis Config
Since we’ve modified our executor from Celery to Native, we are going to delete all Celery-related parts from the setup. LocalExecutor runs duties in parallel on a single machine without having a distributed job queue. Celery requires further providers like Redis, staff, and Flower, which add pointless complexity and overhead. Eradicating them leads to an easier, lighter setup that matches our manufacturing structure. Let’s delete all associated components from the docker-compose.yaml:
- Any
AIRFLOW__CELERY__...traces insetting. - The
airflow-workerservice (utilized by Celery). - The optionally available
flowerservice (Celery dashboard).
Use CTRL + F to seek for celery and redis, and take away every associated block.
This leaves us with a leaner setup, excellent for native improvement utilizing LocalExecutor.
Creating Our First DAG
With the cleanup carried out, let’s now create an actual DAG that simulates an end-to-end ETL workflow.
This DAG defines a easy, but artistic 3-step pipeline:
- Generate mock occasion knowledge (simulating a each day knowledge scrape)
- Remodel the information by sorting it primarily based on depth and saving it to a brand new CSV
- Load the ultimate CSV file into Amazon S3
Within the dags/ listing, create a brand new Python file named our_first_dag.py and paste the DAG code into that file.
This DAG makes use of PythonOperator for all three duties and writes intermediate recordsdata to a neighborhood listing (/decide/airflow/tmp) contained in the container. You shouldn’t fear about S3 setup in job 3, at this level , the bucket and function permissions shall be configured later within the tutorial.
Right here’s the code:
from airflow import DAG
from datetime import datetime, timedelta
from airflow.operators.python import PythonOperator
import os
import pandas as pd
import random
import boto3

default_args = {
    'proprietor': 'your-name',
    'retries': 3,
    'retry_delay': timedelta(minutes=1)
}
output_dir = '/decide/airflow/tmp'
raw_file = 'raw_events.csv'
transformed_file = 'transformed_events.csv'
raw_path = os.path.be part of(output_dir, raw_file)
transformed_path = os.path.be part of(output_dir, transformed_file)
# Process 1: Generate dynamic occasion knowledge
def generate_fake_events():
    occasions = [
        "Solar flare near Mars", "New AI model released", "Fusion milestone","Celestial event tonight", "Economic policy update", "Storm in Nairobi",
        "New particle at CERN", "NASA Moon base plan", "Tremors in Tokyo", "Open-source boom"
    ]
    sample_events = random.pattern(occasions, 5)
    knowledge = {
        "timestamp": [datetime.now().strftime("%Y-%m-%d %H:%M:%S") for _ in sample_events],
        "occasion": sample_events,
        "intensity_score": [round(random.uniform(1, 10), 2) for _ in sample_events],
        "class": [random.choice(["Science", "Tech", "Weather", "Space", "Finance"]) for _ in sample_events]
    }
    df = pd.DataFrame(knowledge)
    os.makedirs(output_dir, exist_ok=True)
    df.to_csv(raw_path, index=False)
    print(f"[RAW] Saved to {raw_path}")

# Process 2: Remodel knowledge and save new CSV
def transform_and_save_csv():
    df = pd.read_csv(raw_path)
    # Type by depth descending
    df_sorted = df.sort_values(by="intensity_score", ascending=False)
    # Save remodeled CSV
    df_sorted.to_csv(transformed_path, index=False)
    print(f"[TRANSFORMED] Sorted and saved to {transformed_path}")

# Process 3: Add to S3
def upload_to_s3(**kwargs):
    run_date = kwargs['ds']
    bucket_name = 'your-bucket-name'
    s3_key = f'your-directory-name/events_transformed_{run_date}.csv'
    s3 = boto3.shopper('s3')
    s3.upload_file(transformed_path, bucket_name, s3_key)
    print(f"Uploaded to s3://{bucket_name}/{s3_key}")

# DAG setup
with DAG(
    dag_id="daily_etl_pipeline_with_transform",
    default_args=default_args,
    description='Simulate a each day ETL stream with transformation and S3 add',
    start_date=datetime(2025, 5, 24),
    schedule='@each day',
    catchup=False,
) as dag:
    task_generate = PythonOperator(
        task_id='generate_fake_events',
        python_callable=generate_fake_events
    )
    task_transform = PythonOperator(
        task_id='transform_and_save_csv',
        python_callable=transform_and_save_csv
    )
    task_upload = PythonOperator(
        task_id='upload_to_s3',
        python_callable=upload_to_s3,

    )
    # Process stream
    task_generate >> task_transform >> task_upload
Understanding What’s Taking place
This DAG simulates an entire ETL course of:
It generates mock occasion knowledge, transforms it by sorting primarily based on depth, and it ought to add the ultimate CSV to an S3 bucket.
The DAG is outlined utilizing with DAG(...) as dag:, which wraps all of the duties and metadata associated to this workflow. Inside this block:
dag_id="daily_etl_pipeline_with_transform"assigns a singular identify for Airflow to trace this workflow.start_date=datetime(2025, 5, 24)units when the DAG ought to begin operating.schedule='@each day'tells Airflow to set off the DAG as soon as daily.catchup=Falseensures that solely the present day’s run is triggered when the DAG is deployed, fairly than retroactively operating for all previous dates.
This line task_generate >> task_transform >> task_upload defines the execution order of duties, guaranteeing that knowledge is generated first, then remodeled, and at last uploaded to S3 in a sequential stream.
PythonOperatoris used to hyperlink your customized Python capabilities (like producing knowledge or importing to S3) to precise Airflow duties that the scheduler can execute.
We haven’t configured the S3 bucket but, so you’ll be able to quickly remark out the upload_to_s3 job (and don’t neglect to take away >> task_upload from the duty sequence). We’ll return to this step after establishing the AWS bucket and permissions within the second a part of this turorial.
Run It and See It in Motion
Now restart Airflow:
docker compose up -d
Then open:
It’s best to now see daily_etl_pipeline_with_transform listed within the UI. Flip it on, then set off it manually from the top-right nook.
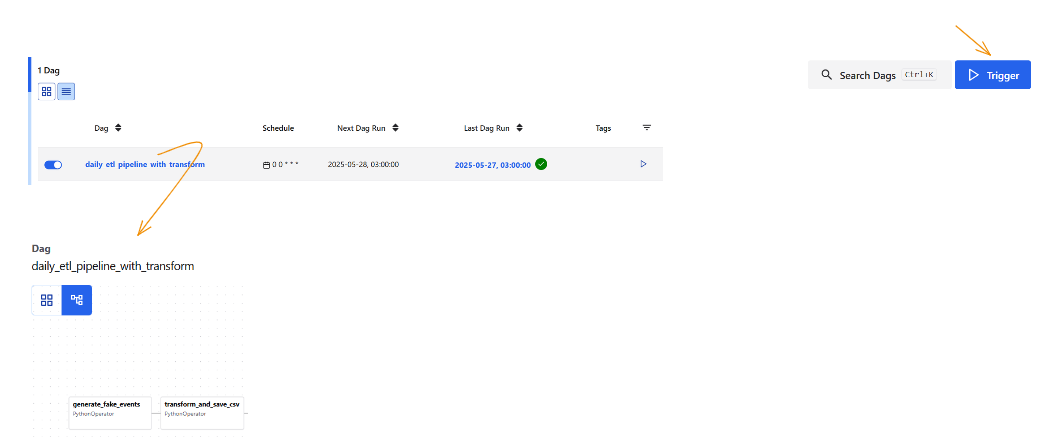
Click on into every job to see its logs and confirm that every part ran as anticipated.
And similar to that — you’ve written and run your first actual DAG!
Wrap-Up & What’s Subsequent
You’ve now arrange Apache Airflow domestically utilizing Docker, configured it for light-weight improvement, and constructed your first actual DAG to simulate an ETL course of — from producing occasion knowledge, to remodeling it, and making ready it for cloud add. This setup provides you a stable basis in DAG construction, Airflow parts, and native testing practices. It additionally highlights the boundaries of native workflows and why cloud-based orchestration is crucial for reliability and scalability.
Within the subsequent a part of this tutorial, we’ll transfer to the cloud. You’ll learn to configure AWS infrastructure to help your pipeline — together with establishing an S3 bucket, RDS for metadata, IAM roles, and safety teams. You’ll additionally construct a production-ready Docker picture and push it to Amazon ECR, making ready for full deployment on Amazon ECS. By the top of Half 2, your pipeline shall be able to run in a safe, scalable, and automatic cloud setting.
Let’s think about this: you’re an information engineer working for a corporation that depends closely on knowledge. Your on a regular basis job? Extract knowledge, remodel it, and cargo it someplace, perhaps a database, perhaps a dashboard, perhaps a cloud storage system.
At first, you in all probability set all this up in your native machine. You write a script that scrapes knowledge, one other one which cleans and transforms it, and one more that uploads it to a vacation spot like Amazon S3. Sounds manageable, proper?
However quickly, issues begin piling up:
- The information supply retains altering — you have to replace your script usually.
- The machine shuts down — you must restart duties manually.
- You neglect to run it — and the information’s old-fashioned.
- A minor bug crashes your transformation step — and your complete pipeline fails.
Now, you’re caught in a endless ETL loop. Each failure, each delay, each replace falls again on you. It’s exhausting, and it’s not scalable.
However what if the cloud might run this whole pipeline for you — robotically, reliably, and 24/7?
In our earlier tutorials, we explored what cloud computing is, the completely different service fashions (IaaS, PaaS, SaaS), deployment fashions, and cloud suppliers like AWS. Now, it’s time to place all that principle into follow.
On this tutorial, we’ll start constructing a easy knowledge pipeline utilizing Apache Airflow, with duties for extracting, remodeling, and loading knowledge into Amazon S3. This primary half focuses fully on growing and testing the pipeline domestically utilizing Docker Compose.
Within the second half, we’ll configure the required cloud infrastructure on AWS — together with an S3 bucket for storage, RDS PostgreSQL for Airflow metadata, IAM roles and safety teams for safe entry, and an Utility Load Balancer to reveal the Airflow UI.
The ultimate a part of the collection walks you thru operating Airflow in containers on Amazon ECS (Fargate). You’ll learn to outline ECS duties and providers, push your customized Docker picture to Amazon ECR, launch background parts just like the scheduler and triggerer, and deploy a totally functioning Airflow net interface that runs reliably within the cloud.
By the top, you’ll have a production-ready, cloud-hosted Airflow setting that runs your workflows robotically, scales along with your workload, and frees you from handbook job orchestration.
Why Apache Airflow — and Why Use Docker?
Earlier than we leap into constructing your first ETL venture, let’s make clear what Apache Airflow is and why it’s the suitable instrument for the job.
Apache Airflow is an open-source platform for authoring, scheduling, and monitoring knowledge workflows.
As a substitute of chaining collectively standalone scripts or counting on fragile cron jobs, you outline your workflows utilizing Python — as a DAG (Directed Acyclic Graph). This construction clearly describes how duties are related, in what order they run, and the way they deal with retries and failures.
Airflow offers a centralized method to automate, visualize, and handle advanced knowledge pipelines. It tracks each job execution, offers detailed logs and statuses, and presents a robust net UI to work together along with your workflows. Whether or not you are scraping knowledge from the online, remodeling recordsdata, importing to cloud storage, or triggering downstream techniques — Airflow can coordinate all these duties in a dependable, scalable, and clear manner.
Conditions: What You’ll Want Earlier than You Begin
Earlier than we dive into establishing Airflow venture, make sure that the next instruments are put in and dealing in your system:
- Docker Desktop – Required to construct and run your Airflow setting domestically utilizing containers.
- Code editor, e.g Visible Studio Code – For writing DAGs, enhancing configuration recordsdata, and operating terminal instructions.
- Python 3.8+ – Airflow DAGs and helper scripts are written in Python. Be sure that Python is put in and obtainable in your terminal or command immediate.
- AWS CLI – We’ll use this later partly two of this tutorial to authenticate, handle AWS providers, and deploy assets from the command line. Run
aws configureafter putting in to set it up.
Working Airflow Utilizing Docker
Alright, now that we’ve bought our instruments prepared, let’s get Airflow up and operating in your machine.
We’ll use Docker Compose, which acts like a conductor for all of the Airflow providers — it ensures every part (the scheduler, API server, database, DAG processor, triggerer) begins collectively and may talk correctly.
And don’t fear — this setup is light-weight and ideal for native improvement and testing. In a while, we’ll transfer the whole pipeline to the cloud. ****
What Is Docker?
Docker is a platform that allows you to bundle purposes and their dependencies into moveable, remoted environments known as containers. These containers run constantly on any system, so your Airflow setup will behave the identical whether or not you are on Home windows, macOS, or Linux.
Why Are We Utilizing Docker?
Have you ever ever put in a instrument or Python bundle that labored completely… till you tried it on one other machine?
That’s precisely why we’re utilizing Docker. It retains every part — code, dependencies, config — inside remoted containers so your Airflow venture works the identical regardless of the place you run it.
Step 1: Let’s Create a Mission Folder
First, open VS Code (or your most popular terminal), and arrange a clear folder to carry your Airflow recordsdata:
mkdir airflow-docker && cd airflow-dockerThis folder will finally maintain your DAGs, logs, and plugins as you construct out your Airflow venture.
Step 2: Get the Official docker-compose.yaml File
The Apache Airflow group offers a ready-to-go Docker Compose file. Let’s obtain it:
curl -LfO 'https://airflow.apache.org/docs/apache-airflow/3.0.1/docker-compose.yaml'This file describes every part we have to run: the scheduler (which triggers your duties primarily based on the DAG schedule), the API server (your net UI), a SQLite database, the triggerer (used for deferrable duties and environment friendly wait states), and the DAG processor (which parses and displays your DAG recordsdata within the background). You possibly can affirm this by exploring the docker-compose.yaml file generated in your airflow-docker venture listing.
Fairly neat, proper?
Step 3: Create the Wanted Folders
Now we want to ensure Airflow has the folders it expects. These shall be mounted into the Docker containers:
mkdir -p ./dags ./logs ./plugins ./configdags/— the place you’ll put your pipeline codelogs/— for job logsplugins/— for any customized Airflow pluginsconfig/— for further settings, if wanted
Step 4: Set the Consumer ID (Linux Customers Solely)
In case you’re on Linux, this step avoids permission points when Docker writes recordsdata to your native system.
Run:
echo -e "AIRFLOW_UID=$(id -u)" > .envIn case you’re on macOS or Home windows, you could get a warning that AIRFLOW_UID just isn’t set. To repair this, create a .env file in the identical listing as your docker-compose.yaml and add:
AIRFLOW_UID=50000Step 5: Initialize the Database
Earlier than something works, Airflow must arrange its metadata database. That is the place it tracks duties, runs, and logs. Be sure that Docker Desktop is launched and operating within the background (simply open the app, no terminal instructions wanted).
Run:
docker compose up airflow-initYou’ll see a bunch of logs scroll by — as soon as it finishes, it’ll say one thing like Admin person airflow created.
That’s your default login:
- Username:
airflow - Password:
airflow
Step 6: Time to Launch!
Let’s begin the entire setting:
docker compose up -d
It will begin all providers — the api-server, scheduler, triggerer and dag-processor.
As soon as every part’s up, open your browser and go to:
http://localhost:8080It’s best to see the Airflow UI. Go forward and log in. And that’s it! You now have Apache Airflow operating domestically.
It’s best to additionally see all of your containers operating — and hopefully marked as wholesome.
If one thing retains restarting or your native localhost web page fail to load, you in all probability must allocate extra reminiscence to Docker—no less than 4 GB, however 8 GB is even higher. You possibly can change this in Docker Desktop beneath
Settings > Sources. On Home windows, in case you don’t see the reminiscence allocation possibility there, you could want to change Docker to make use of Hyper-V as an alternative of WSL.Earlier than switching, press Home windows + R, kind
optionalfeatures, and guarantee each Hyper-V and Digital Machine Platform are checked—click on OK and restart your laptop if prompted.Then open Docker Desktop, go to Settings → Basic, uncheck “Use the WSL 2 primarily based engine”, and restart Docker when prompted.
Now that Airflow is up and operating, let’s customise it a bit — beginning with a clear setting and setting it as much as match our wants.
Once you first open the Airflow UI, you’ll discover a bunch of instance DAGs. They’re useful, however we gained’t be utilizing them. Let’s clear them out.
Disable Instance DAGs and Swap to LocalExecutor
First, shut every part down cleanly:
docker compose down -v
Subsequent, open your docker-compose.yaml and discover the road beneath setting::
AIRFLOW__CORE__LOAD_EXAMPLES: 'true'
Change 'true' to 'false'. This disables the default instance DAGs.
Now, we’re not utilizing CeleryExecutor on this venture , we’ll preserve issues easy with LocalExecutor. So change this line:
AIRFLOW__CORE__EXECUTOR: CeleryExecutorto:
AIRFLOW__CORE__EXECUTOR: LocalExecutorTake away Celery and Redis Config
Since we’ve modified our executor from Celery to Native, we are going to delete all Celery-related parts from the setup. LocalExecutor runs duties in parallel on a single machine without having a distributed job queue. Celery requires further providers like Redis, staff, and Flower, which add pointless complexity and overhead. Eradicating them leads to an easier, lighter setup that matches our manufacturing structure. Let’s delete all associated components from the docker-compose.yaml:
- Any
AIRFLOW__CELERY__...traces insetting. - The
airflow-workerservice (utilized by Celery). - The optionally available
flowerservice (Celery dashboard).
Use CTRL + F to seek for celery and redis, and take away every associated block.
This leaves us with a leaner setup, excellent for native improvement utilizing LocalExecutor.
Creating Our First DAG
With the cleanup carried out, let’s now create an actual DAG that simulates an end-to-end ETL workflow.
This DAG defines a easy, but artistic 3-step pipeline:
- Generate mock occasion knowledge (simulating a each day knowledge scrape)
- Remodel the information by sorting it primarily based on depth and saving it to a brand new CSV
- Load the ultimate CSV file into Amazon S3
Within the dags/ listing, create a brand new Python file named our_first_dag.py and paste the DAG code into that file.
This DAG makes use of PythonOperator for all three duties and writes intermediate recordsdata to a neighborhood listing (/decide/airflow/tmp) contained in the container. You shouldn’t fear about S3 setup in job 3, at this level , the bucket and function permissions shall be configured later within the tutorial.
Right here’s the code:
from airflow import DAG
from datetime import datetime, timedelta
from airflow.operators.python import PythonOperator
import os
import pandas as pd
import random
import boto3

default_args = {
    'proprietor': 'your-name',
    'retries': 3,
    'retry_delay': timedelta(minutes=1)
}
output_dir = '/decide/airflow/tmp'
raw_file = 'raw_events.csv'
transformed_file = 'transformed_events.csv'
raw_path = os.path.be part of(output_dir, raw_file)
transformed_path = os.path.be part of(output_dir, transformed_file)
# Process 1: Generate dynamic occasion knowledge
def generate_fake_events():
    occasions = [
        "Solar flare near Mars", "New AI model released", "Fusion milestone","Celestial event tonight", "Economic policy update", "Storm in Nairobi",
        "New particle at CERN", "NASA Moon base plan", "Tremors in Tokyo", "Open-source boom"
    ]
    sample_events = random.pattern(occasions, 5)
    knowledge = {
        "timestamp": [datetime.now().strftime("%Y-%m-%d %H:%M:%S") for _ in sample_events],
        "occasion": sample_events,
        "intensity_score": [round(random.uniform(1, 10), 2) for _ in sample_events],
        "class": [random.choice(["Science", "Tech", "Weather", "Space", "Finance"]) for _ in sample_events]
    }
    df = pd.DataFrame(knowledge)
    os.makedirs(output_dir, exist_ok=True)
    df.to_csv(raw_path, index=False)
    print(f"[RAW] Saved to {raw_path}")

# Process 2: Remodel knowledge and save new CSV
def transform_and_save_csv():
    df = pd.read_csv(raw_path)
    # Type by depth descending
    df_sorted = df.sort_values(by="intensity_score", ascending=False)
    # Save remodeled CSV
    df_sorted.to_csv(transformed_path, index=False)
    print(f"[TRANSFORMED] Sorted and saved to {transformed_path}")

# Process 3: Add to S3
def upload_to_s3(**kwargs):
    run_date = kwargs['ds']
    bucket_name = 'your-bucket-name'
    s3_key = f'your-directory-name/events_transformed_{run_date}.csv'
    s3 = boto3.shopper('s3')
    s3.upload_file(transformed_path, bucket_name, s3_key)
    print(f"Uploaded to s3://{bucket_name}/{s3_key}")

# DAG setup
with DAG(
    dag_id="daily_etl_pipeline_with_transform",
    default_args=default_args,
    description='Simulate a each day ETL stream with transformation and S3 add',
    start_date=datetime(2025, 5, 24),
    schedule='@each day',
    catchup=False,
) as dag:
    task_generate = PythonOperator(
        task_id='generate_fake_events',
        python_callable=generate_fake_events
    )
    task_transform = PythonOperator(
        task_id='transform_and_save_csv',
        python_callable=transform_and_save_csv
    )
    task_upload = PythonOperator(
        task_id='upload_to_s3',
        python_callable=upload_to_s3,

    )
    # Process stream
    task_generate >> task_transform >> task_upload
Understanding What’s Taking place
This DAG simulates an entire ETL course of:
It generates mock occasion knowledge, transforms it by sorting primarily based on depth, and it ought to add the ultimate CSV to an S3 bucket.
The DAG is outlined utilizing with DAG(...) as dag:, which wraps all of the duties and metadata associated to this workflow. Inside this block:
dag_id="daily_etl_pipeline_with_transform"assigns a singular identify for Airflow to trace this workflow.start_date=datetime(2025, 5, 24)units when the DAG ought to begin operating.schedule='@each day'tells Airflow to set off the DAG as soon as daily.catchup=Falseensures that solely the present day’s run is triggered when the DAG is deployed, fairly than retroactively operating for all previous dates.
This line task_generate >> task_transform >> task_upload defines the execution order of duties, guaranteeing that knowledge is generated first, then remodeled, and at last uploaded to S3 in a sequential stream.
PythonOperatoris used to hyperlink your customized Python capabilities (like producing knowledge or importing to S3) to precise Airflow duties that the scheduler can execute.
We haven’t configured the S3 bucket but, so you’ll be able to quickly remark out the upload_to_s3 job (and don’t neglect to take away >> task_upload from the duty sequence). We’ll return to this step after establishing the AWS bucket and permissions within the second a part of this turorial.
Run It and See It in Motion
Now restart Airflow:
docker compose up -d
Then open:
It’s best to now see daily_etl_pipeline_with_transform listed within the UI. Flip it on, then set off it manually from the top-right nook.
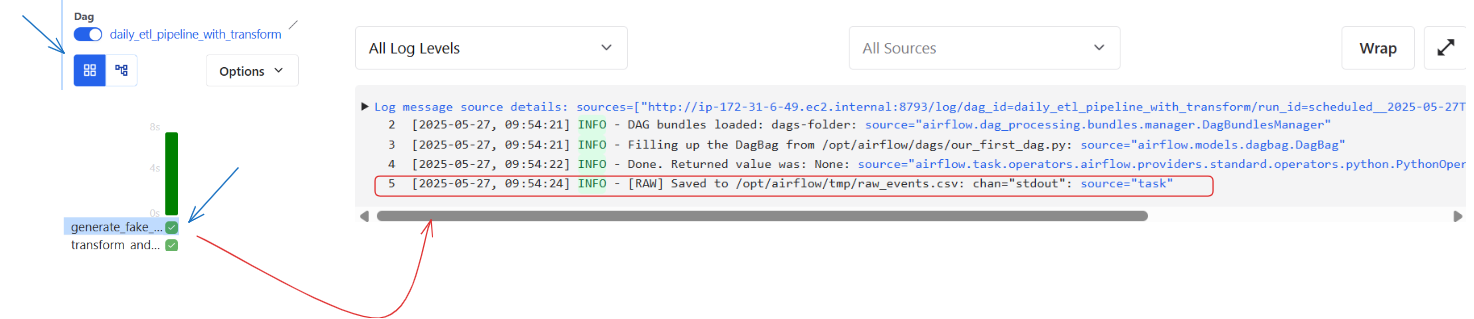
Click on into every job to see its logs and confirm that every part ran as anticipated.
And similar to that — you’ve written and run your first actual DAG!
Wrap-Up & What’s Subsequent
You’ve now arrange Apache Airflow domestically utilizing Docker, configured it for light-weight improvement, and constructed your first actual DAG to simulate an ETL course of — from producing occasion knowledge, to remodeling it, and making ready it for cloud add. This setup provides you a stable basis in DAG construction, Airflow parts, and native testing practices. It additionally highlights the boundaries of native workflows and why cloud-based orchestration is crucial for reliability and scalability.
Within the subsequent a part of this tutorial, we’ll transfer to the cloud. You’ll learn to configure AWS infrastructure to help your pipeline — together with establishing an S3 bucket, RDS for metadata, IAM roles, and safety teams. You’ll additionally construct a production-ready Docker picture and push it to Amazon ECR, making ready for full deployment on Amazon ECS. By the top of Half 2, your pipeline shall be able to run in a safe, scalable, and automatic cloud setting.


