

On Dec 10, the quantity is 148465 / 150000 since there have been a brand new server opened, and it’ll take 10,000 account. Often in 2 weeks, it will likely be fulfilled.
1 Create your personal account
2 Log into your assigned panel by https://panel.serv00.com/
For me, I’m utilizing https://panel13.serv00.com/
3 Panel Dashboard – DevilWEB2.0
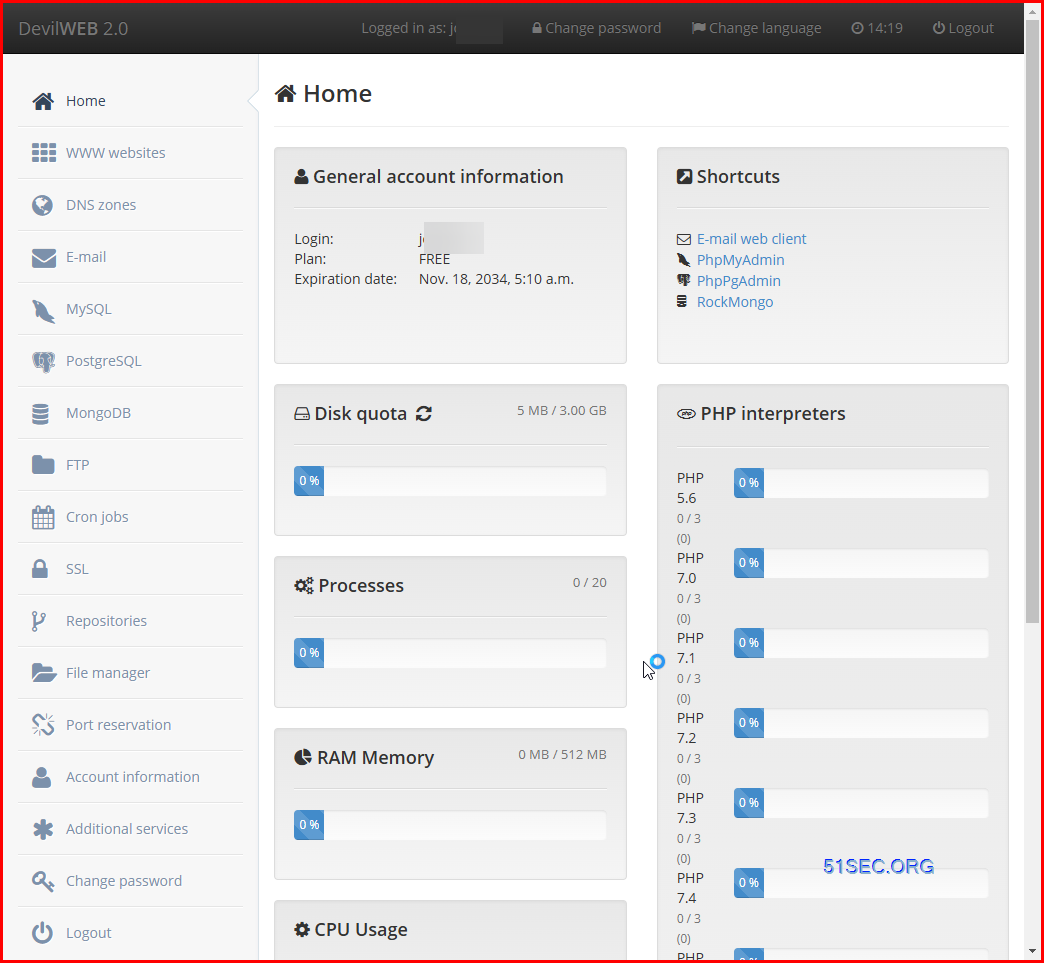
4 Verify your Account Data and Server Data
| Plan: | FREE |
| Expiration date: | Nov. 18, 2034, 4:51 a.m. |
Mail servers
| SMTP server: | mail13.serv00.com |
| IMAP server: | mail13.serv00.com |
| POP3 server: | mail13.serv00.com |
Database servers
| MySQL server: | mysql13.serv00.com |
| PostgreSQL server: | pgsql13.serv00.com |
| MongoDB server: | mongo13.serv00.com |
DNS servers
| DNS server #1: | dns1.serv00.com |
| DNS server #2: | dns2.serv00.com |
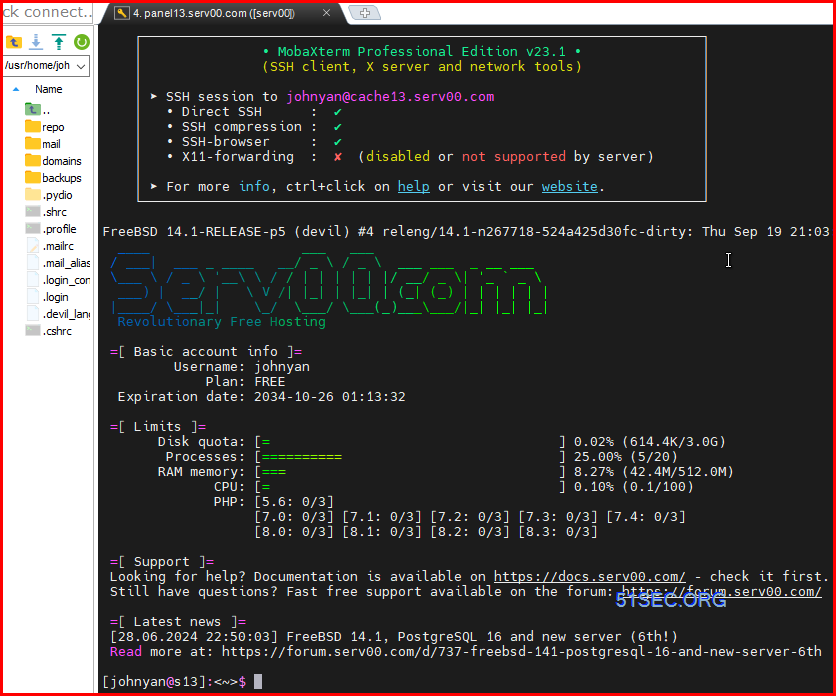
Login with SSH
SSH Login
host: Relying on the allotted server if you registered. For me, there are 12 servers full already, so I bought server 13, which is :
consumer identify and account is the one you regestered at serv00.
To maintain you account alive, you had higher to log in as soon as each 90 days.
https://www.serv00.com/tos
    ┌──────────────────────────────────────────────────────────────────────┐
    │               • MobaXterm Skilled Version v23.1 •               │
    │               (SSH consumer, X server and community instruments)               │
    │                                                                      │
    │ ⮞ SSH session to [email protected]                          │
    │   • Direct SSH      :  ✓                                             │
    │   • SSH compression :  ✓                                             │
    │   • SSH-browser     :  ✓                                             │
    │   • X11-forwarding  :  ✗  (disabled or not supported by server)      │
    │                                                                      │
    │ ⮞ For more information, ctrl+click on on assist or go to our web site.            │
    └──────────────────────────────────────────────────────────────────────┘

Final login: Fri Jan 17 14:26:59 2025 from 160.32.192.102
FreeBSD 14.1-RELEASE-p5 (satan) #4 releng/14.1-n267718-524a425d30fc-dirty: Thu Sep 19 21:03:53 CEST 2024
  ____                   ___   ___
 / ___|  ___ _ ____   __/ _  / _   ___ ___  _ __ ___
 ___  / _  '__  / / | | | | | |/ __/ _ | '_ ` _
  ___) |  __/ |    V /| |_| | |_| | (_| (_) | | | | | |
 |____/ ___|_|    _/  ___/ ___(_)______/|_| |_| |_|
  Revolutionary Free Internet hosting

 =[ Basic account info ]=
         Username: netsec
             Plan: FREE
  Expiration date: 2035-01-15 17:34:18

 =[ Limits ]=
       Disk quota: [=====================================] 7.15% (219.7M/3.0G)
        Processes: [=====================================] 25.00% (5/20)
       RAM reminiscence: [=====================================] 7.34% (37.6M/512.0M)
              CPU: [=====================================] 3.40% (3.4/100)
              PHP: [5.6: 0/3]
                   [7.0: 0/3] [7.1: 0/3] [7.2: 0/3] [7.3: 0/3] [7.4: 0/3]
                   [8.0: 0/3] [8.1: 0/3] [8.2: 0/3] [8.3: 0/3] [8.4: 0/3]

 =[ Support ]=
 Searching for assist? Documentation is on the market on https://docs.serv00.com/ - examine it first.
 Nonetheless have questions? Quick free assist out there on the discussion board: https://discussion board.serv00.com/

 =[ Latest news ]=
 [09.01.2025 02:25:15] Server migration - s15.serv00.com
 Learn extra at: https://discussion board.serv00.com/d/2251-server-migration-s15serv00com

[netsec@s13]:<~>$
SSH 登录 Serv00,输入以下命令以激活运行许可:
Set up WordPress
https://docs.serv00.com/WordPress/
Create a MySQL DB
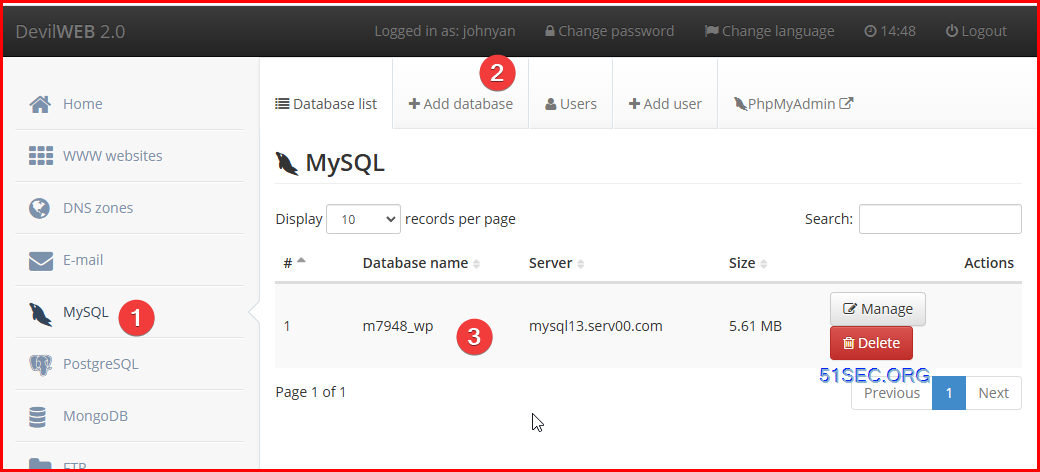
- Go to
~/domains/DOMAIN/the placeDOMAIN (equivalent to jo.serv00.web)is the identify of the area the place WordPress will likely be put in, command:cd ~/domains/DOMAIN/. - Obtain the set up archive of the most recent CMS model:
fetch https://wordpress.org/newest.zip - Delete the
public_htmllisting, unpack the archive, rename the unpacked listing and take away the pointless archive after unpacking:rm -r public_html && unzip newest.zip && mv wordpress public_html && rm newest.zip - Go to the web site and proceed the traditional WordPress set up in your browser. https://jo.serv00.web
Deploy Your Personal Apps in Serv00
Allow – Run Your Personal Functions
DevilWEB2.0 – Further providers – Run your personal functions – Enabled
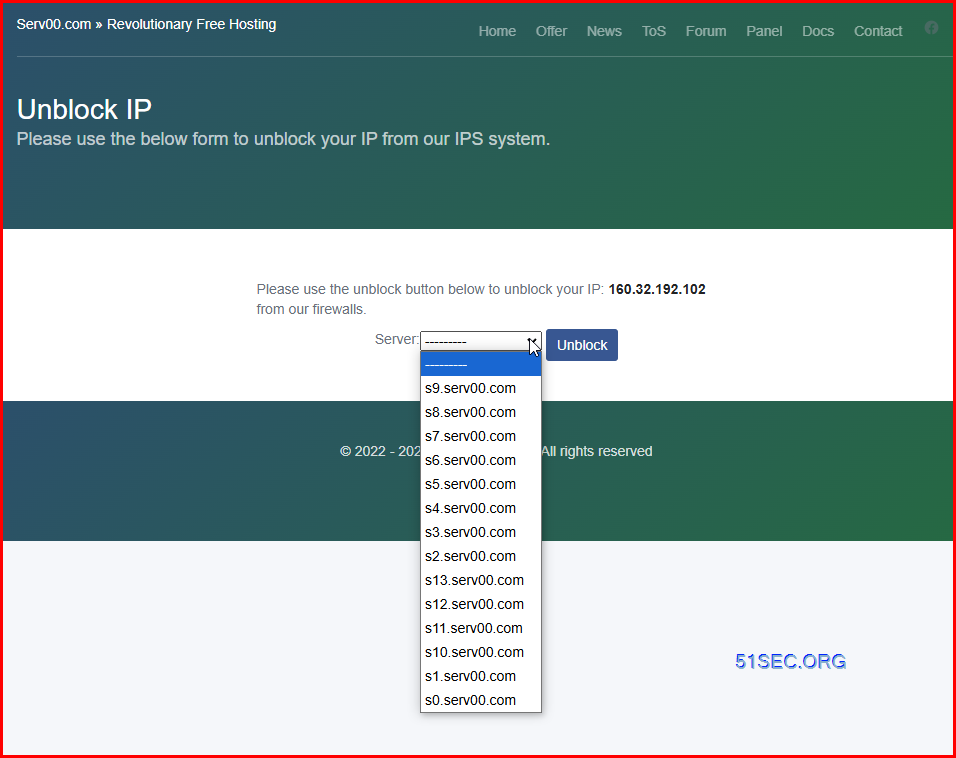
Unblock IP
If for some causes, your ip bought blocked by serv00.com, you should utilize following web page to unblock your ip.
https://www.serv00.com/ip_unban/
Set up PM2
bash <(curl -s https://uncooked.githubusercontent.com/Shadownc/serv00-sh/major/install-pm2.sh)
# or
bash <(curl -s https://uncooked.githubusercontent.com/k0baya/alist_repl/major/serv00/install-pm2.sh)
PM2 instructions checklist:
- pm2 begin ./auto-renew.sh
- pm2 checklist
- pm2 ls
- pm2 delete auto-renew
- pm2 save
- pm2 resurrect
- pm2 logs
Set up Cloudflared
Cloudflared 官方仓库并没有构建 FreeBSD 系统上能够使用的二进制文件,但是同样的,我找到了第三方的构筑。使用第三方构筑的二进制文件,就能愉快的使用隧道了。
关于 Cloudflared 是什么,有什么用,ARGO_TOKEN 如何获取等部分,这里不再赘述,详细可以查看我的关于 CodeSandbox 的文章。
1 Create Cloudflared working folder:
- mkdir -p ~/domains/cloudflared && cd ~/domains/cloudflared
2 Obtain Cloudflared from the third occasion’s construct:
- wget https://cloudflared.bowring.uk/binaries/cloudflared-freebsd-latest.7z && 7z x cloudflared-freebsd-latest.7z && rm cloudflared-freebsd-latest.7z && mv -f ./temp/* ./cloudflared && rm -rf temp
3 Check first:
- ./cloudflared tunnel –edge-ip-version auto –protocol http2 –heartbeat-interval 10s run –token ARGO_TOKEN
Substitute ARGO_TOKEN with your personal. After check, ctrl+c to cease the operating.
- pm2 begin ./cloudflared — tunnel –edge-ip-version auto –protocol http2 –heartbeat-interval 10s run –token ARGO_TOKEN
Get Argo_Token from Cloudflare Zero Belief service web page / Networks / Tunnels
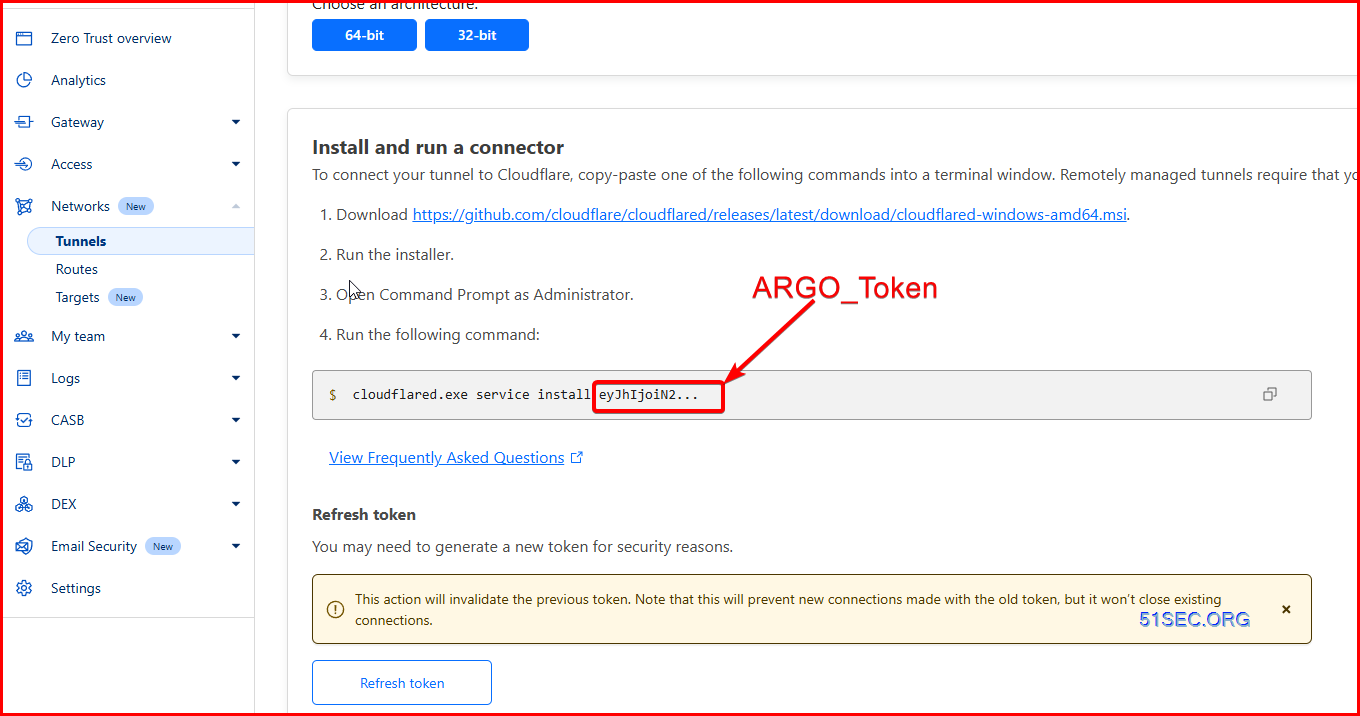
Substitute ARGO_TOKEN with the one you discovered from Cloudflare Zero Belief service web page / Networks / Tunnels.
[j@s13]:<~/domains/cloudflared>$ pm2 begin ./cloudflared -- tunnel --edge-ip-version auto --protocol http2 --heartbeat-interval 10s run --token eyJhIjoiN2YzNjkyNmRlOTI3ZWQ3NmEwYThhOGYyNWFhZjMxOGMiLCJ0IjoiODQ3YzM3NTctODRhZC00YjExLTliNzAtMmNiZmUwZjgzYmNhIiwicyI6Ik1qTTJZekV5T1RndFkyVXdPQzAwWkRCaExUaGpZbVF0WkRVMk1ETTRNREl3TldSbSJ91

[PM2] Spawning PM2 daemon with pm2_home=/dwelling/jo/.pm2
[PM2] PM2 Efficiently daemonized
[PM2] Beginning /usr/dwelling/jo/domains/cloudflared/cloudflared in fork_mode (1 occasion)
[PM2] Carried out.
┌────┬────────────────┬─────────────┬─────────┬─────────┬──────────┬────────┬──────┬───────────┬──────────┬──────────┬──────────┬──────────┐
│ id │ identify           │ namespace   │ model │ mode    │ pid      │ uptime │ ↺    │ standing    │ cpu      │ mem      │ consumer     │ watching │
├────┼────────────────┼─────────────┼─────────┼─────────┼──────────┼────────┼──────┼───────────┼──────────┼──────────┼──────────┼──────────┤
│ 0  │ cloudflared    │ default     │ N/A     │ fork    │ 86038    │ 3s     │ 0    │ on-line    │ 600%     │ 26.3mb   │ jo  │ disabled │
└────┴────────────────┴─────────────┴─────────┴─────────┴──────────┴────────┴──────┴───────────┴──────────┴──────────┴──────────┴──────────┘
[jo@s13]:<~/domains/cloudflared>$
You would possibly want to attend a bit to see all outputs.
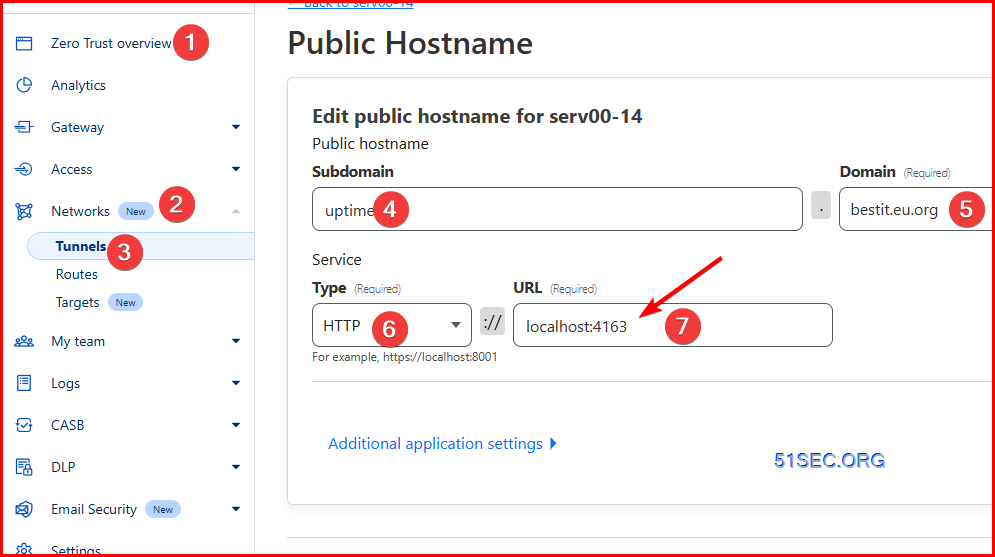
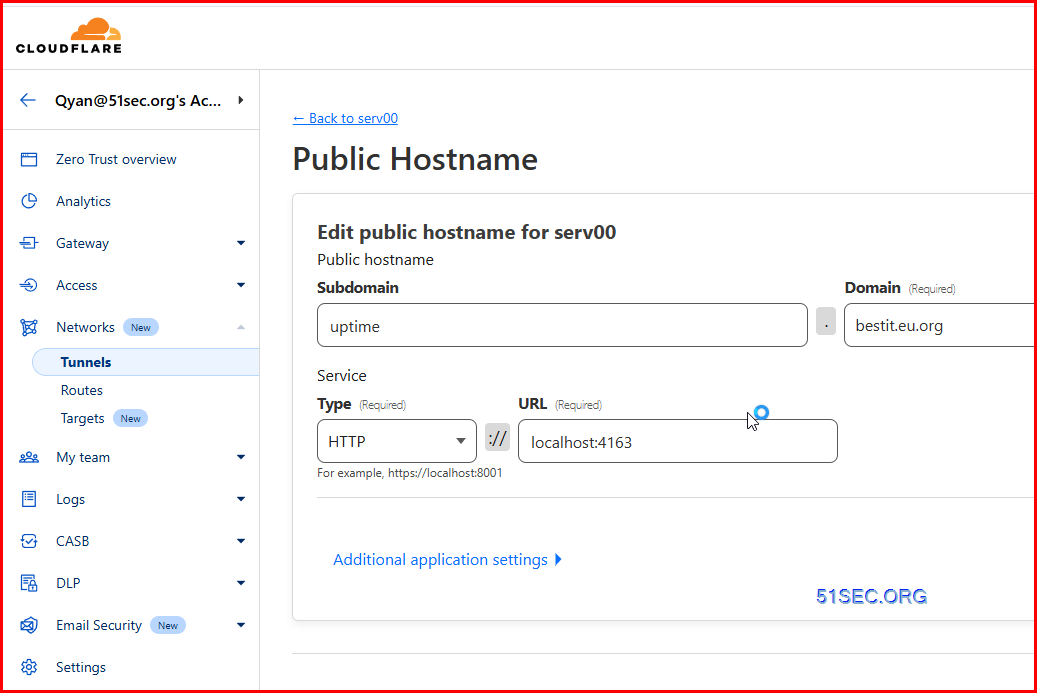
5 Then go to Cloudflare tunnel’s public host identify web page to arrange your personal area to map to your service’s port.
Word: https://saika.us.kg/2024/01/27/serv00_logs/
Set up Web site Monitoring APP – Uptime Kuma
All Instructions
cd ~/domains && wget https://github.com/louislam/uptime-kuma/archive/refs/tags/1.22.1.zip && unzip 1.22.1.zip && rm - rf public_html && mv -f uptime-kuma-1.22.1 public_html && rm -f 1.22.1.zip && cd public_html


npm ci --production


wget https://github.com/louislam/uptime-kuma/releases/obtain/1.22.1/dist.tar.gz && tar -xzvf dist.tar.gz && rm dist.tar.gz


npm set up


node server/server.js --port=4163

pm2 begin server/server.js --name uptime-kuma -- --port=4163
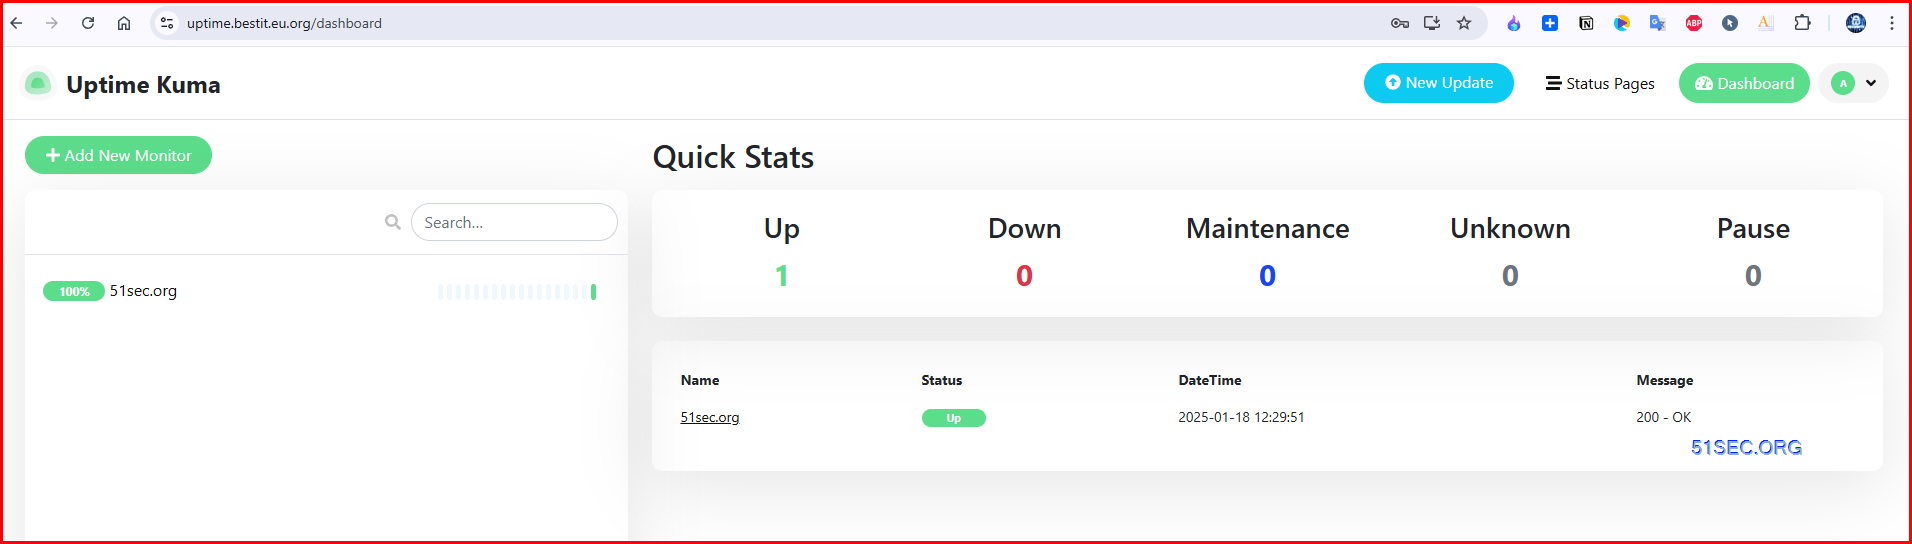
Demo: https://uptime.bestit.eu.org/standing/all
Because of the platform limitations of FreeBSD, model 1.23 has built-in PlayWright and can’t run it, so solely model 1.22 will be put in. Keep in mind to launch the TCP port in Panel first.
First, launch a port within the Panel, after which add a New Web site in line with the next desk:
| Key | Worth |
|---|---|
| Area | xxx.USERNAME.serv00.web(You can too delete the unique USERNAME.serv00.web and add it once more) |
| Web site Kind | proxy |
| Proxy Goal | localhost |
| Proxy URL | Go away clean |
| Proxy port | The port you propose to make use of to deploy Uptime-Kuma |
| Use HTTPS | False |
| DNS assist | True |
After including the brand new web site, proceed to click on Handle SSL certificates above, then click on Handle on the suitable facet of the export IP, after which click on Add certificates:
| Kind | Area |
|---|---|
| Generate Let’s Encrypted certificates | Maintain it in line with the area identify of the positioning you simply added (if it’s the unique one USERNAME.serv00.web, you’ll be able to omit this step) |
Then log in through SSH and enter the area identify listing you simply created:
BASH
Set manufacturing mode:
Obtain the dist file:
BASH
Set up extra dependencies:
There will likely be errors throughout the set up course of. Simply ignore them. In truth, it can run usually in the long run. The built-in Cloudflared reverse proxy can’t be used on the FreeBSD platform, however you should utilize the above-mentioned exterior Cloudflared for reverse proxy and use your personal area identify.
Check run:
BASH
Keep in mind to switch PORT with the port you launched. After confirming that there isn’t any drawback with the operation, press
Ctrl+cto cease the operation.
Use pm2 to handle the background operation:
BASH
Keep in mind to switch PORT with the port you launched.
Should you don’t need your Uptime-Kuma
http://IP:PORTto be accessed by others, you’ll be able to add the suffix on the finish of the execution command--host=127.0.0.1in order that it could actually solely be accessed by the area identify of the reverse proxy:BASH
Likewise, you may as well use Cloudflared Tunnel so as to add domains with out selecting to make use of a proxy.
[jonnetsec@s14]:<~/domains/public_html>$ pm2 begin server/server.js –identify uptime-kuma — –port=4163
[PM2] Beginning /usr/dwelling/jonnetsec/domains/public_html/server/server.js in fork_mode (1 occasion)
[PM2] Carried out.
┌────┬────────────────┬─────────────┬─────────┬─────────┬──────────┬────────┬──────┬───────────┬──────────┬──────────┬──────────┬──────────┐
│ id │ identify │ namespace │ model │ mode │ pid │ uptime │ ↺ │ standing │ cpu │ mem │ consumer │ watching │
├────┼────────────────┼─────────────┼─────────┼─────────┼──────────┼────────┼──────┼───────────┼──────────┼──────────┼──────────┼──────────┤
│ 0 │ cloudflared │ default │ N/A │ fork │ 41282 │ 73m │ 0 │ on-line │ 0% │ 36.3mb │ jon… │ disabled │
│ 3 │ uptime-kuma │ default │ 1.22.1 │ fork │ 86760 │ 0s │ 0 │ on-line │ 0% │ 46.9mb │ jon… │ disabled │
└────┴────────────────┴─────────────┴─────────┴─────────┴──────────┴────────┴──────┴───────────┴──────────┴──────────┴──────────┴──────────┘
[PM2][WARN] Present course of checklist shouldn’t be synchronized with saved checklist. Kind ‘pm2 save’ to synchronize.
[jonnetsec@s14]:<~/domains/public_html>$ pm2 save
[PM2] Saving present course of checklist…
[PM2] Efficiently saved in /dwelling/jonnetsec/.pm2/dump.pm2
[jonnetsec@s14]:<~/domains/public_html>$
[Note] You would possibly have to run following instructions to revive the providers managed by PM2 and examine logs.
——————————Following methodology shouldn’t be working anymore —–
——————————it copied right here only for a reference. —–
Clone the Uptime Kuma undertaking
As soon as related to the server, go into domainsthe listing and clone the Uptime Kuma GitHub repository:
- cd ~/domains
- git clone https://github.com/louislam/uptime-kuma.git
Set up dependencies and run Uptime Kuma
Enter the cloned undertaking listing and run the next instructions to put in the required dependencies and carry out preliminary settings:
- cd uptime-kuma
- npm run setup
Modify the configuration file
Modify ecosystem.config.js the file in line with the precise state of affairs and set the right port quantity. The next is a pattern configuration:
module.exports = {
apps: [{
name: “uptime-kuma”,
script: “./server/server.js”,
args: “–port=11010”,
env: {
“PLAYWRIGHT_BROWSERS_PATH”: “/nonexistent”
}
}]
};
Begin the service
Lastly, begin the Uptime Kuma service utilizing pm2:
- pm2 begin ./ecosystem.config.js
By way of the above steps, you’ve got efficiently arrange the Uptime Kuma monitoring service on Serv00. You possibly can entry your monitoring web page by the set port quantity and begin real-time monitoring of your web site.
Notes:
- https://linux.do/t/subject/168835
- https://weblog.agexf.com/2024/06/30/up-serv00
Your Personal Area Mailbox with Serv00 Internet hosting
使用自己的域名
- 登录
serv00面板 这里用的S13的 面板地址就是:https://panel13.serv00.com/
- 点击
DNS zones新增一个(Add new zone)

- 要到你的域名托管处添加A记录解析 推荐托管在
Cloudflare
- 返回
Zone checklist点击你添加的域名右侧操作按钮的Edit红框内的需要在CloudflareDNS解析添加

- 在
Cloudflare添加

- 面板点击
E-mail添加一个邮箱

- 返回
Area checklist就可以看到域名出现在列表了 点击Particulars设置一下存储大小 注意不要给太大 因为serv00只有3G储存

- 前置工作 添加邮箱的时候 控制台会有一个
/add的请求 找到它并且记录token

- 修改脚本中对应值 直接在控制台运行脚本
|
|
上一步保存的 |
|
|
你的域名 |
|
|
你是S几就填几 |
|
|
生成的邮箱的密码 |
|
|
本次执行生成邮箱的数量 |
const csrfToken = '';
const area = '';
const quantity = 13;
const password = 'your1@PASSWORD';
const maxEmails = 10;


const characters = 'abcdefghijklmnopqrstuvwxyz0123456789';


perform generateRandomPrefix(size = 5) {
  let prefix = '';
  for (let i = 0; i < size; i++) {
    const randomIndex = Math.flooring(Math.random() * characters.size);
    prefix += characters[randomIndex];
  }
  return prefix;
}


async perform addMailbox(prefix, password) {
  const electronic mail = `${prefix}@${area}`;
  const physique = `csrfmiddlewaretoken=${csrfToken}&electronic mail=${electronic mail}&id_email-placeholder-1=${prefix}&password1=${password}&password2=${password}`;

  const response = await fetch(`https://panel${quantity}.serv00.com/mail/particulars/add_mailbox/${area}`, {
    methodology: "POST",
    headers: {
      "Content material-Kind": "software/x-www-form-urlencoded",
    },
    physique: physique,
    credentials: "embrace"
  });

  if (response.okay) {
    console.log(`邮箱 ${electronic mail} 添加成功`);
  } else {
    console.error(`邮箱 ${electronic mail} 添加失败: ${response.standing} ${await response.textual content()}`);
  }
}


async perform batchAdd(password, maxEmails) {
  const usedPrefixes = new Set();

  for (let i = 0; i < maxEmails; i++) {
    let prefix;
    do {
      prefix = generateRandomPrefix();
    } whereas (usedPrefixes.has(prefix));

    usedPrefixes.add(prefix);
    await addMailbox(prefix, password);
    await new Promise(resolve => setTimeout(resolve, 1000));
  }
}


batchAdd(password, maxEmails);
Word: https://weblog.lmyself.prime/article/122ee568-45a2-802a-a9ea-c2bf6e5d1c23
IP High quality Verify in FreeBSD
https://github.com/spiritLHLS/ecs
IP质量检测,含15家数据库查询,含DNS黑名单查询
含 IPV4 和 IPV6 检测,含ASN和地址查询
含邮件端口检测
- bash <(wget -qO- bash.spiritlhl.web/ecs-ipcheck)
Auto Login to Renew Serv00 Each Month
可以使用自身 SSH 自身的方式进行自动续期,操作如下:
1 进入一个自己喜欢的路径,使用 cat 命令新建 auto-renew.sh 脚本:
cat > auto-renew.sh << EOF
#!/bin/bash
sshpass -p ‘密码’ ssh -o StrictHostKeyChecking=no -o UserKnownHostsFile=/dev/null -tt 用户名@地址 “exit” &
EOF
记得把其中的密码、用户名、ssh的地址修改为你自己的。
2 给 auto-renew.sh添加可执行权限:
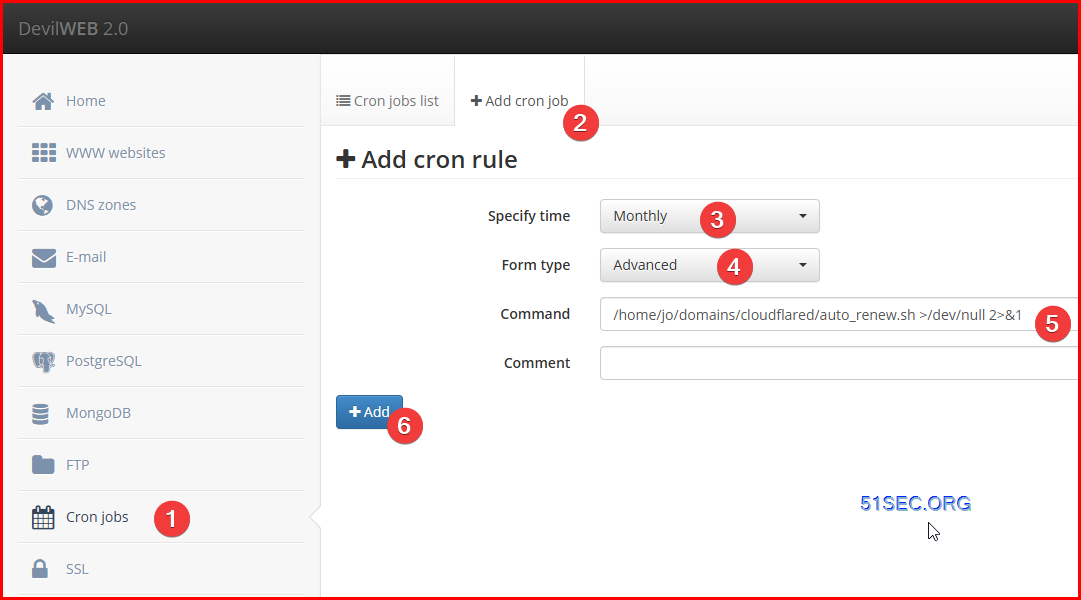
3 再去 Panel 中找到 Cron jobs 选项卡,使用 Add cron job 功能添加任务,Specify time 选择 Month-to-month,Kind kind 选择 Superior。Command 写 auto_renew.sh 脚本文件的绝对路径,如 /dwelling/username/auto_renew.sh >/dev/null 2>&1 即可。
这样就会每隔一个月自动执行一次SSH连接,自己SSH自己进行续期。
Video
YouTube: Get a free serv00 account and create wordpress web site:
Set up Uptime Kuma:


