The next steps is barely used for a specific atmosphere to have a simplified deployments which is to focus on bringing MDE to all units as quick as we are able to (in every week for 1k units together with home windows, macOS, linux, servers, workstations, and so on), additionally take away current expired antimalware software program, on the identical time, has most potential safety on the top level units.
The concept deployment will take 2-3 months with all thorough testing, planning and verifying.
Background
Third Get together Antivirus / Bug already deployed into all Workstations and Servers.
Microsoft Defender for Endpoints (P2) and Defender for Servers (P1) has been chosen to interchange this third social gathering safety software program on all workstations (Home windows and Mac) and all servers (Home windows and Linux)
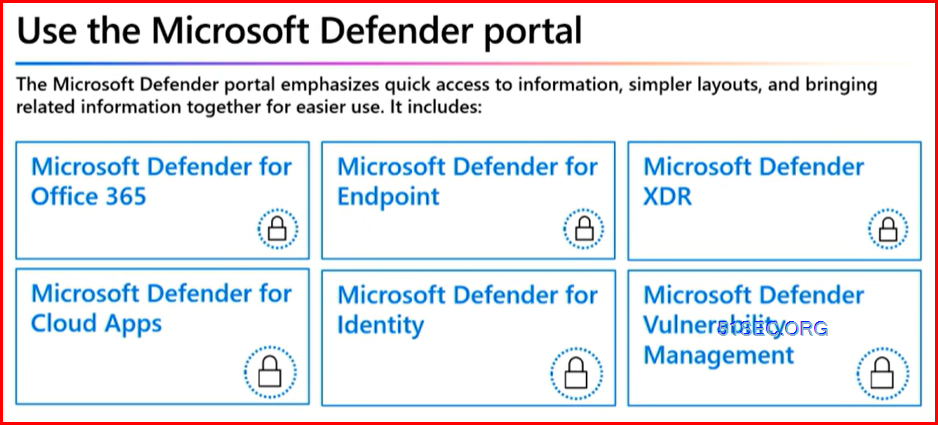
From Microsoft study, https://study.microsoft.com/en-us/defender-endpoint/mde-planning-guide, the steps to deploy Defender for Endpoint are:
Step 5 – Configure capabilities: You’re now able to configure Defender for Endpoint safety capabilities to guard your units.
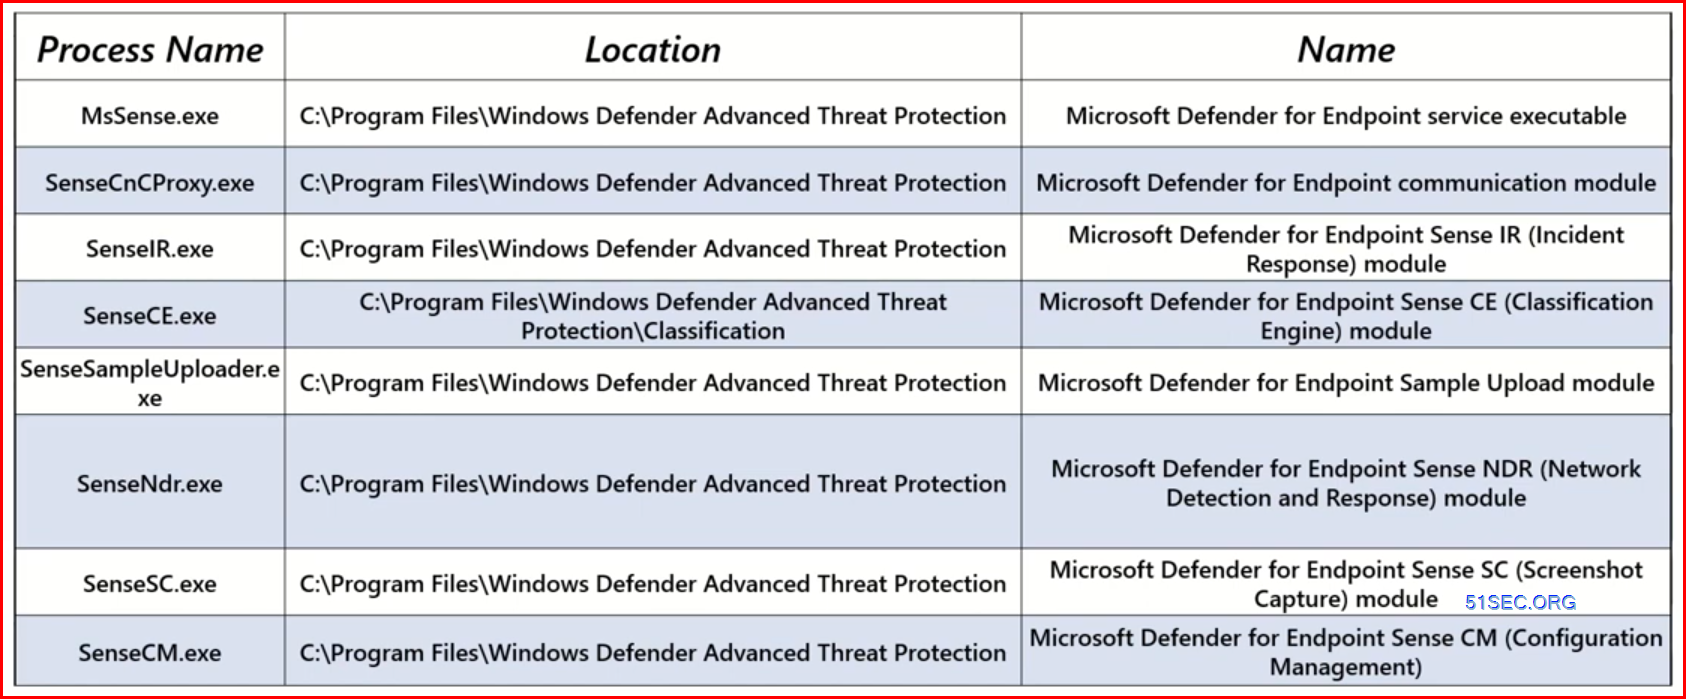
Course of associated to MDE
Excessive Stage Deployment Steps for Workstation
1 Producing onboarding code
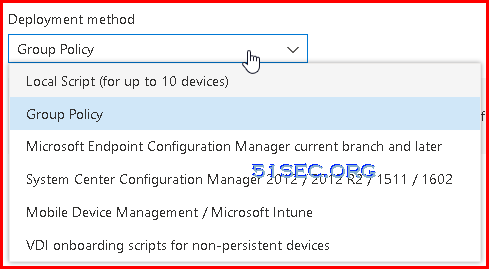
Onboard units to Microsoft Defender for Endpoint utilizing the onboarding configuration package deal that matches your most popular deployment methodology. For different machine preparation directions, learn Onboard and arrange.Deployment strategies:
You possibly can configure a single machine by working a script regionally. Notice: This script has been optimized for utilization with a restricted variety of units (1-10). To deploy at scale, please see different deployment choices above. For extra data on the best way to configure and monitor Microsoft Defender for Endpoint units, see Configure units utilizing a neighborhood script part within the Microsoft Defender for Endpoint information. Obtain onboarding package deal
2 Deploy onboarding package deal (script) to all workstations
It may be executed part by part, ranging from pilot machines, then departments by departments, or location by location.
Examine MDE portal https://safety.microsoft.com/ – Property – Gadgets web page to get the listing of all machines and get the standing of machines.
You need to use Group Coverage or third social gathering deployment instruments in your patching and software program set up to deploy this script.
3 If there may be third social gathering XDR software program already put in on workstations, the MDE will run on passive mode.
3. Allow Defender for servers (Tenant degree or Powershell script for assigned assets)
4. Make the most of free information ingestion
5. Put together for OS evaluation (Defender for server plan 2)
6. Arrange File Integrity monitoring (Defender for server plan 2)
This tenant-level setting lets you routinely and natively onboard any non-Azure server working Defender for Endpoint to Defender for Cloud, with none further agent deployments. This onboarding path is good for patrons with blended and hybrid server property who want to consolidate server safety beneath Defender for Servers.
Enabling direct onboarding is an opt-in setting on the tenant degree. It impacts each current and new servers onboarded to Defender for Endpoint in the identical Microsoft Entra tenant. Shortly after you allow this setting, your server units will present beneath the designated subscription.
Go to Defender for Cloud > Setting Settings > Direct onboarding.
Change the Direct onboarding toggle to On.
Choose the subscription you want to use for servers onboarded straight with Defender for Endpoint.
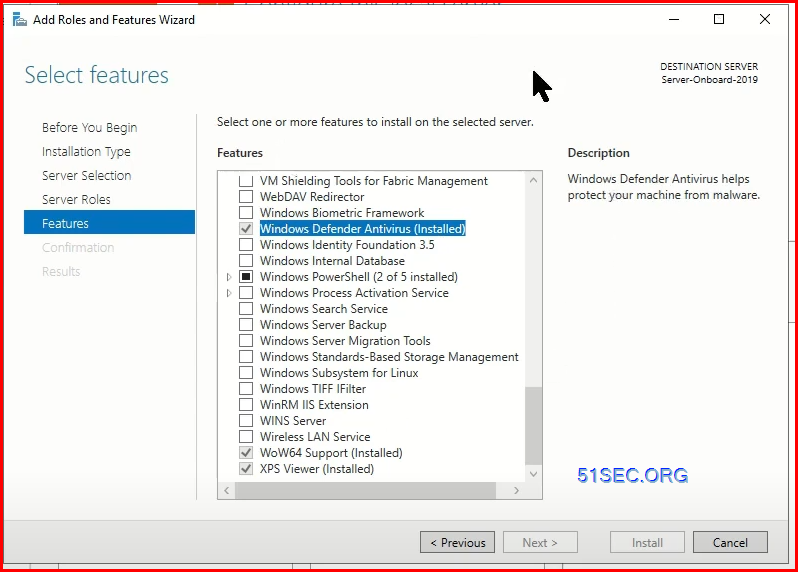
Servers is not going to be onboarded if the home windows defender AV part shouldn’t be put in on the machine
Defender AV shouldn’t be disabled by GPO
Ensure that your server is having newest safety updates
Required URLs are whitelisted – https://obtain.microsoft.com/obtain/6/b/f/6bfff670-47c3-4e45-b01b-64a2610eaefa/mde-urls-commercial.xlsx
To simplify server mgmt, use Azure Replace Administration Heart. watch this playlist: https://www.youtube.com/playlist?listing=PLboJ9yx0c_SUn_pQQrKfFUmk5mA0kC9MV
You may additionally need to configurare Azure Log Analytics and Antomation Account for Azure Arc and Replace Administration Heart:
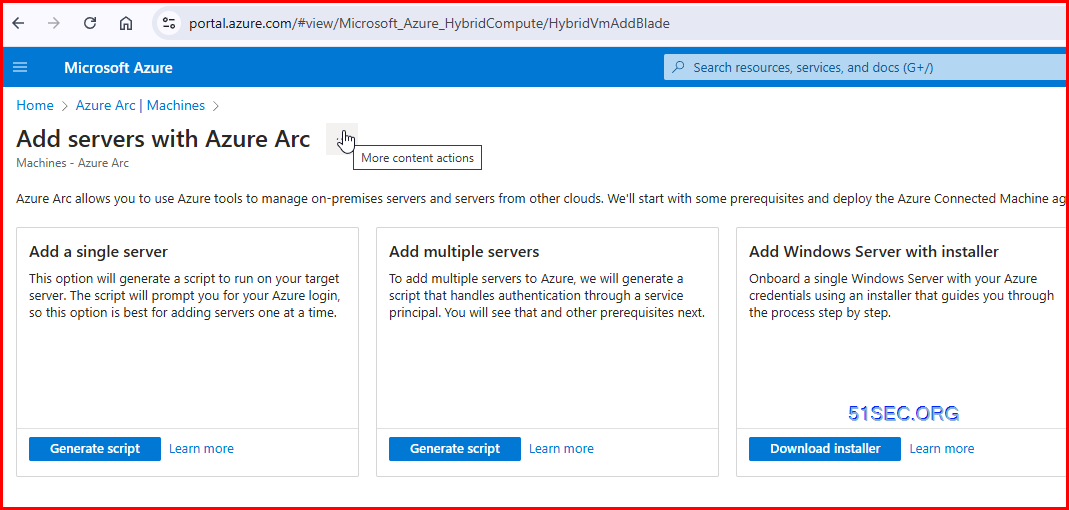
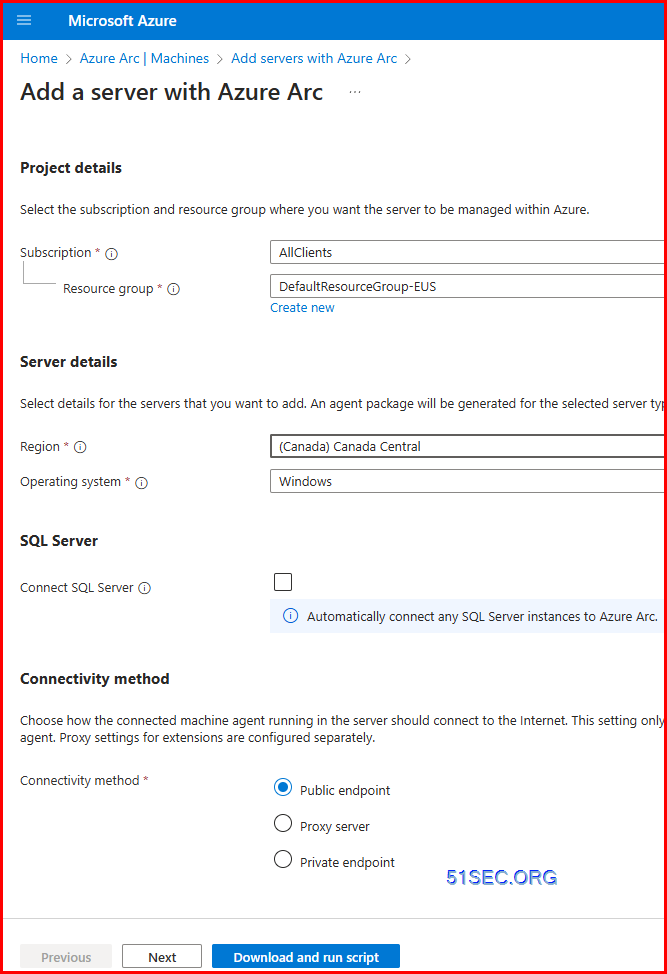
1 Generate Azure Arc Script
2 Run Particular PowerShell Script to Allow MDE
Operating Powershell script to allow defender for servers
Ensure that use correct useful resource group or tag to allow MDE.
4 Put MDE in passive mode if you’re utilizing a third-party anti-malware answer.
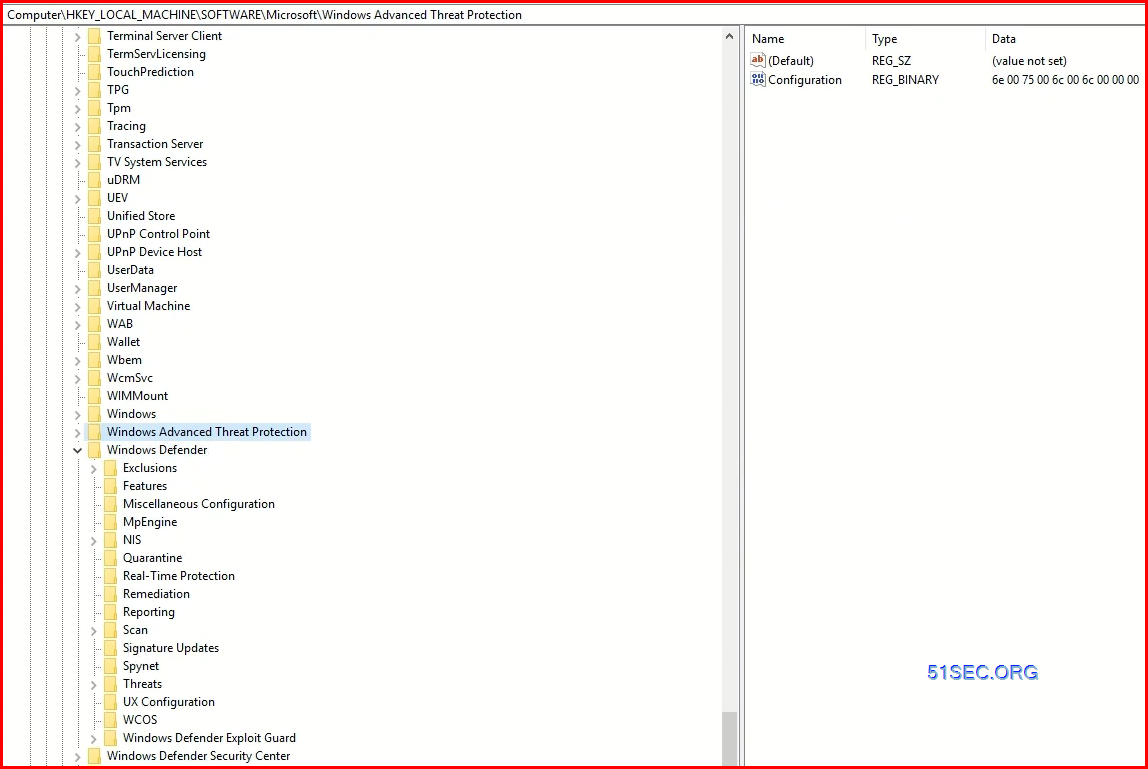
You’ll want to apply the next Microsoft Defender Antivirus passive mode setting. Confirm that it was configured appropriately: Set the next registry entry:
Path: HKLMSOFTWAREPoliciesMicrosoftWindows Superior Menace Safety
Title: ForceDefenderPassiveMode
Kind: REG_DWORD
Worth: 1
5 Configure Defender Portal hook up with Intune
Defender Settings
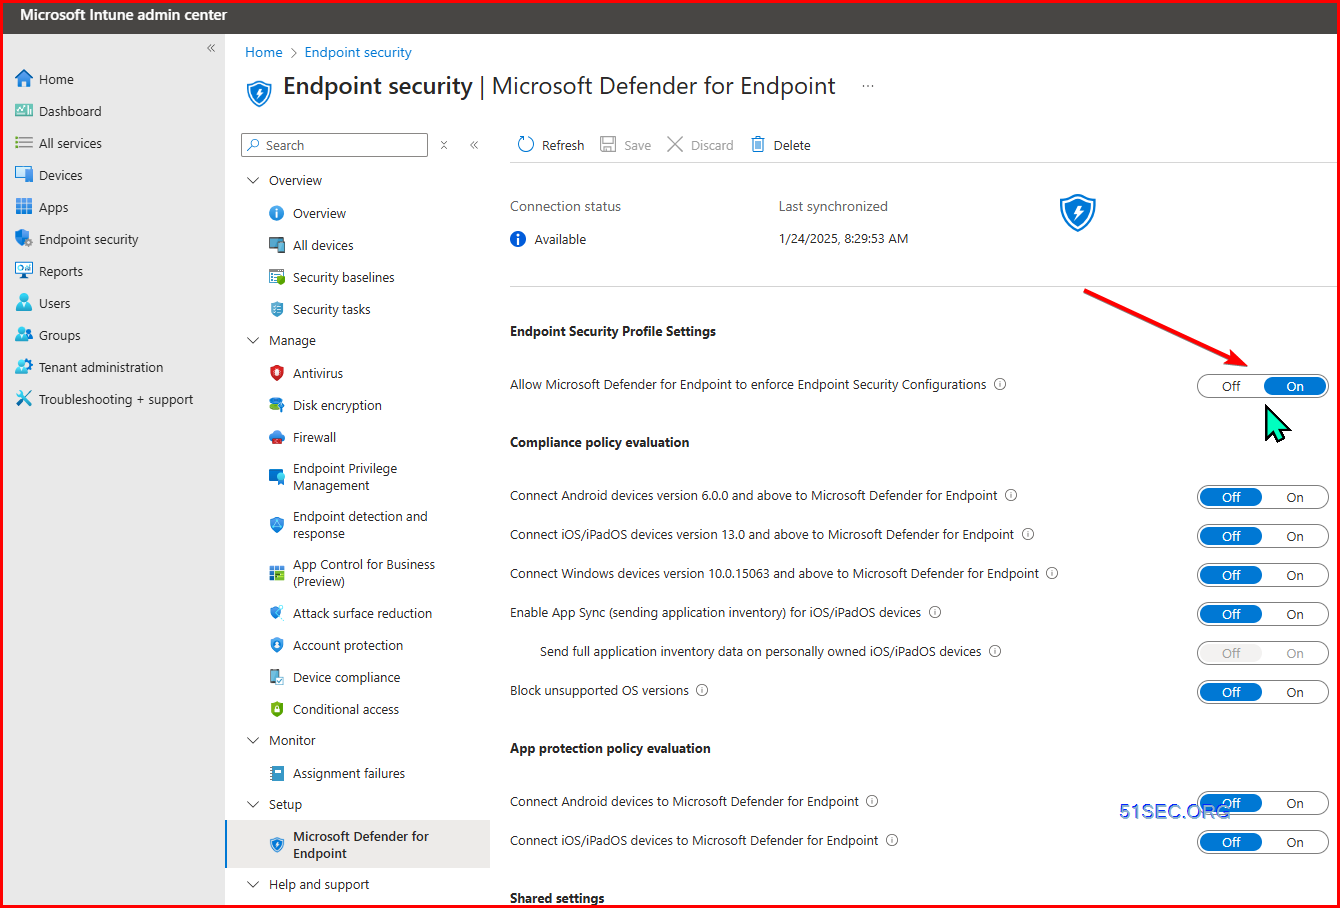
6 Configure Intune to Join Home windows Gadgets to Microsoft Defender for Endpoint
Intune – Endpoint Safety – Setup – Microsoft Defender for Endpoints
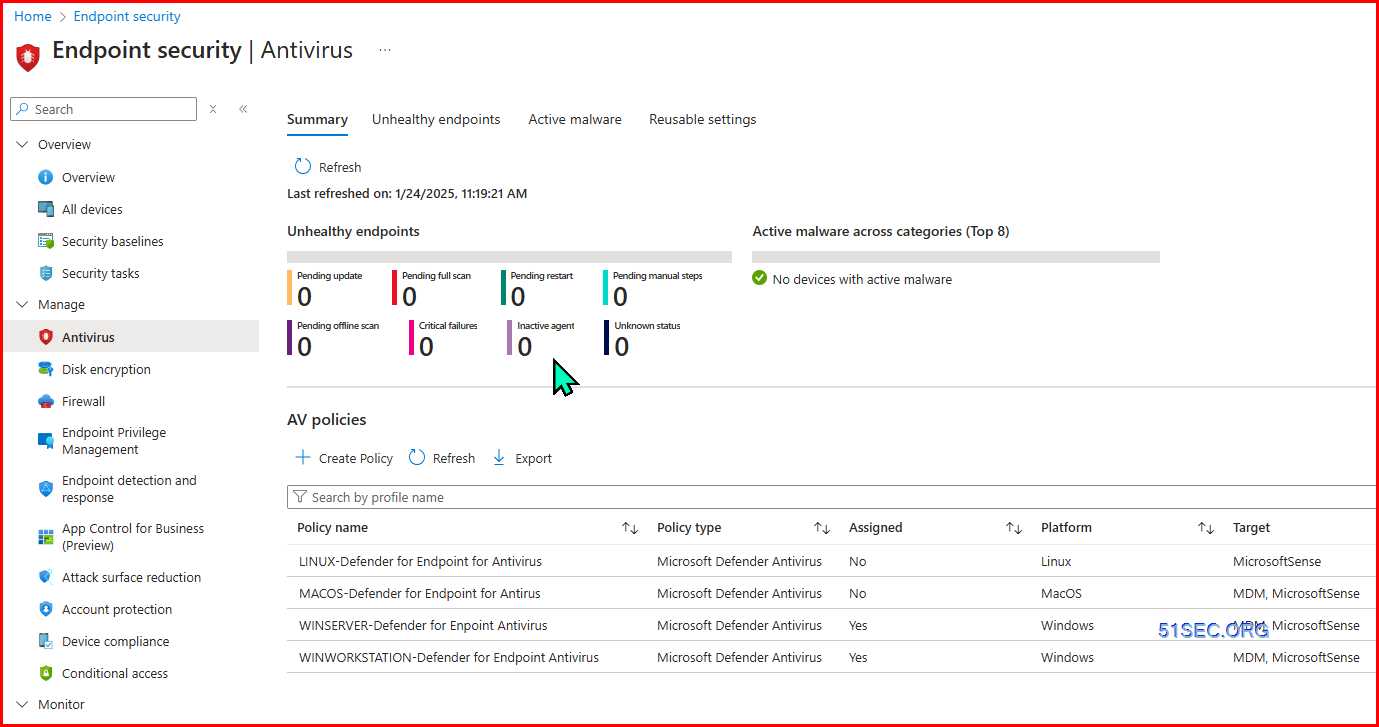
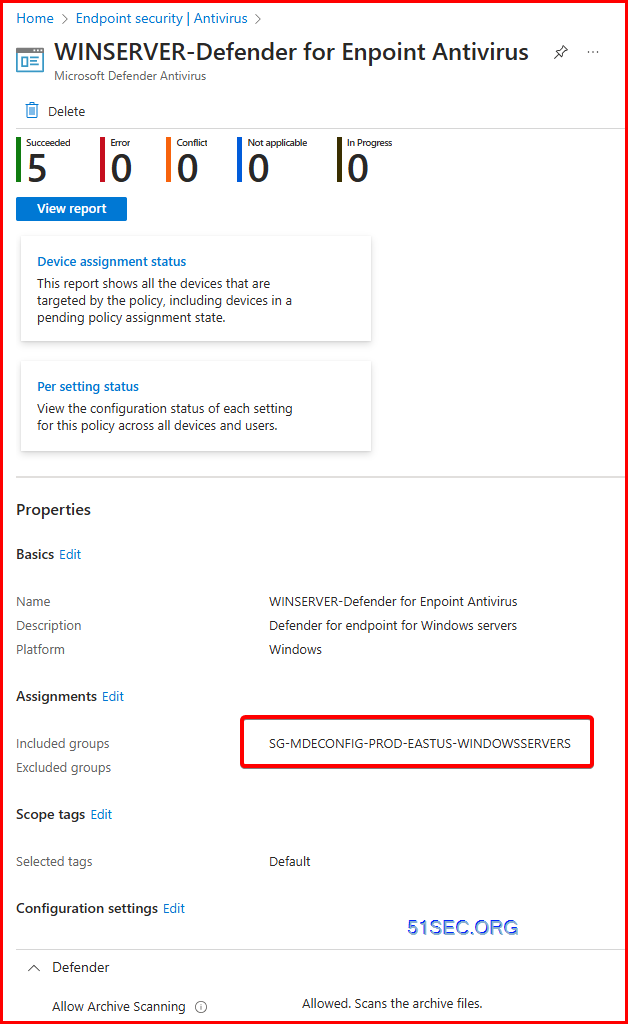
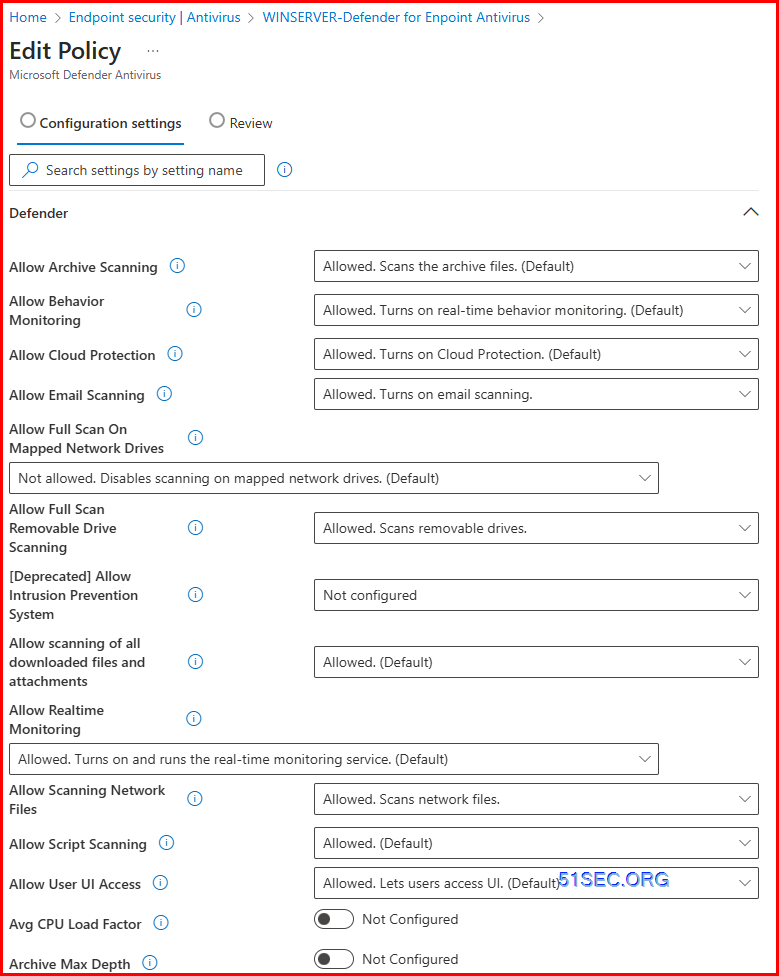
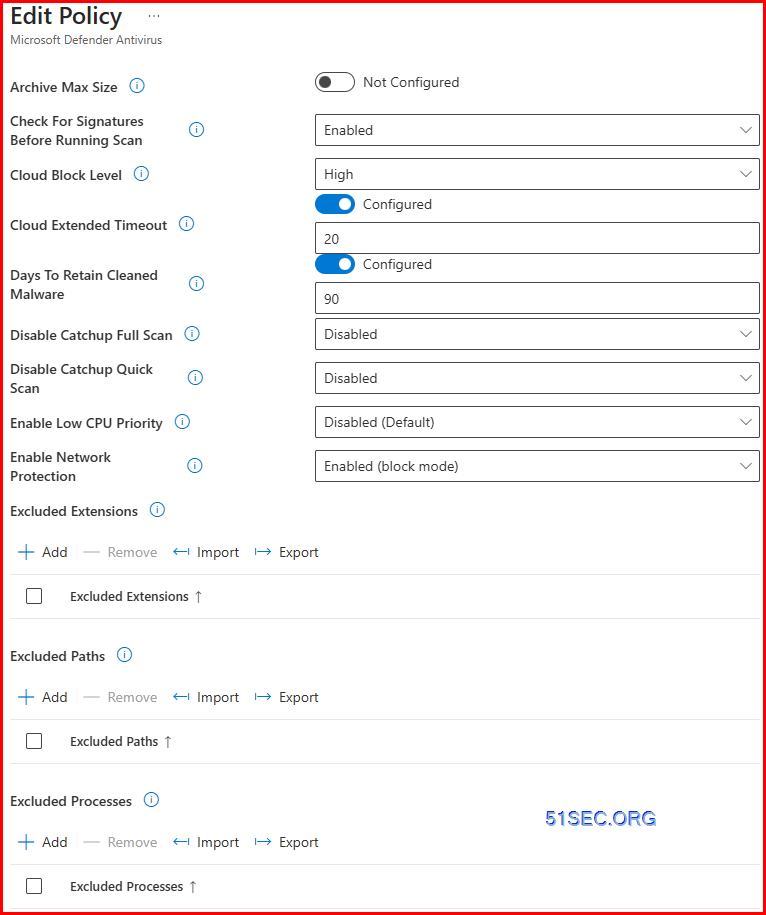
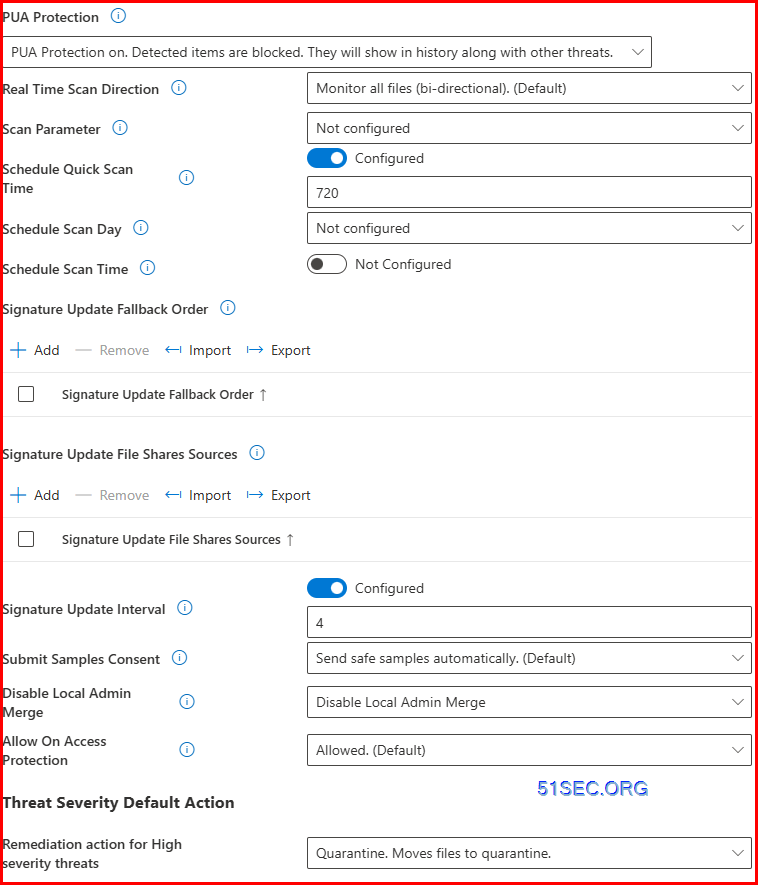
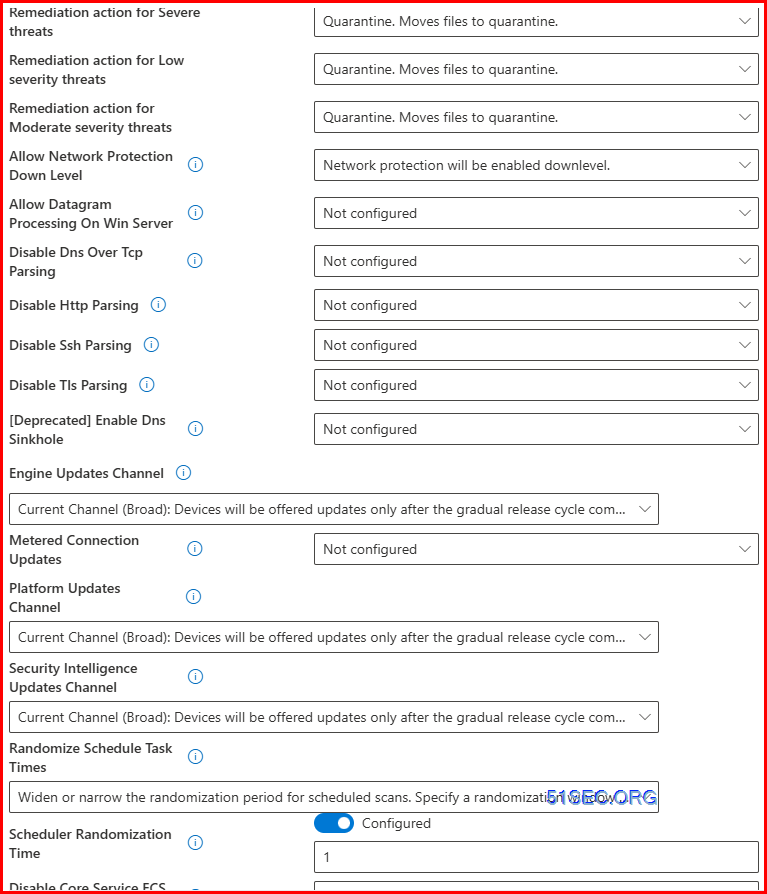
7 Configure Antivirus and Expose Administration Coverage / Profiles in Intune
Workflow of Onboarding Servers
This workflow is an instance utilizing onboarding script. In case you are utilizing Arc, it will likely be completely different in step 4.
1. Confirm AV service put in and working on the machines
sc question windefend
sc qc windefend
hostname
2. Examine the registries earlier than onboarding
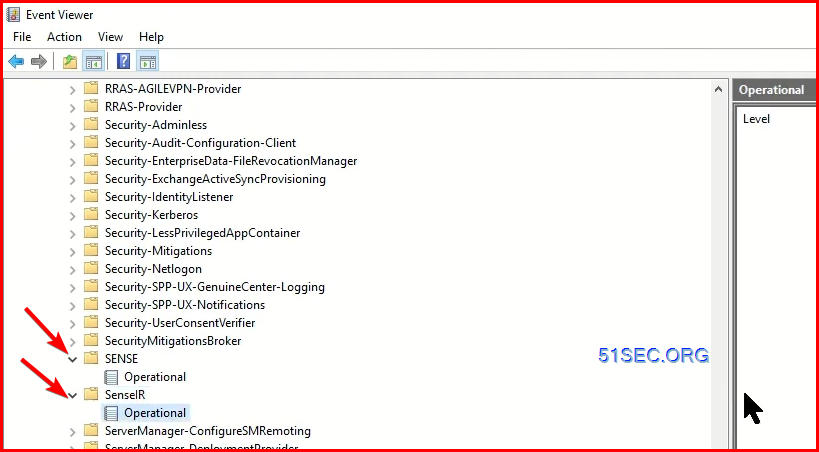
3. Examine the occasion logs within the sense associated folders
sc qc sense
sc question sense
the service shouldn’t be working and no logs are in sense associated folders
4. Run onboarding script
5. confirm sense service is working
Offboard Home windows Servers
You possibly can offboard Home windows Server 2012 R2, Home windows Server 2016, Home windows Server (SAC), Home windows Server 2019, Home windows Server 2019 Core version, Home windows Server 2022, and Home windows Server 2025 (starting in February 2025 and rolling out over the subsequent a number of weeks) utilizing the identical methodology accessible for Home windows 10 consumer units.
After offboarding, you’ll be able to proceed to uninstall the unified answer package deal on Home windows Server 2016 and Home windows Server 2012 R2.
For different Home windows server variations, you’ve two choices to offboard Home windows servers from the service:
Uninstall the MMA agent
Take away the Defender for Endpoint workspace configuration
Offboarding units is a possible answer. This sounds fascinating at first, nevertheless it gained’t work in our case.
Two other ways exist to offboard units:
Regionally, by working an offboarding script on a tool (supported for macOS, Linux, and Home windows (Server)).
Via the offboarding API (supported for Home windows 10 and Home windows Server 2019).
It is very important perceive that offboarding a tool doesn’t take away a tool from the stock. As an alternative, the machine switches to an ‘inactive’ state 7 days after offboarding. Which means offboarding shouldn’t be an environment friendly option to handle reimaged/repurposed units.
The primary aim of offboarding is to sever the connection between Microsoft Defender and the machine. That is helpful in a number of situations, together with:
A tool encounters compatibility points as a result of the scanning course of impacts efficiency and the usual operation of the server or respectable processes are being blocked
You’re transferring away from Microsoft Defender to a distinct EDR answer.
The machine is now not in scope.
The final situation is one thing I frequently encounter with prospects: accidentally, the client onboarded private units into Microsoft Defender for Endpoint because of a misconfiguration. By utilizing the offboarding API, I might block the machine from sending information to Microsoft 365 Defender by transferring it out of scope for the corporate. So offboarding units do have a use case, however it’s not an answer for managing inactive units
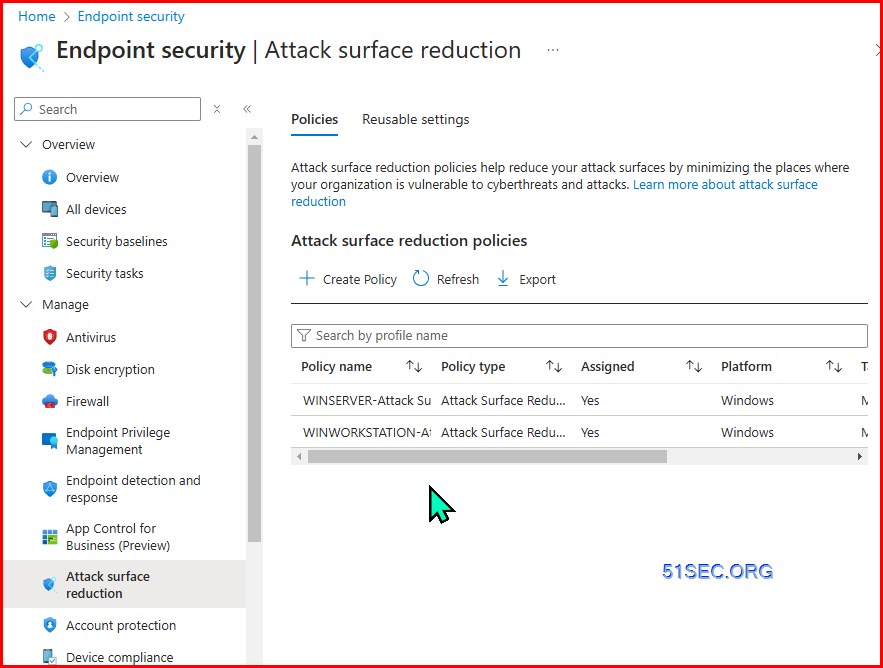
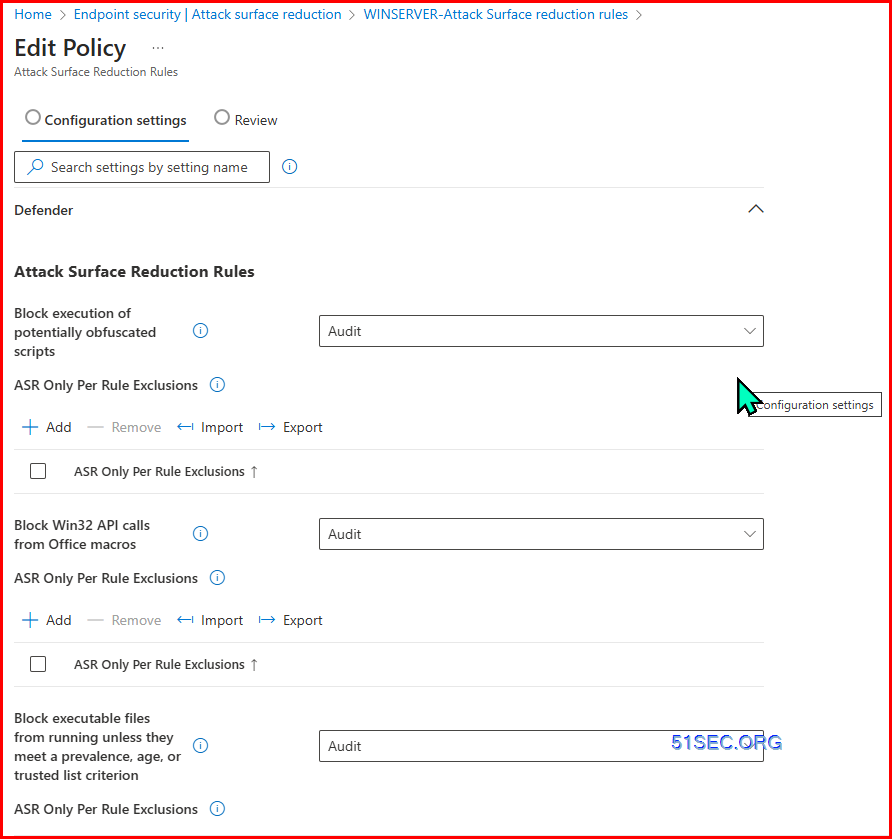
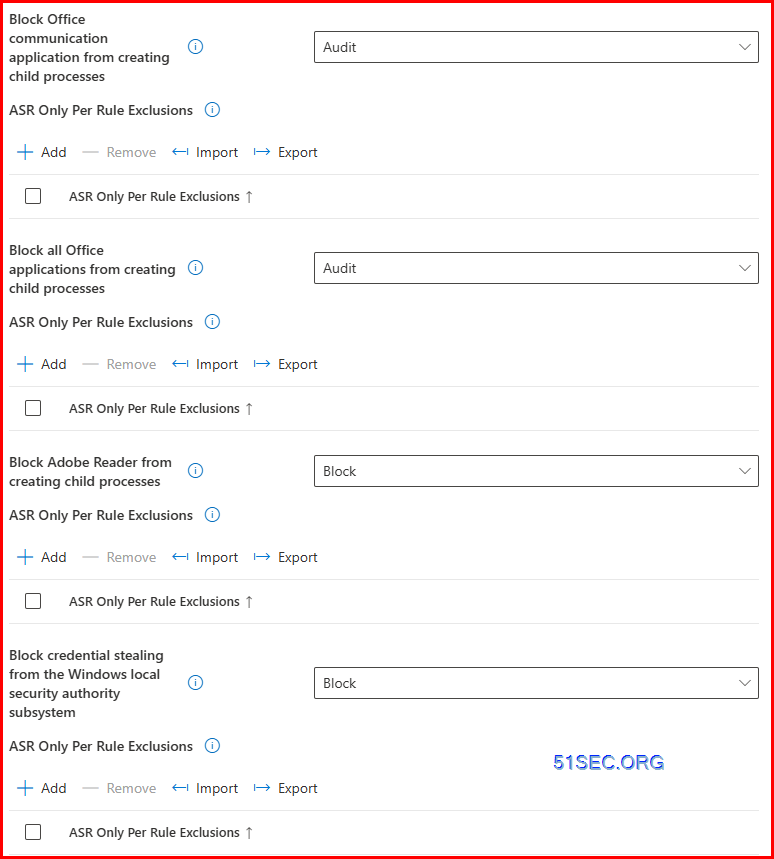
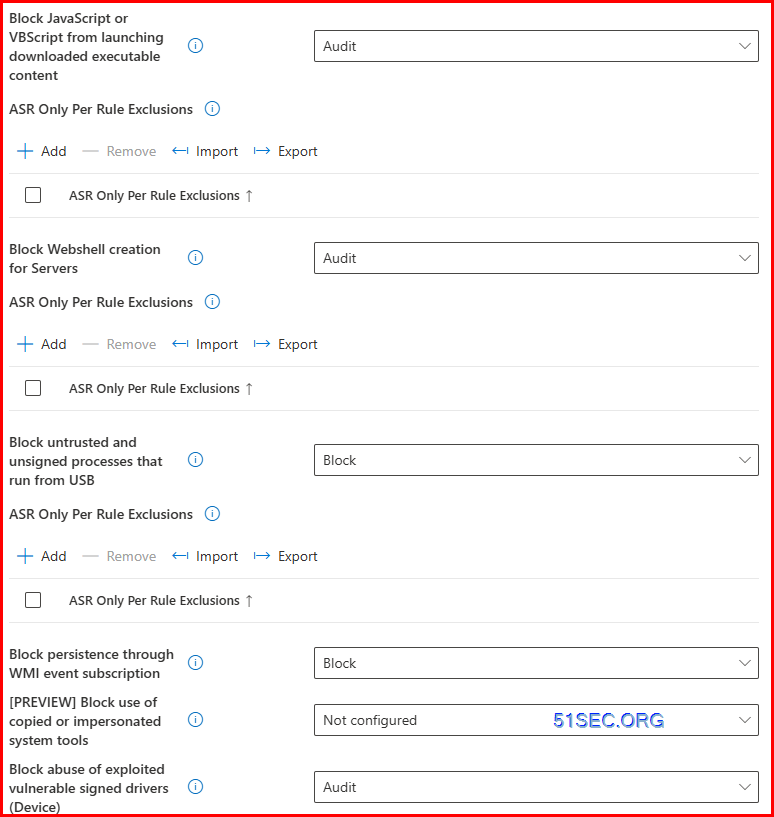
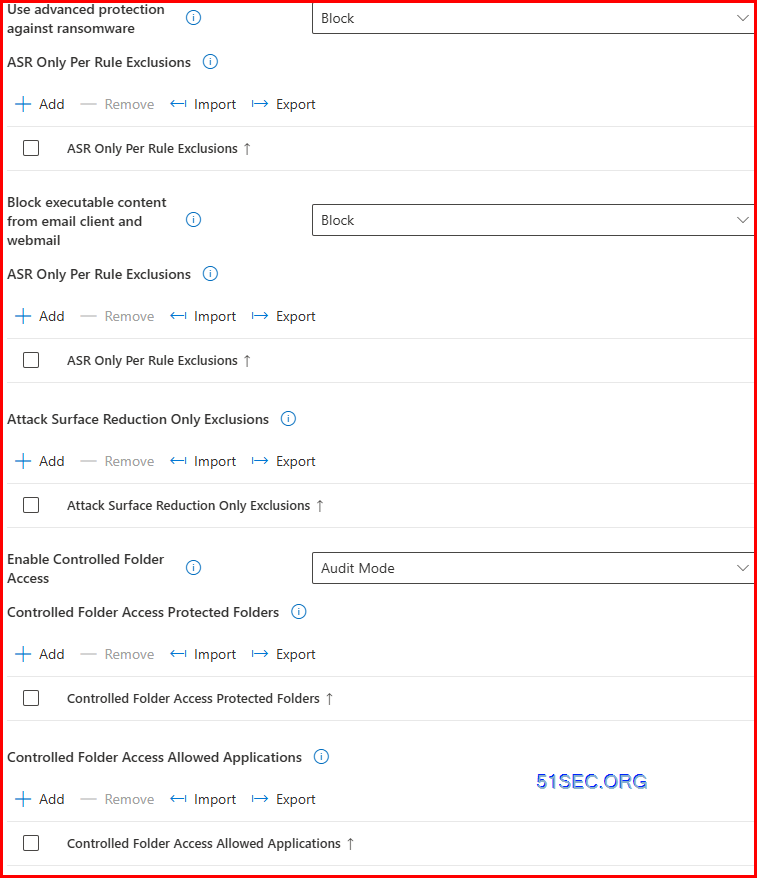
Safety Insurance policies for Home windows Workstation
The newest steady version shall be built-in into the MDE for Endpoint agent. Guarantee that you’re working the most recent version for both macOS or Linux.
Onboard non-persistent digital desktop infrastructure (VDI) units in Microsoft Defender XDR
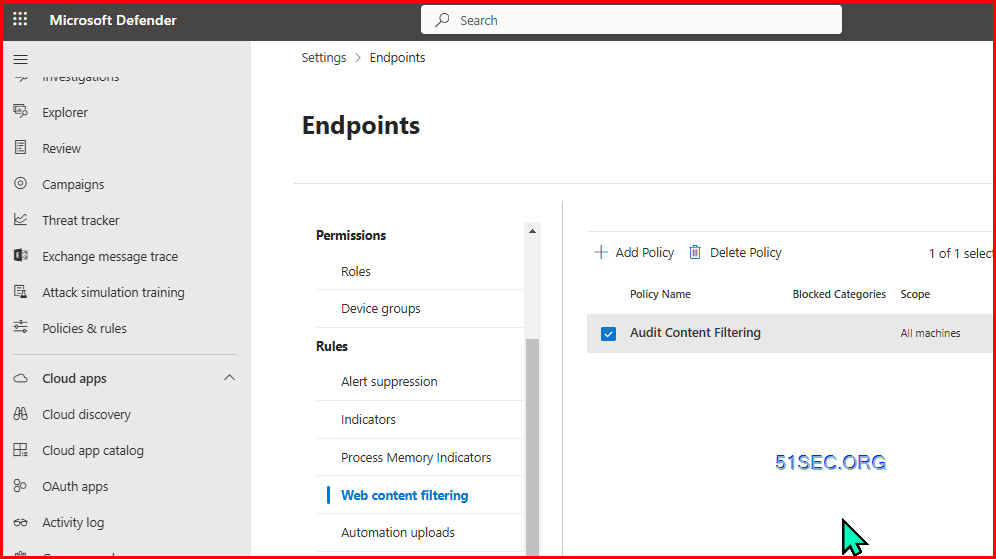
Open the VDI configuration package deal file (WindowsDefenderATPOnboardingPackage.zip) that you simply downloaded from the service onboarding wizard. It’s also possible to get the package deal from the Microsoft Defender portal.
Within the navigation pane, choose Settings > Endpoints > Machine administration > Onboarding.
Choose the working system.
Within the Deployment methodology subject, choose VDI onboarding scripts for non-persistent endpoints.
Choose Obtain package deal and save the file.
Copy the recordsdata from the WindowsDefenderATPOnboardingPackage folder extracted from the zipped folder into the golden/major picture beneath the trail C:WINDOWSSystem32GroupPolicyMachineScriptsStartup. (The folder shall be generated by native group coverage from subsequent step, if the folder shouldn’t be offered within the system)
In case you’re implementing a number of entries for every machine – one for every session, copy WindowsDefenderATPOnboardingScript.cmd.
In case you’re implementing a single entry for every machine, copy each Onboard-NonPersistentMachine.ps1 and WindowsDefenderATPOnboardingScript.cmd.
Open a Native Group Coverage Editor window and navigate to Pc Configuration > Home windows Settings > Scripts > Startup. NoteDomain Group Coverage may additionally be used for onboarding non-persistent VDI units.
Relying on the strategy you’d prefer to implement, comply with the suitable steps:Broaden tableMethodStepsSingle entry for every device1. Choose the PowerShell Scripts tab, then choose Add (Home windows Explorer opens straight within the path the place you copied the onboarding script earlier). 2. Navigate to onboarding PowerShell script Onboard-NonPersistentMachine.ps1. There’s no must specify the opposite file, because it’s triggered routinely.A number of entries for every device1. Choose the Scripts tab, then choose Add (Home windows Explorer opens straight within the path the place you copied the onboarding script earlier). 2. Navigate to the onboarding bash script WindowsDefenderATPOnboardingScript.cmd.
Check your answer
For VDI Grasp picture, it is not going to be onboarded into MDE portal. To keep away from it to be onboarded, following scrip will verify the hostname of machines earlier than run VDI begin up script.
Write-Host "INFO: Checking hostname towards a listing of identified grasp photographs... Please wait..."

# Get the present hostname
$CURRENT_HOSTNAME = (hostname)

# Outline the goal hostnames
$TARGET_HOSTNAMES = @("example1", "example2", "example3", "example4", "MDLT2")

Write-Host "INFO: Present hostname is $CURRENT_HOSTNAME"
Write-Host "INFO: Goal hostnames are $($TARGET_HOSTNAMES -join ', ')"

# Initialize a flag to point if a match is discovered
$MATCH_FOUND = $false

# Examine if the present hostname matches any of the goal hostnames
foreach ($TARGET_HOSTNAME in $TARGET_HOSTNAMES) {
    if ($CURRENT_HOSTNAME -eq $TARGET_HOSTNAME) {
        $MATCH_FOUND = $true
        Write-Host "INFO: Hostname matches one of many goal hostnames"
        Write-Host "WARNING: This machine is a grasp picture... Exiting..."
        exit
    }
}

if (-not $MATCH_FOUND) {
    Write-Host "INFO: Hostname doesn't match any of the goal hostnames"
    $script = $PSScriptRoot+"Onboard-NonPersistentMachine.ps1"
    & $script
}
For Home windows 2012 R2 and Home windows 2016, the onboarding script for VDI grasp picture shall be modified with :
@echo off echo INFO: Checking hostname towards a listing of identified grasp photographs… Please wait… for /f “tokens=*” %%i in (‘hostname’) do set CURRENT_HOSTNAME=%%i set TARGET_HOSTNAMES=example1 exampl2 example3 exampel4 echo INFO: Present hostname is %CURRENT_HOSTNAME% echo INFO: Goal hostnames are %TARGET_HOSTNAMES% set MATCH_FOUND=false for %%h in (%TARGET_HOSTNAMES%) do ( if “%CURRENT_HOSTNAME%”==”%%h” ( set MATCH_FOUND=true echo INFO: Hostname matches one of many goal hostnames¨C158C echo WARNING: This machine is a grasp picture… Exiting…¨C159C exit ¨C160C )¨C161C)
¨C162C
¨C357C¨C358C¨C359C¨C360C¨C361C¨C362C¨C363C¨C364C
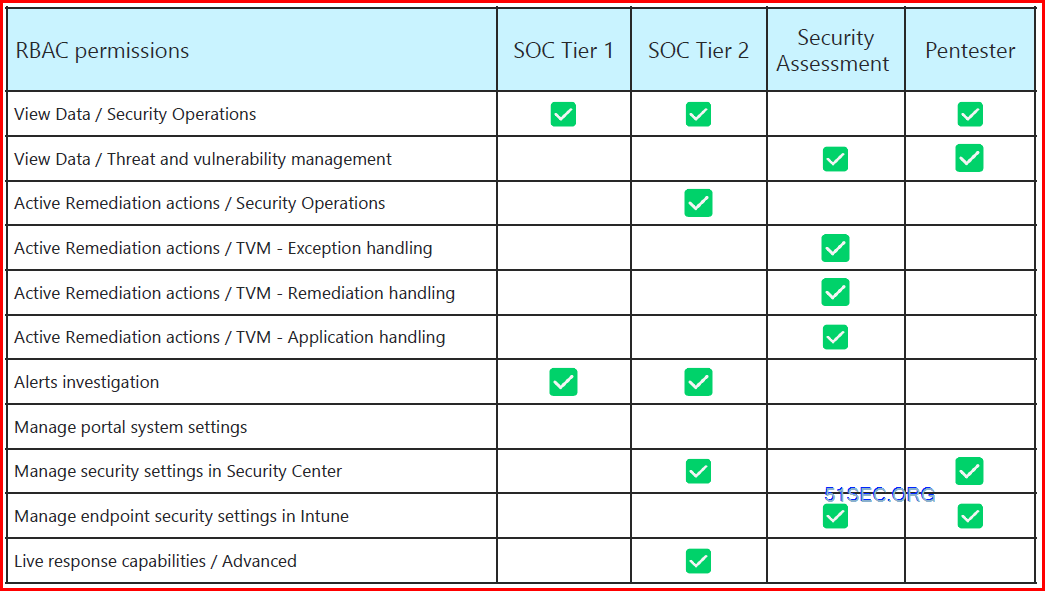
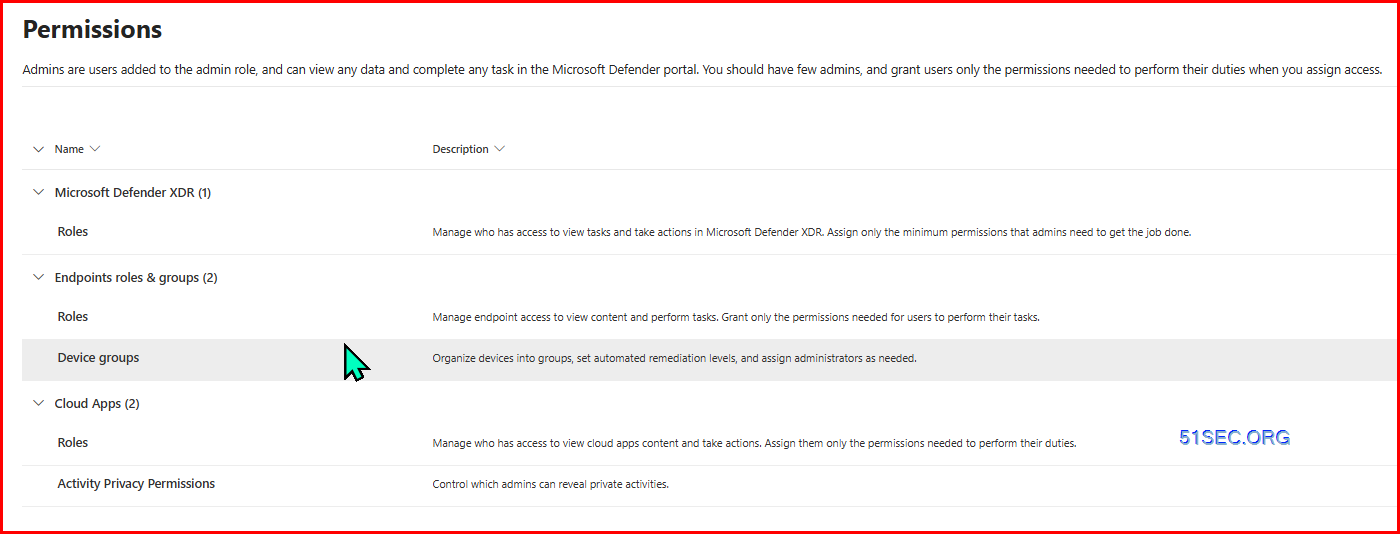
RBAC
4 Steps:
1. Create Azure AD Person Teams
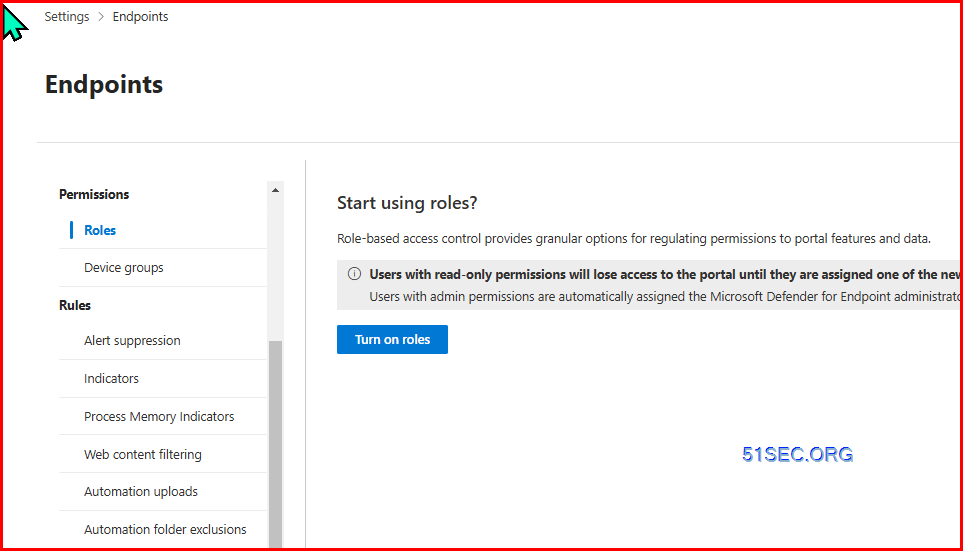
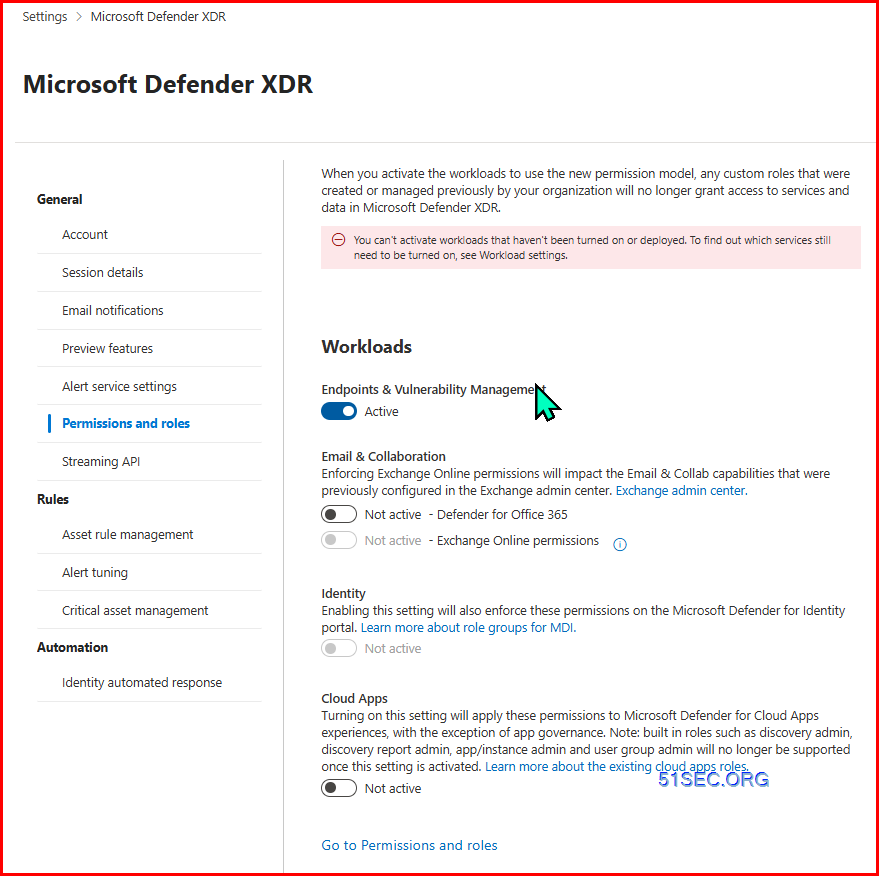
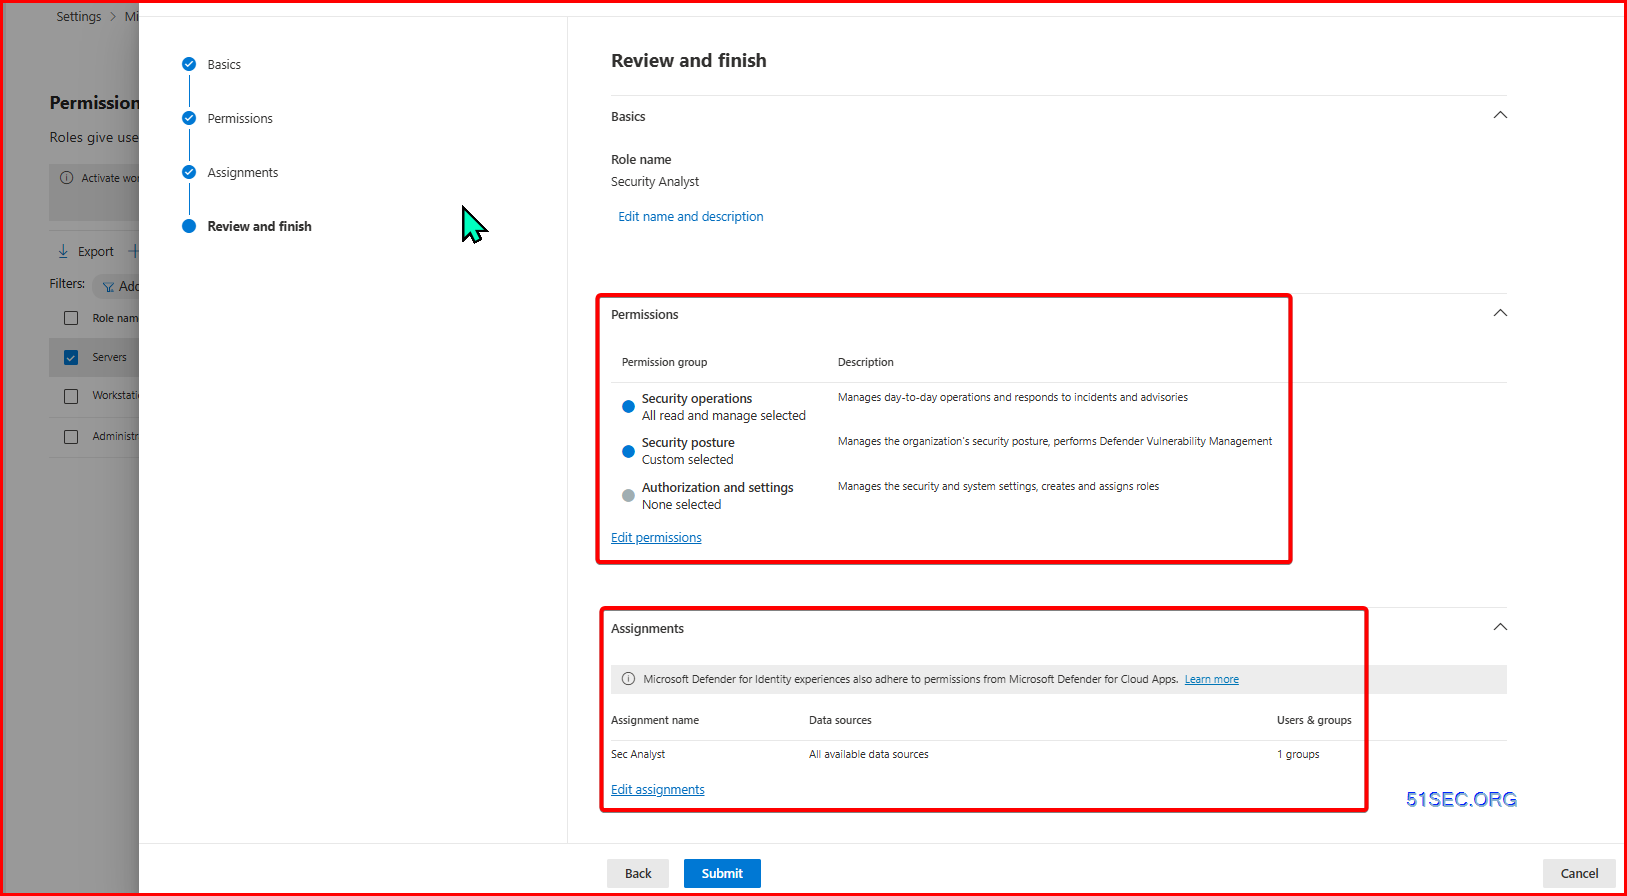
2. Configure MDE RBAC
3. Create Machine Tags
4. Create Machine Teams
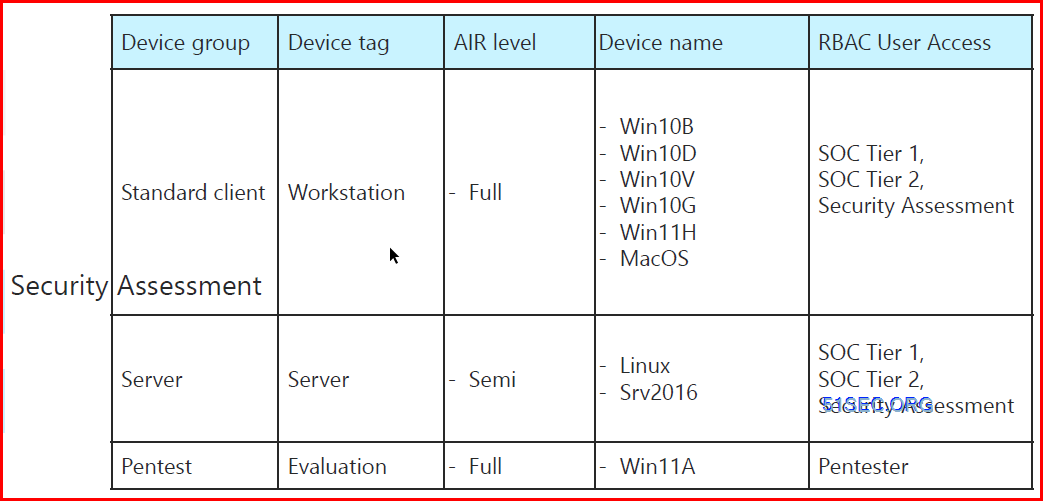
Examine Record Pattern:
Machine Teams / Person Teams
Many customers ask when to make use of consumer teams and when to make use of machine teams. The reply depends upon your aim. Right here’s some steering to get you began.
Machine teams
If you wish to apply settings on a tool, no matter who’s signed in, then assign your insurance policies to a units group. Settings utilized to machine teams all the time go along with the machine, not the consumer.
For instance:
Machine teams are helpful for managing units that don’t have a devoted consumer. For instance, you’ve units that print tickets, scan stock, are shared by shift staff, are assigned to a selected warehouse, and so forth. Put these units in a units group, and assign your insurance policies to this units group.
You create a Machine Firmware Configuration Interface (DFCI) Intune profile that updates settings within the BIOS. For instance, you configure this coverage to disable the machine digital camera, or lock down the boot choices to forestall customers from booting up one other OS. This coverage is an effective situation to assign to a units group.
On some particular Home windows units, you all the time need to management some Microsoft Edge settings, no matter who’s utilizing the machine. For instance, you need to block all downloads, restrict all cookies to the present looking session, and delete the looking historical past. For this situation, put these particular Home windows units in a units group. Then, create an Administrative Template in Intune, add these machine settings, after which assign this coverage to the units group.
To summarize, use machine teams if you don’t care who’s signed in on the machine, or if anybody indicators in. You need your settings to all the time be on the machine.
Person teams
Coverage settings utilized to consumer teams all the time go along with the consumer, and go along with the consumer when signed in to their many units. It’s regular for customers to have many units, corresponding to a Floor Professional for work, and a private iOS/iPadOS machine. And, it’s regular for an individual to entry electronic mail and different group assets from these units.
If a consumer has a number of units on the identical platform, then you should utilize filters on the group task. For instance, a consumer has a private iOS/iPadOS machine, and an organization-owned iOS/iPadOS. While you assign a coverage for that consumer, you should utilize filters to focus on solely the organization-owned machine.
Comply with this common rule: If a function belongs to a consumer, corresponding to electronic mail or consumer certificates, then assign to consumer teams.
For instance:
You need to put a Assist Desk icon for all customers on all their units. On this situation, put these customers in a customers group, and assign your Assist Desk icon coverage to this customers group.
A consumer receives a brand new organization-owned machine. The consumer indicators in to the machine with their area account. The machine is routinely registered in Microsoft Entra ID, and routinely managed by Intune. This coverage is an effective situation to assign to a customers group.
Every time a consumer indicators in to a tool, you need to management options in apps, corresponding to OneDrive or Workplace. On this situation, assign your OneDrive or Workplace coverage settings to a customers group.For instance, you need to block untrusted ActiveX controls in your Workplace apps. You possibly can create an Administrative Template in Intune, configure this setting, after which assign this coverage to a customers group.
To summarize, use consumer teams if you need your settings and guidelines to all the time go along with the consumer, no matter machine they use.
Right here’s an instance of the best way to add a TAG to units utilizing the onboarding script:
Open the onboarding script file in a textual content editor
Find the :SCRIPT_START part
Add a command to assign a TAG to the machine. As an example, if we need to assign a TAG “Workgroup“, we are able to use the next command:
REG add "HKLMSOFTWAREPoliciesMicrosoftWindows Superior Menace ProtectionDeviceTagging" /v Group /t REG_SZ /f /d "Workgroup" >NUL 2>&1
By incorporating a command to assign TAGs throughout the onboarding script, we are able to streamline the method and routinely categorize the units throughout onboarding.
Machine Group and Machine Tag Examine Record Pattern:


