
Snowflake is likely one of the most in-demand instruments for contemporary knowledge engineers.
Many firms use it as a part of their analytics pipelines and cloud knowledge platforms, and it is ceaselessly listed as a required or most well-liked talent in knowledge engineering roles.
However what precisely is Snowflake? How does it work? And the way do you truly use it each day?
On this tutorial, you’ll get hands-on expertise with Snowflake. You’ll discover ways to navigate the interface, load knowledge, run queries, and monitor credit score utilization, supplying you with the boldness to begin utilizing Snowflake in real-world initiatives.
So what is Snowflake?
Snowflake is a cloud-based knowledge warehouse platform and scalable SQL interface. It handles all of the infrastructure for you — together with scaling up (or down) when wanted, storing your knowledge, and processing your queries.
You don’t want to fret about configuring servers or managing efficiency. You simply load your knowledge and begin querying.
Who makes use of Snowflake, and why?
Firms like Capital One, HelloFresh, Penske, and Nissan use Snowflake to energy their analytics and knowledge operations. It’s particularly in style with knowledge engineering and analytics groups as a result of it solves widespread issues: lengthy question instances, scattered or siloed knowledge, and complex infrastructure that’s troublesome to scale.
With Snowflake, groups can mix knowledge from varied enterprise departments, corresponding to gross sales, finance, advertising, and help, and analyze it multi functional place. They will additionally share stay datasets between departments or with exterior companions, while not having to duplicate or export any knowledge. And since Snowflake scales compute robotically, it could actually deal with every thing from routine dashboard queries to large-scale reporting throughout peak enterprise hours.
Analysts use it to discover and visualize knowledge in instruments like Energy BI or Tableau. Engineers use it to construct pipelines that clear and remodel uncooked knowledge. And knowledge scientists can run machine studying workflows instantly in opposition to Snowflake tables, while not having to maneuver knowledge into separate techniques.
Whether or not you’re working with structured tables, semi-structured logs (like JSON), or massive flat information in cloud storage, Snowflake gives a single place to retailer, question, and share knowledge effectively.
What makes Snowflake totally different?
One motive Snowflake is so in style is the way it handles efficiency at scale. In conventional techniques like PostgreSQL, your queries run on the identical machine that shops your knowledge. In Snowflake, these two elements are separated:
- Storage: the place your knowledge lives
- Compute: the assets that course of your queries
This separation means totally different groups can run queries on the identical time with out slowing one another down. It additionally means you’ll be able to scale your compute energy up or down relying in your wants, and pause it fully once you’re not utilizing it to save lots of prices.
Getting began with Snowflake
You’ll be able to join a free trial of Snowflake by means of their web site.
You’ll be prompted to pick a Snowflake version. The “Commonplace” version is good for studying as a result of it offers you entry to the core options on the lowest credit score price.
You’ll even be requested to decide on a cloud supplier (like AWS, GCP, or Azure). This doesn’t require any cloud account or prior information — Snowflake runs on prime of those platforms, and this step merely determines the place your knowledge and compute might be hosted behind the scenes.
For studying functions, any supplier is ok. You’ll be able to safely go along with AWS or decide whichever one you’re most acquainted with in addition to the default “Area”. You received’t have to work together with the cloud supplier in any respect.
Snowflake’s free trial features a set of credit you need to use to discover the platform and run queries over a 30-day interval. No cost methodology is required.
📝 Word: If you happen to simply signed up for a Snowflake account, you might even see a pop-up providing that will help you load knowledge. You’ll be able to shut it for now as a result of we’ll stroll by means of that course of step-by-step. We’re skipping the Quickstart on this tutorial so you will get hands-on with every a part of the method. That means, you’ll perceive not simply what to do, however how Snowflake works behind the scenes.
When you’ve accomplished signup and logged in and dismissed any quickstart pop-ups you see, you’ll land in Snowsight, Snowflake’s web-based interface. That is the place you’ll spend most of your time.
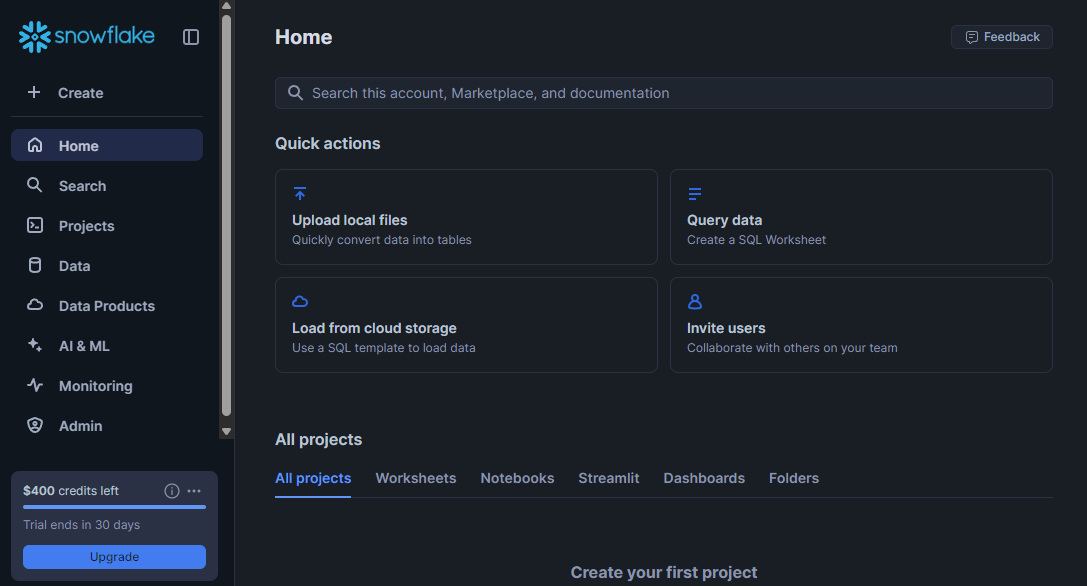
Begin by finding the navigation panel on the left. You need to see tabs for Initiatives, Knowledge, Monitoring, Admin, and extra. You need not discover every thing instantly, however these are the principle instruments you will use.
Let’s begin with the part that does the heavy lifting: the digital warehouse.
Understanding digital warehouses
In Snowflake, your knowledge is saved in centralized cloud storage. It stays there, no matter how or once you question it.
To entry and course of that knowledge, Snowflake makes use of one thing referred to as a digital warehouse. A warehouse isn’t a bodily constructing, however as a substitute is a short lived engine made up of compute assets that powers your SQL queries.
Each time you run a question, Snowflake makes use of a warehouse to course of it. As a result of your knowledge is saved individually, you’ll be able to create a number of warehouses that every one entry the identical knowledge for various groups, initiatives, or use instances. Every warehouse runs independently, so groups can work in parallel with out slowing one another down.
This separation of compute (warehouses) and storage (your knowledge) is what makes Snowflake versatile, scalable, and cost-effective.
Making a warehouse
You’ll be able to create a warehouse from the Admin > Warehouses tab.
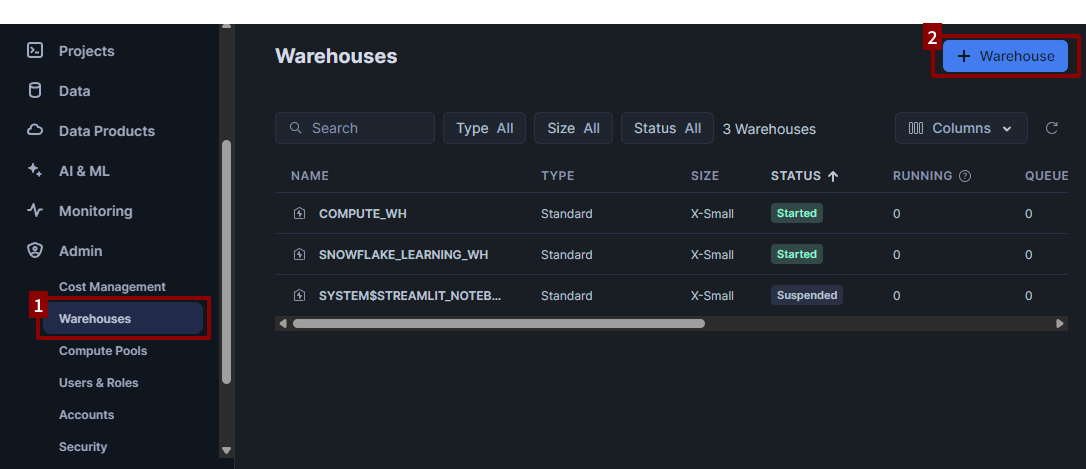
- Click on + Warehouse within the higher right-hand nook.
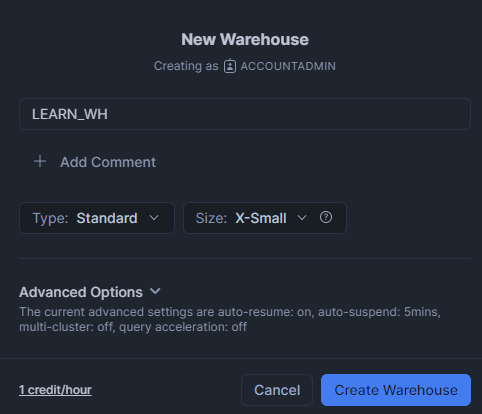
- Give it a reputation like
LEARN_WH. -
Select a dimension. For observe, the smallest dimension (X-Small) is ok.
Snowflake fees compute credit per second whereas a warehouse is lively. The excellent news? You’ll be able to pause your warehouse once you’re not utilizing it, and you must, to keep away from pointless credit score utilization.
As soon as your warehouse is created, you can begin or cease it at any time.
By default, Snowflake may even robotically droop your warehouse after a couple of minutes of inactivity. You’ll be able to examine this setting within the Superior Choices when creating or enhancing your warehouse.
This auto-suspend function helps you keep away from by accident leaving a warehouse operating, which is very helpful once you’re experimenting or studying. We advocate conserving this selection enabled.
Making a database
Earlier than you’ll be able to load or question knowledge in Snowflake, you will want a database to carry your work.
In Snowflake, a database is basically a container, just like a folder, that shops your tables and different objects. It helps hold issues organized and separate from different initiatives or datasets.
To create your first database:
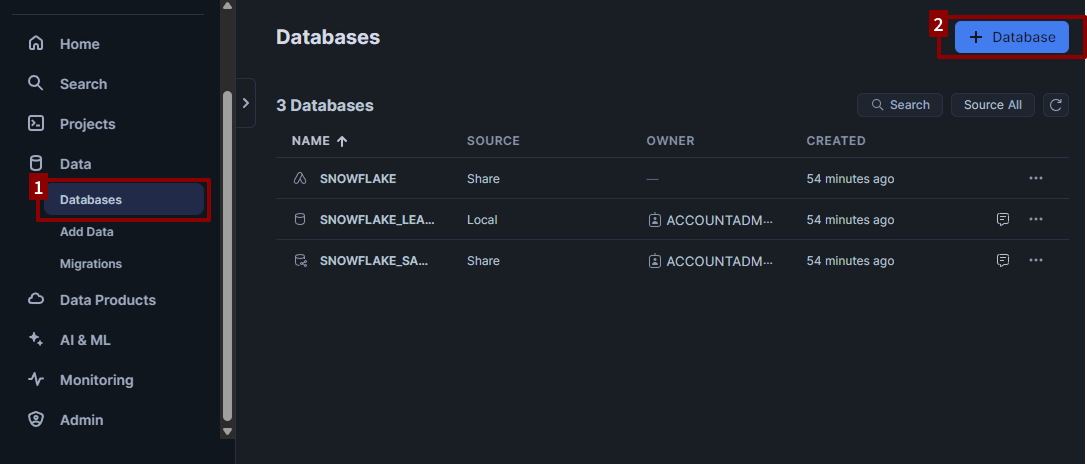
- Go to the Knowledge > Databases tab within the left-hand sidebar.
- Click on + Database.
- Identify your database one thing associated to the dataset. For this tutorial, we’ll use the identify
BOOKSTORE. - Click on Create.
That’s it — you have created a database. For now, we’ll hold issues easy and work on this database.
Making a desk and loading knowledge
Now that you’ve got a database, let’s create a easy desk so you can begin writing SQL queries.
There are two methods to create a desk in Snowflake: you’ll be able to write a CREATE TABLE assertion manually, or you need to use the interface to add a CSV file and have Snowflake create the desk for you robotically.
On this tutorial, we’ll use the CSV add methodology. It’s the quickest solution to get began, and it helps you discover ways to work with exterior knowledge.
First, obtain the pattern CSV file right here.
We’ll use this dataset of on-line bookstore gross sales to observe loading and querying knowledge in Snowflake.
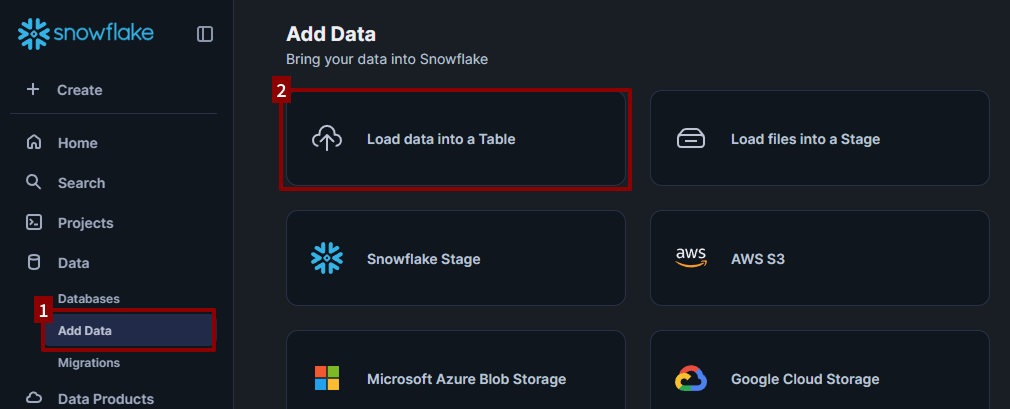
Go to Knowledge > Add Knowledge and select Load knowledge right into a Desk.
Earlier than importing, take a fast have a look at the top-right nook of the interface. You need to see a dropdown for the Warehouse.
Although you created a warehouse earlier (e.g., LEARN_WH), Snowflake should default to 1 referred to as COMPUTE_WH. That’s a pre-created warehouse that comes with new accounts.
For this tutorial, change the dropdown to LEARN_WH (or no matter identify you gave your warehouse) so that you’re utilizing the compute assets you arrange your self. It’s not strictly required for this step, but it surely’s an excellent behavior to construct.
Now you’re able to load the file:
- Drag and drop
bookstore.csvinto the Load Knowledge into Desk pane. - Choose
BOOKSTOREas your database. The schema ought to robotically choosePUBLIC. -
Identify your desk one thing like
books.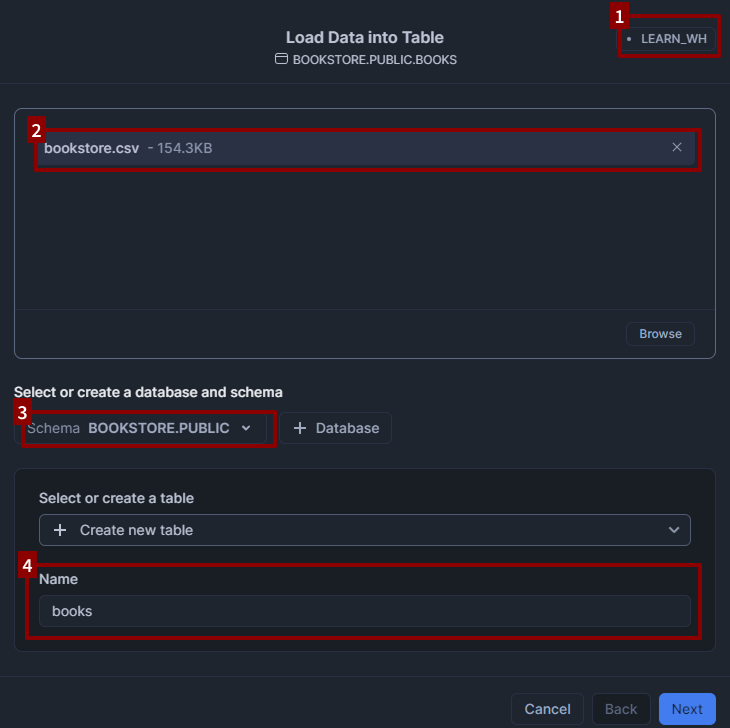
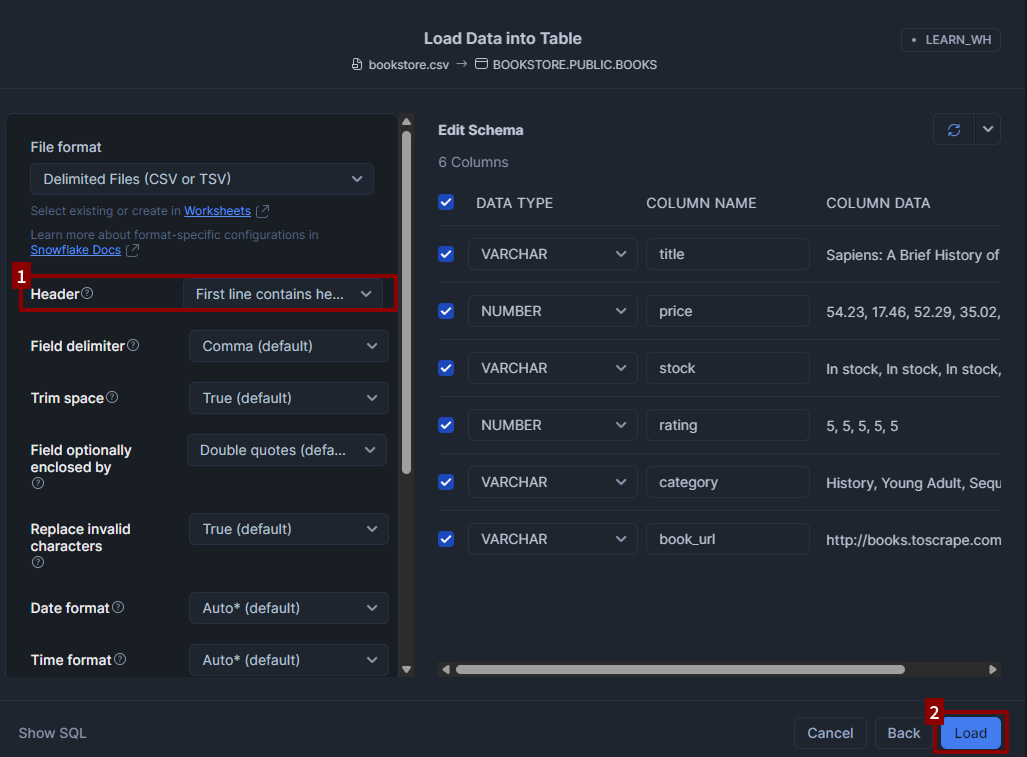
When you click on Subsequent, you’ll see choices that will help you efficiently load the CSV contents into Snowflake.
- Within the File format panel underneath “View Choices”, specify Header > First line comprises header.
-
Click on Load.
After loading the info, you might even see a pop-up with the choice to Question Knowledge. Skip this for now and click on Executed.
Creating and utilizing a worksheet
Together with your knowledge loaded, you’re prepared to begin exploring it with SQL queries.
The place the place you do that in Snowflake is known as a worksheet. A worksheet is sort of a scratchpad the place you’ll be able to write, run, and save your SQL code.
To create a brand new worksheet:
- Go to the Initiatives >Worksheets tab within the left-hand sidebar.
- Click on + Worksheet to create a brand new SQL worksheet.
By default, your new worksheet may have a generic identify like Worksheet 1 or the present date/time. It’s an excellent behavior to rename your worksheets so you’ll be able to simply discover them later.
To rename it:
- Double-click the worksheet identify on the prime.
-
Enter a brand new identify, corresponding to
Bookstore Queries.
Earlier than you begin writing SQL, double-check your context selectors within the toolbar:
- Warehouse: the compute useful resource operating your queries (e.g.,
LEARN_WH) - Database: the place your knowledge is saved (e.g.,
BOOKSTORE) - Schema: a sub-container inside your database (probably
PUBLIC)

These inform Snowflake the place to search for your knowledge and which compute assets to make use of. You’ll be able to change them utilizing the dropdown menus on the prime of the worksheet. In case your context selectors aren’t set appropriately, your queries could return an error or no outcomes, so it’s an excellent behavior to all the time double-check them earlier than operating queries.
Writing and operating queries
Now that you’ve got a worksheet open, it’s time to make use of it to discover your knowledge.
Snowflake makes use of a SQL dialect that’s principally ANSI-compliant, which suggests the core syntax is similar to what you’d discover in different databases. If you happen to’ve used SQL in PostgreSQL, MySQL, or SQLite, most of your queries will work the identical means right here.
In a while, you could discover some Snowflake-specific features and behaviors, however for now, every thing you want follows normal SQL.
To run a question:
- Click on anyplace contained in the question you need to run.
- Both click on the Run button (the ▶️ icon), or use the keyboard shortcut:
- Mac:
Cmd + Enter - Home windows/Linux:
Ctrl + Enter
- Mac:
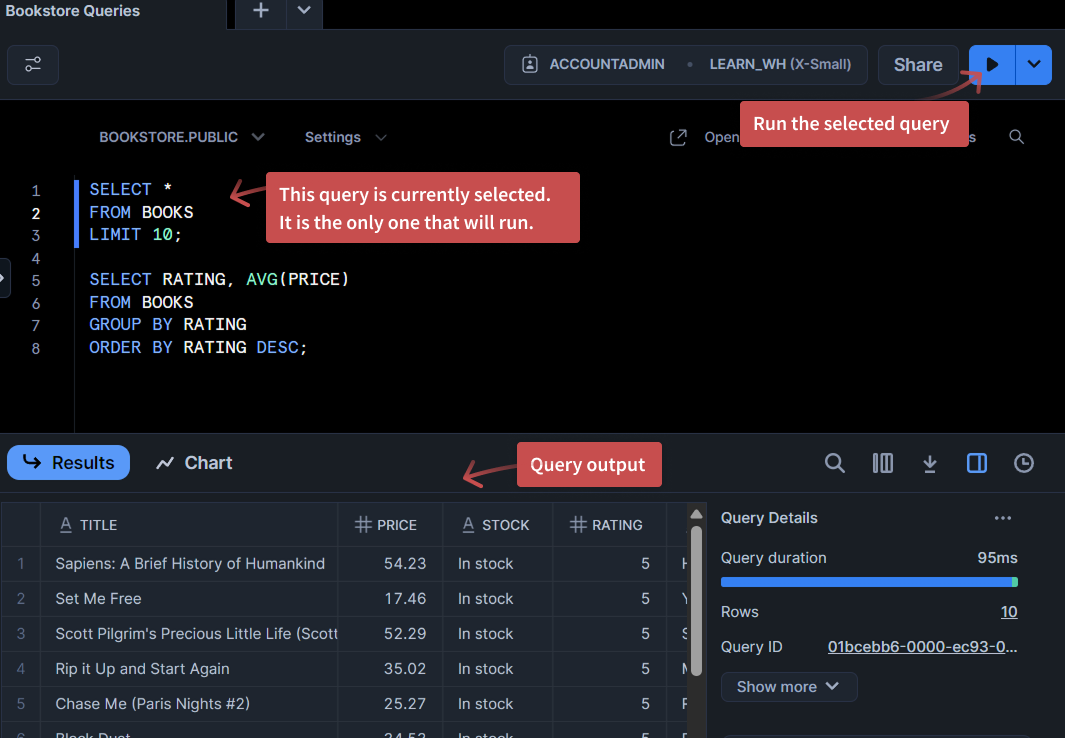
Solely the at the moment chosen question will run, even in case you have a number of queries within the worksheet. If you wish to run a number of queries directly, you’ll be able to spotlight all of them and click on Run.
Once you run a question, Snowflake shows the leads to a panel on the backside of the worksheet.
This panel all the time exhibits the outcomes of your most just lately run question. If you happen to run one other question, the panel will replace to point out the brand new outcomes.
You received’t see the output of older queries within the worksheet until you run them once more.
Within the subsequent part, you’ll discover ways to view your full question historical past, together with previous outcomes, utilizing the Historical past tab.
Instance queries
Let’s observe with a couple of easy queries in your BOOKS desk.
-- preview the books desk
SELECT *
FROM BOOKS
LIMIT 10;
-- common value by score
SELECT RATING, AVG(PRICE)
FROM BOOKS
GROUP BY RATING
ORDER BY RATING DESC;
These examples ought to provide you with an excellent begin. Attempt writing a couple of extra queries of your individual — you’ll be able to hold including them to your worksheet. For instance:
- Discover books with a value over 50
- Depend the variety of books per writer
- Type books by title
You don’t have to delete older queries; simply click on contained in the one you need to run.
Modifying knowledge
Along with studying knowledge, you may also use SQL to change it. For instance, to replace data or create new tables. You need to use statements like:
CREATE OR REPLACE TABLEUPDATEDELETEINSERT INTO
Simply bear in mind: modifying knowledge consumes compute assets (credit), identical to querying. Use small datasets whereas studying to maintain prices low.
Viewing your question historical past
By now, you have run a number of queries in your worksheet. You’ll have observed that Snowflake solely exhibits the outcomes of your final run question within the outcomes panel.
However what if you wish to see queries you ran earlier? Or examine how lengthy they took to run?
That’s the place the Question Historical past tab is available in.
Yow will discover it within the left-hand sidebar: simply click on Monitoring > Question Historical past.
This tab exhibits a listing of all of the queries you’ve run just lately throughout all worksheets in your present Snowflake account.
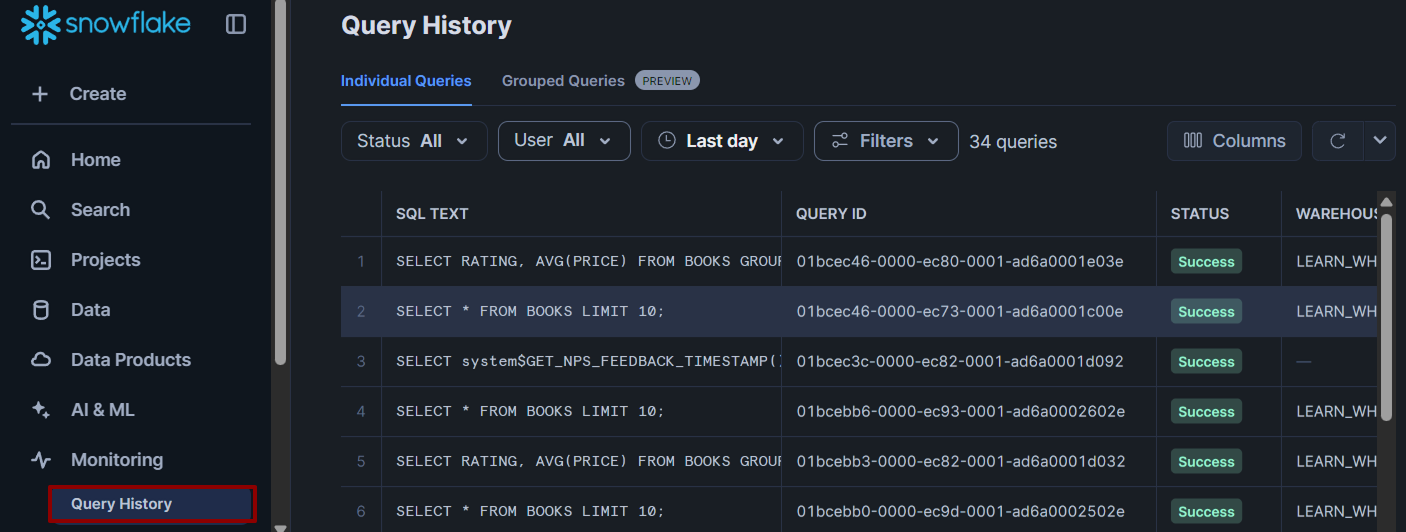
For every question, you’ll be able to see:
- The SQL textual content you ran
- The time it ran and the way lengthy it took
- The warehouse that processed it
- The standing (profitable, failed, and so forth.)
You’ll be able to click on on any question within the Historical past tab to view the precise SQL you ran, together with a preview of its outcomes.
Why is this beneficial?
- If you happen to by accident shut a worksheet or lose your house, you’ll be able to nonetheless discover your previous queries right here.
- If you wish to copy an earlier question and tweak it, that is the quickest solution to discover it.
The Historical past tab solely exhibits your individual queries (not these of different customers), and it shops a restricted historical past. For long-term saving, it’s nonetheless a good suggestion to call and save vital worksheets.
Understanding Snowflake credit and prices
Now that you simply’ve seen how you can view your question historical past, let’s take a more in-depth have a look at how Snowflake’s pricing works and how you can handle your credit score utilization as you run queries.
Snowflake’s pricing mannequin relies on utilization. You pay individually for:
- Storage: priced per terabyte per thirty days. In most studying instances, this price is negligible.
- Compute: primarily based on how lengthy your warehouse is lively. A operating warehouse consumes credit by the second.
Once you run queries, you employ compute, which is what triggers credit score consumption.
You’ll be able to’t see credit score utilization for particular person queries within the Historical past tab, however you’ll be able to view total credit score consumption within the Admin tab.
To examine this:
- Go to Admin → Value Administration.
- The Value Administration view shows the variety of credit your warehouses have consumed over time, damaged down by day and warehouse.
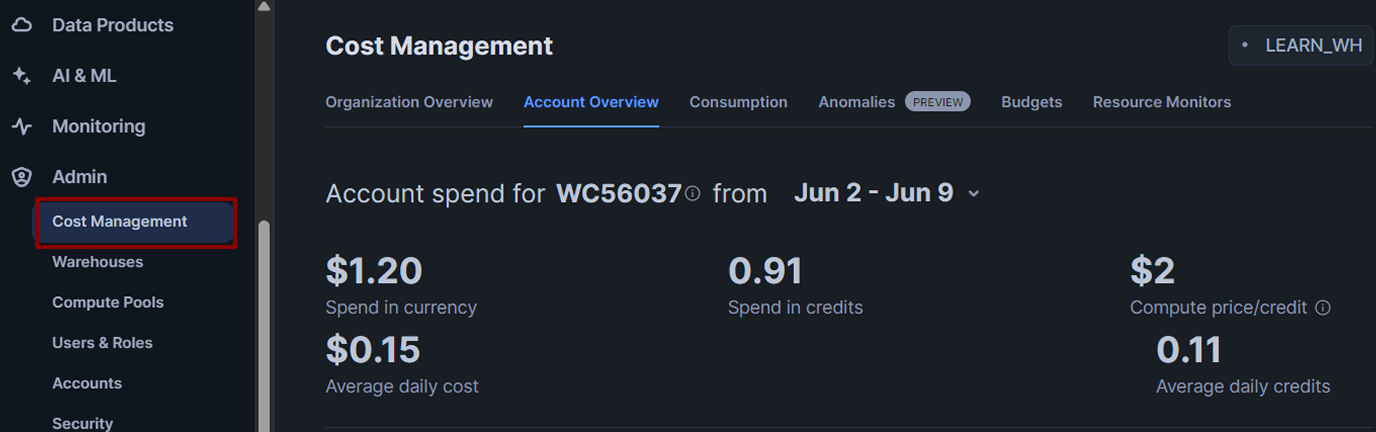
Monitor this in your trial account to benefit from your free credit. It’s an excellent behavior to examine this tab often so that you perceive the place your credit are going.
A number of suggestions for conserving prices low whereas studying:
- Pause your warehouse when it is not in use. You solely pay for compute whereas your warehouse is operating.
- Use a small warehouse dimension (corresponding to X-Small) until you require extra energy.
- Keep away from rerunning queries unnecessarily. Snowflake fees for every execution, even when the info hasn’t modified.
Studying to observe your credit score utilization now will provide help to use Snowflake extra effectively in actual initiatives.
Subsequent steps
You’ve achieved quite a bit already. You’ve got:
- Uploaded knowledge from a file
- Created and configured a warehouse
- Written and run SQL queries in Snowflake
- Explored Snowflake’s pricing and utilization mannequin
With these abilities, you now have the inspiration to make use of Snowflake in real-world knowledge workflows — from loading and querying knowledge to monitoring compute utilization. You additionally perceive what makes Snowflake totally different from conventional databases and why it’s a helpful software for contemporary knowledge engineering.
Now that you simply’re arrange, one of the simplest ways to continue learning is to maintain utilizing it. Attempt loading bigger datasets. Experiment with totally different warehouse sizes. Monitor your credit score utilization as you go.
Once you’re prepared, you’ll be able to discover extra of what Snowflake presents and begin making use of it to actual initiatives:
- Manage your knowledge with schemas to separate totally different initiatives, groups, or knowledge varieties inside the identical account.
- Join a number of knowledge sources by importing new information, utilizing cloud storage integrations (like AWS S3), or querying knowledge from exterior levels.
- Question semi-structured knowledge like JSON, XML, or Parquet — instantly, utilizing SQL — to discover logs, API exports, or cloud-based occasion knowledge.
- Discover public datasets by means of the Snowflake Market, and be a part of them with your individual knowledge for richer insights.
- Construct a easy reporting pipeline: clear your knowledge utilizing SQL, summarize it into new tables, and visualize it in a BI software like Energy BI or Tableau.
- Handle entry with roles to regulate who can question, modify, or administer particular databases or warehouses.
Every of those is a step towards constructing the form of sensible, portfolio-ready expertise that employers search for.
And when that job description says “Snowflake expertise most well-liked,” you will know what they imply and be prepared to point out it.
Snowflake is likely one of the most in-demand instruments for contemporary knowledge engineers.
Many firms use it as a part of their analytics pipelines and cloud knowledge platforms, and it is ceaselessly listed as a required or most well-liked talent in knowledge engineering roles.
However what precisely is Snowflake? How does it work? And the way do you truly use it each day?
On this tutorial, you’ll get hands-on expertise with Snowflake. You’ll discover ways to navigate the interface, load knowledge, run queries, and monitor credit score utilization, supplying you with the boldness to begin utilizing Snowflake in real-world initiatives.
So what is Snowflake?
Snowflake is a cloud-based knowledge warehouse platform and scalable SQL interface. It handles all of the infrastructure for you — together with scaling up (or down) when wanted, storing your knowledge, and processing your queries.
You don’t want to fret about configuring servers or managing efficiency. You simply load your knowledge and begin querying.
Who makes use of Snowflake, and why?
Firms like Capital One, HelloFresh, Penske, and Nissan use Snowflake to energy their analytics and knowledge operations. It’s particularly in style with knowledge engineering and analytics groups as a result of it solves widespread issues: lengthy question instances, scattered or siloed knowledge, and complex infrastructure that’s troublesome to scale.
With Snowflake, groups can mix knowledge from varied enterprise departments, corresponding to gross sales, finance, advertising, and help, and analyze it multi functional place. They will additionally share stay datasets between departments or with exterior companions, while not having to duplicate or export any knowledge. And since Snowflake scales compute robotically, it could actually deal with every thing from routine dashboard queries to large-scale reporting throughout peak enterprise hours.
Analysts use it to discover and visualize knowledge in instruments like Energy BI or Tableau. Engineers use it to construct pipelines that clear and remodel uncooked knowledge. And knowledge scientists can run machine studying workflows instantly in opposition to Snowflake tables, while not having to maneuver knowledge into separate techniques.
Whether or not you’re working with structured tables, semi-structured logs (like JSON), or massive flat information in cloud storage, Snowflake gives a single place to retailer, question, and share knowledge effectively.
What makes Snowflake totally different?
One motive Snowflake is so in style is the way it handles efficiency at scale. In conventional techniques like PostgreSQL, your queries run on the identical machine that shops your knowledge. In Snowflake, these two elements are separated:
- Storage: the place your knowledge lives
- Compute: the assets that course of your queries
This separation means totally different groups can run queries on the identical time with out slowing one another down. It additionally means you’ll be able to scale your compute energy up or down relying in your wants, and pause it fully once you’re not utilizing it to save lots of prices.
Getting began with Snowflake
You’ll be able to join a free trial of Snowflake by means of their web site.
You’ll be prompted to pick a Snowflake version. The “Commonplace” version is good for studying as a result of it offers you entry to the core options on the lowest credit score price.
You’ll even be requested to decide on a cloud supplier (like AWS, GCP, or Azure). This doesn’t require any cloud account or prior information — Snowflake runs on prime of those platforms, and this step merely determines the place your knowledge and compute might be hosted behind the scenes.
For studying functions, any supplier is ok. You’ll be able to safely go along with AWS or decide whichever one you’re most acquainted with in addition to the default “Area”. You received’t have to work together with the cloud supplier in any respect.
Snowflake’s free trial features a set of credit you need to use to discover the platform and run queries over a 30-day interval. No cost methodology is required.
📝 Word: If you happen to simply signed up for a Snowflake account, you might even see a pop-up providing that will help you load knowledge. You’ll be able to shut it for now as a result of we’ll stroll by means of that course of step-by-step. We’re skipping the Quickstart on this tutorial so you will get hands-on with every a part of the method. That means, you’ll perceive not simply what to do, however how Snowflake works behind the scenes.
When you’ve accomplished signup and logged in and dismissed any quickstart pop-ups you see, you’ll land in Snowsight, Snowflake’s web-based interface. That is the place you’ll spend most of your time.
Begin by finding the navigation panel on the left. You need to see tabs for Initiatives, Knowledge, Monitoring, Admin, and extra. You need not discover every thing instantly, however these are the principle instruments you will use.
Let’s begin with the part that does the heavy lifting: the digital warehouse.
Understanding digital warehouses
In Snowflake, your knowledge is saved in centralized cloud storage. It stays there, no matter how or once you question it.
To entry and course of that knowledge, Snowflake makes use of one thing referred to as a digital warehouse. A warehouse isn’t a bodily constructing, however as a substitute is a short lived engine made up of compute assets that powers your SQL queries.
Each time you run a question, Snowflake makes use of a warehouse to course of it. As a result of your knowledge is saved individually, you’ll be able to create a number of warehouses that every one entry the identical knowledge for various groups, initiatives, or use instances. Every warehouse runs independently, so groups can work in parallel with out slowing one another down.
This separation of compute (warehouses) and storage (your knowledge) is what makes Snowflake versatile, scalable, and cost-effective.
Making a warehouse
You’ll be able to create a warehouse from the Admin > Warehouses tab.
- Click on + Warehouse within the higher right-hand nook.
- Give it a reputation like
LEARN_WH. -
Select a dimension. For observe, the smallest dimension (X-Small) is ok.
Snowflake fees compute credit per second whereas a warehouse is lively. The excellent news? You’ll be able to pause your warehouse once you’re not utilizing it, and you must, to keep away from pointless credit score utilization.
As soon as your warehouse is created, you can begin or cease it at any time.
By default, Snowflake may even robotically droop your warehouse after a couple of minutes of inactivity. You’ll be able to examine this setting within the Superior Choices when creating or enhancing your warehouse.
This auto-suspend function helps you keep away from by accident leaving a warehouse operating, which is very helpful once you’re experimenting or studying. We advocate conserving this selection enabled.
Making a database
Earlier than you’ll be able to load or question knowledge in Snowflake, you will want a database to carry your work.
In Snowflake, a database is basically a container, just like a folder, that shops your tables and different objects. It helps hold issues organized and separate from different initiatives or datasets.
To create your first database:
- Go to the Knowledge > Databases tab within the left-hand sidebar.
- Click on + Database.
- Identify your database one thing associated to the dataset. For this tutorial, we’ll use the identify
BOOKSTORE. - Click on Create.
That’s it — you have created a database. For now, we’ll hold issues easy and work on this database.
Making a desk and loading knowledge
Now that you’ve got a database, let’s create a easy desk so you can begin writing SQL queries.
There are two methods to create a desk in Snowflake: you’ll be able to write a CREATE TABLE assertion manually, or you need to use the interface to add a CSV file and have Snowflake create the desk for you robotically.
On this tutorial, we’ll use the CSV add methodology. It’s the quickest solution to get began, and it helps you discover ways to work with exterior knowledge.
First, obtain the pattern CSV file right here.
We’ll use this dataset of on-line bookstore gross sales to observe loading and querying knowledge in Snowflake.
Go to Knowledge > Add Knowledge and select Load knowledge right into a Desk.
Earlier than importing, take a fast have a look at the top-right nook of the interface. You need to see a dropdown for the Warehouse.
Although you created a warehouse earlier (e.g., LEARN_WH), Snowflake should default to 1 referred to as COMPUTE_WH. That’s a pre-created warehouse that comes with new accounts.
For this tutorial, change the dropdown to LEARN_WH (or no matter identify you gave your warehouse) so that you’re utilizing the compute assets you arrange your self. It’s not strictly required for this step, but it surely’s an excellent behavior to construct.
Now you’re able to load the file:
- Drag and drop
bookstore.csvinto the Load Knowledge into Desk pane. - Choose
BOOKSTOREas your database. The schema ought to robotically choosePUBLIC. -
Identify your desk one thing like
books.
When you click on Subsequent, you’ll see choices that will help you efficiently load the CSV contents into Snowflake.
- Within the File format panel underneath “View Choices”, specify Header > First line comprises header.
-
Click on Load.
After loading the info, you might even see a pop-up with the choice to Question Knowledge. Skip this for now and click on Executed.
Creating and utilizing a worksheet
Together with your knowledge loaded, you’re prepared to begin exploring it with SQL queries.
The place the place you do that in Snowflake is known as a worksheet. A worksheet is sort of a scratchpad the place you’ll be able to write, run, and save your SQL code.
To create a brand new worksheet:
- Go to the Initiatives >Worksheets tab within the left-hand sidebar.
- Click on + Worksheet to create a brand new SQL worksheet.
By default, your new worksheet may have a generic identify like Worksheet 1 or the present date/time. It’s an excellent behavior to rename your worksheets so you’ll be able to simply discover them later.
To rename it:
- Double-click the worksheet identify on the prime.
-
Enter a brand new identify, corresponding to
Bookstore Queries.
Earlier than you begin writing SQL, double-check your context selectors within the toolbar:
- Warehouse: the compute useful resource operating your queries (e.g.,
LEARN_WH) - Database: the place your knowledge is saved (e.g.,
BOOKSTORE) - Schema: a sub-container inside your database (probably
PUBLIC)
These inform Snowflake the place to search for your knowledge and which compute assets to make use of. You’ll be able to change them utilizing the dropdown menus on the prime of the worksheet. In case your context selectors aren’t set appropriately, your queries could return an error or no outcomes, so it’s an excellent behavior to all the time double-check them earlier than operating queries.
Writing and operating queries
Now that you’ve got a worksheet open, it’s time to make use of it to discover your knowledge.
Snowflake makes use of a SQL dialect that’s principally ANSI-compliant, which suggests the core syntax is similar to what you’d discover in different databases. If you happen to’ve used SQL in PostgreSQL, MySQL, or SQLite, most of your queries will work the identical means right here.
In a while, you could discover some Snowflake-specific features and behaviors, however for now, every thing you want follows normal SQL.
To run a question:
- Click on anyplace contained in the question you need to run.
- Both click on the Run button (the ▶️ icon), or use the keyboard shortcut:
- Mac:
Cmd + Enter - Home windows/Linux:
Ctrl + Enter
- Mac:
Solely the at the moment chosen question will run, even in case you have a number of queries within the worksheet. If you wish to run a number of queries directly, you’ll be able to spotlight all of them and click on Run.
Once you run a question, Snowflake shows the leads to a panel on the backside of the worksheet.
This panel all the time exhibits the outcomes of your most just lately run question. If you happen to run one other question, the panel will replace to point out the brand new outcomes.
You received’t see the output of older queries within the worksheet until you run them once more.
Within the subsequent part, you’ll discover ways to view your full question historical past, together with previous outcomes, utilizing the Historical past tab.
Instance queries
Let’s observe with a couple of easy queries in your BOOKS desk.
-- preview the books desk
SELECT *
FROM BOOKS
LIMIT 10;
-- common value by score
SELECT RATING, AVG(PRICE)
FROM BOOKS
GROUP BY RATING
ORDER BY RATING DESC;
These examples ought to provide you with an excellent begin. Attempt writing a couple of extra queries of your individual — you’ll be able to hold including them to your worksheet. For instance:
- Discover books with a value over 50
- Depend the variety of books per writer
- Type books by title
You don’t have to delete older queries; simply click on contained in the one you need to run.
Modifying knowledge
Along with studying knowledge, you may also use SQL to change it. For instance, to replace data or create new tables. You need to use statements like:
CREATE OR REPLACE TABLEUPDATEDELETEINSERT INTO
Simply bear in mind: modifying knowledge consumes compute assets (credit), identical to querying. Use small datasets whereas studying to maintain prices low.
Viewing your question historical past
By now, you have run a number of queries in your worksheet. You’ll have observed that Snowflake solely exhibits the outcomes of your final run question within the outcomes panel.
However what if you wish to see queries you ran earlier? Or examine how lengthy they took to run?
That’s the place the Question Historical past tab is available in.
Yow will discover it within the left-hand sidebar: simply click on Monitoring > Question Historical past.
This tab exhibits a listing of all of the queries you’ve run just lately throughout all worksheets in your present Snowflake account.
For every question, you’ll be able to see:
- The SQL textual content you ran
- The time it ran and the way lengthy it took
- The warehouse that processed it
- The standing (profitable, failed, and so forth.)
You’ll be able to click on on any question within the Historical past tab to view the precise SQL you ran, together with a preview of its outcomes.
Why is this beneficial?
- If you happen to by accident shut a worksheet or lose your house, you’ll be able to nonetheless discover your previous queries right here.
- If you wish to copy an earlier question and tweak it, that is the quickest solution to discover it.
The Historical past tab solely exhibits your individual queries (not these of different customers), and it shops a restricted historical past. For long-term saving, it’s nonetheless a good suggestion to call and save vital worksheets.
Understanding Snowflake credit and prices
Now that you simply’ve seen how you can view your question historical past, let’s take a more in-depth have a look at how Snowflake’s pricing works and how you can handle your credit score utilization as you run queries.
Snowflake’s pricing mannequin relies on utilization. You pay individually for:
- Storage: priced per terabyte per thirty days. In most studying instances, this price is negligible.
- Compute: primarily based on how lengthy your warehouse is lively. A operating warehouse consumes credit by the second.
Once you run queries, you employ compute, which is what triggers credit score consumption.
You’ll be able to’t see credit score utilization for particular person queries within the Historical past tab, however you’ll be able to view total credit score consumption within the Admin tab.
To examine this:
- Go to Admin → Value Administration.
- The Value Administration view shows the variety of credit your warehouses have consumed over time, damaged down by day and warehouse.
Monitor this in your trial account to benefit from your free credit. It’s an excellent behavior to examine this tab often so that you perceive the place your credit are going.
A number of suggestions for conserving prices low whereas studying:
- Pause your warehouse when it is not in use. You solely pay for compute whereas your warehouse is operating.
- Use a small warehouse dimension (corresponding to X-Small) until you require extra energy.
- Keep away from rerunning queries unnecessarily. Snowflake fees for every execution, even when the info hasn’t modified.
Studying to observe your credit score utilization now will provide help to use Snowflake extra effectively in actual initiatives.
Subsequent steps
You’ve achieved quite a bit already. You’ve got:
- Uploaded knowledge from a file
- Created and configured a warehouse
- Written and run SQL queries in Snowflake
- Explored Snowflake’s pricing and utilization mannequin
With these abilities, you now have the inspiration to make use of Snowflake in real-world knowledge workflows — from loading and querying knowledge to monitoring compute utilization. You additionally perceive what makes Snowflake totally different from conventional databases and why it’s a helpful software for contemporary knowledge engineering.
Now that you simply’re arrange, one of the simplest ways to continue learning is to maintain utilizing it. Attempt loading bigger datasets. Experiment with totally different warehouse sizes. Monitor your credit score utilization as you go.
Once you’re prepared, you’ll be able to discover extra of what Snowflake presents and begin making use of it to actual initiatives:
- Manage your knowledge with schemas to separate totally different initiatives, groups, or knowledge varieties inside the identical account.
- Join a number of knowledge sources by importing new information, utilizing cloud storage integrations (like AWS S3), or querying knowledge from exterior levels.
- Question semi-structured knowledge like JSON, XML, or Parquet — instantly, utilizing SQL — to discover logs, API exports, or cloud-based occasion knowledge.
- Discover public datasets by means of the Snowflake Market, and be a part of them with your individual knowledge for richer insights.
- Construct a easy reporting pipeline: clear your knowledge utilizing SQL, summarize it into new tables, and visualize it in a BI software like Energy BI or Tableau.
- Handle entry with roles to regulate who can question, modify, or administer particular databases or warehouses.
Every of those is a step towards constructing the form of sensible, portfolio-ready expertise that employers search for.
And when that job description says “Snowflake expertise most well-liked,” you will know what they imply and be prepared to point out it.


