
AcmeCorp makes use of a Home windows Server for Distant Desktop entry to their community. Whereas this isn’t thought-about a finest follow, it is important to their enterprise and must be open from the Web.
Utilizing the Malware Server, situated on the web, a hacker performs a random port scan and discovers port TCP/3389 is open on the IP deal with 100.65.0.10 (FGT-EDGE exterior IP).
With out a legitimate set of credentials to the server, they may attempt to brute drive an assault to achieve entry.
For this goal, we are going to work on the foundation FortiGate (FGT-EDGE).
To entry the FGT-EDGE, return to the Lab’s most important web page (Lab Exercise Tab) click on FGT-EDGE from the sidebar menu after which use the HTTPS possibility.
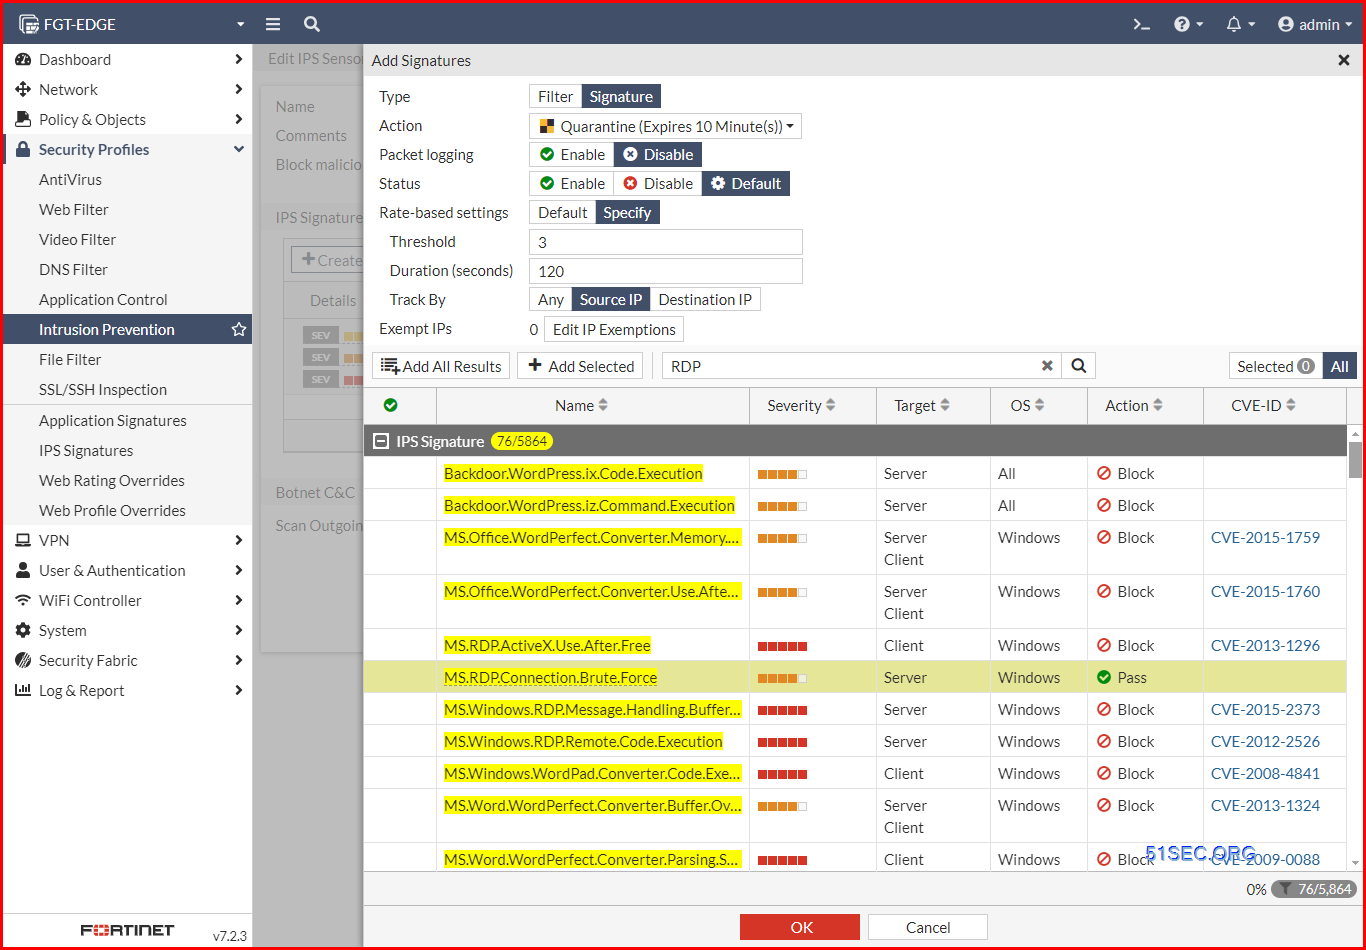
Utilizing the Safety Profiles > Intrusion Prevention part, you will have to allow and customise a rate-based IPS signature to dam a Microsoft RDP brute drive assault and quarantine the attacker’s IP deal with.
To efficiently full this goal, you will have to edit the IPS sensor profile named ‘default’ and allow the proper rate-based IPS signature.
The signature ought to provoke a block of the attacker’s Supply IP deal with for 10 minutes after a number of RDP brute drive requests are launched at a fee of 3 occasions in 120 seconds by the attacker.
2. Apply IPS Sensor to Firewall Coverage
3. Execute RDP Brute Drive Assault
4. Confirm Outcomes
You can even test the logs from Log & Report > Safety Occasions > Intrusion Prevention.
Many of the FortiGate NGFW UTM options (AV, internet filtering, e mail filtering, and so on.) can work in both Stream mode or Proxy mode. FortiOS default inspection mode is Stream based mostly.
To efficiently full this goal, you will have to use Proxy-based inspection to web visitors outbound through the Web coverage, and inbound through the Mail_Server coverage.
1 Configure CDR Anti-Virus
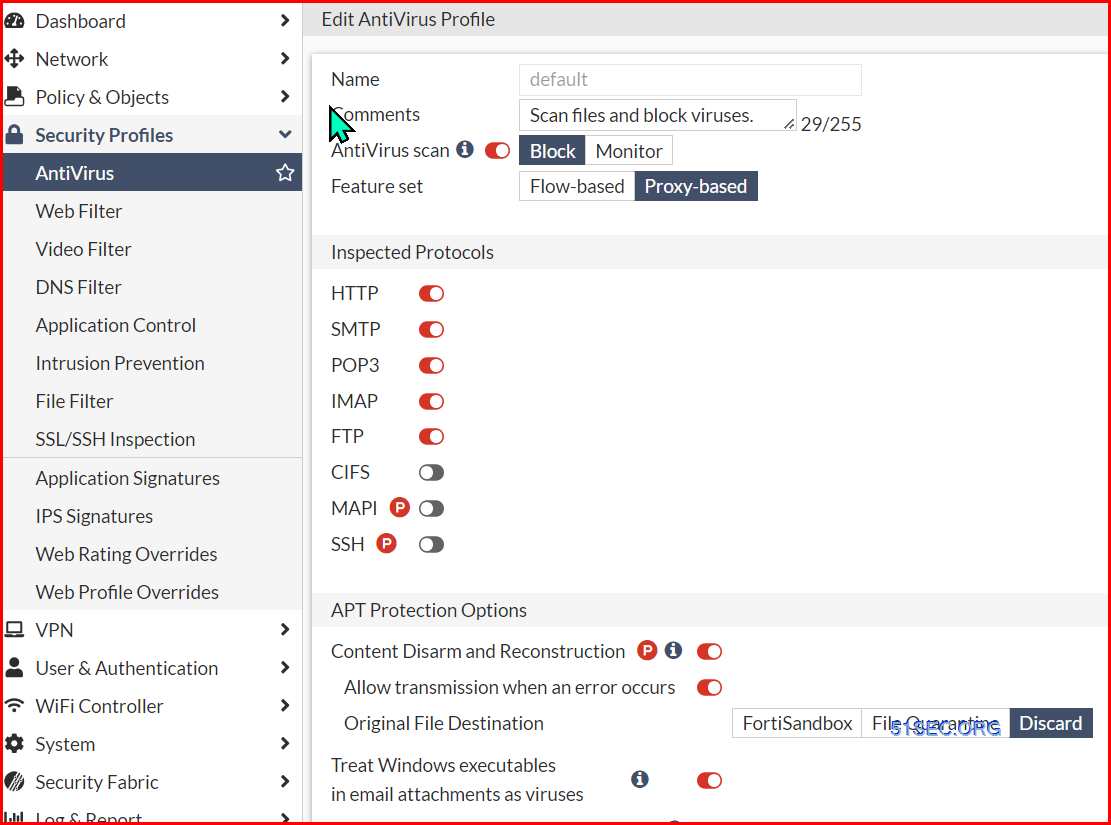
Superior threats are continually evolving to search out methods round conventional signature-based and reputation-based safety prevention measures. The Fortinet Content material Disarm & Reconstruction (CDR) service processes all incoming information, disassembles them, and strips all energetic content material from the file in real-time to create a flat and sanitized file to supply to the top person. CDR can fortify your zero-day file safety technique by proactively eradicating any attainable malicious content material from information passing by means of the FortiGate.
For this goal, we might be engaged on the FGT-EDGE to allow the Content material Disarm and Reconstruction (CDR) characteristic to sanitize and take away the phishing web site hyperlink within the ‘Registration Directions’ PDF file attachment earlier than Bob receives it by e mail from the attacker.
To finish this goal, you will have to allow Content material Disarm and Reconstruction within the ‘default’ antivirus profile.
2 Apply Anti-virus profile
Utilizing the Coverage & Objects > Firewall Coverage part, apply the configured AntiVirus profile to the suitable firewall coverage.
3 Confirm by sending malicious file in e mail
Confirm the ‘default‘ AntiVirus profile configuration as follows:
- On the FGT-EDGE gadget.
- Click on on the CLI console (>_) image situated on the prime proper.
- Kind the next instructions:
config antivirus profileedit default - As soon as within the ‘default’ AntiVirus profile, attempt to confirm the CDR configuration and reply.
config antivirus profileedit defaultconfig content-disarmpresent full
4 Configure Exterior Connector
Exterior Block Listing (Risk Feed) – File Hashes
Risk feed connectors assist an inventory of file hashes and can be utilized to strengthen the Virus Outbreak Prevention service. This characteristic permits customers to include exterior third-party dynamic Malware hash block lists into their FortiGate AntiVirus scanning by specifying a URI to an exterior server.
Purpose
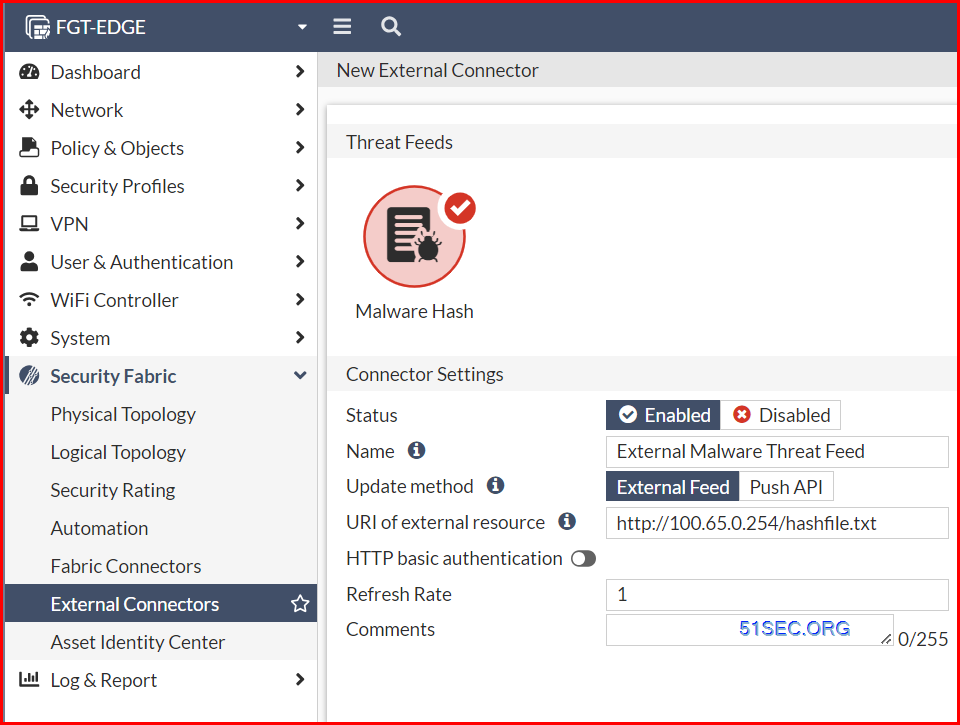
For this goal, we might be engaged on the FGT-EDGE. Utilizing the Safety Cloth > Exterior Connectors part, create a Malware Hash Risk Feed to import a malware hash checklist from an exterior server into the FGT-EDGE AntiVirus signature database.
Success
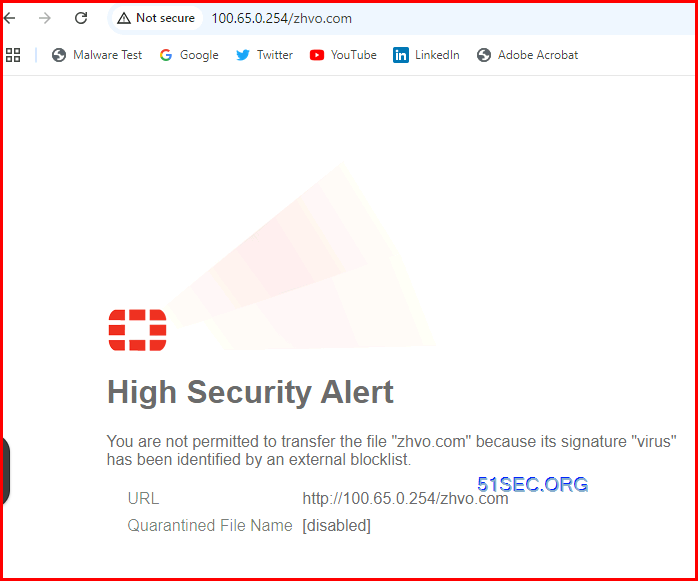
To finish this goal, you will have to create a brand new Malware Hash Risk Feed to import an inventory of malware hashes from ‘hashfile.txt’ which resides on an exterior internet server (HTTP) with IP deal with 100.65.0.254.
This internet server doesn’t require HTTP primary authentication and any modifications made to the exterior checklist, must be imported each 1 minute.
As soon as the Exterior Connector is configured, you will have to make it possible for the connector is in an Up/Inexperienced state by clicking on the refresh icon.
5 Configure ANtiVirus Profile
Utilizing the Safety Profiles > AntiVirus part, allow the Exterior Malware Block Listing and FortiGuard Outbreak Prevention Database.
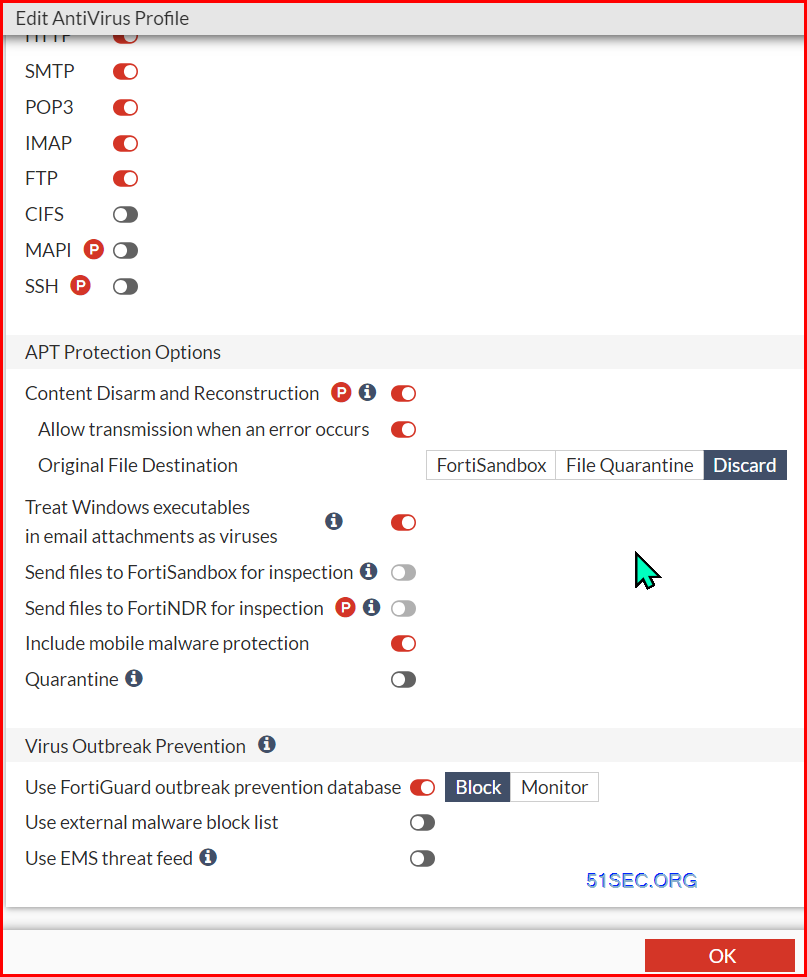
Word: You will want to allow use exterior mailware block checklist.
6 Apply Antivirus Profile
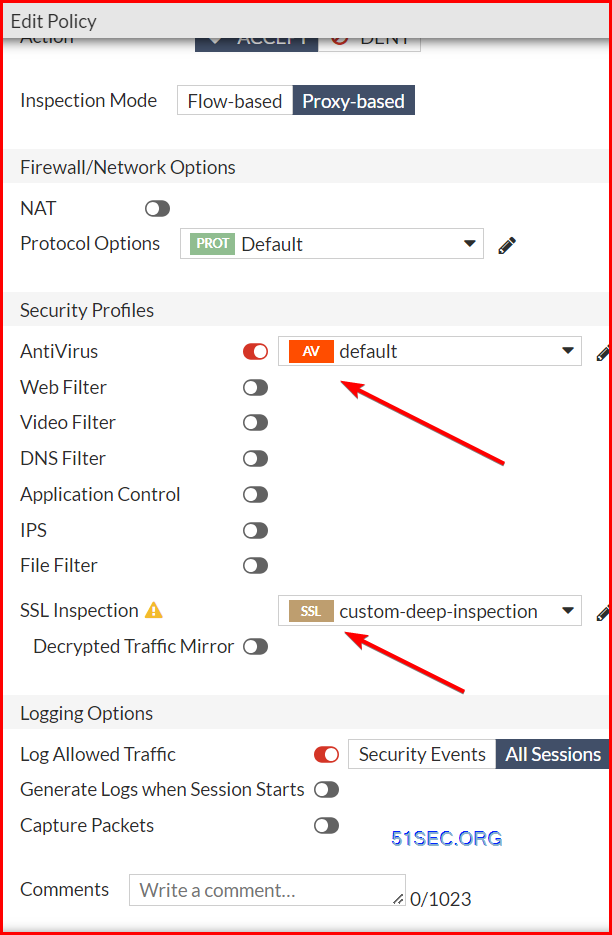
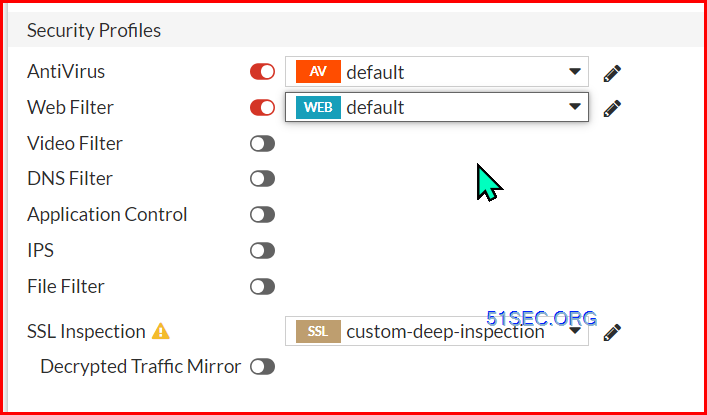
Utilizing the Coverage & Objects > Firewall Coverage part, apply the configured AntiVirus profile to the suitable firewall coverage.
To finish this goal, you could apply the AntiVirus profile ‘default’ and ‘custom-deep-inspection’ SSL inspection profile to the ‘Web’ Firewall Coverage.
7 Obtain Malware Pattern and test the blocking is efficient.
Antomation Stitches
Directors can outline automated workflows, known as an Automation Sew, which use if/then statements to trigger FortiOS to routinely reply to an occasion in a pre-defined vogue.
In short, an admin can create a ‘sew’ defining which ‘actions’ to take when sure occasions are ‘triggered’. As a result of this workflow is a part of the Safety Cloth, automation stitches are configured within the Safety Cloth root FortiGate and replicated to all downstream FortiGate gadgets.
1 Create Automation Sew
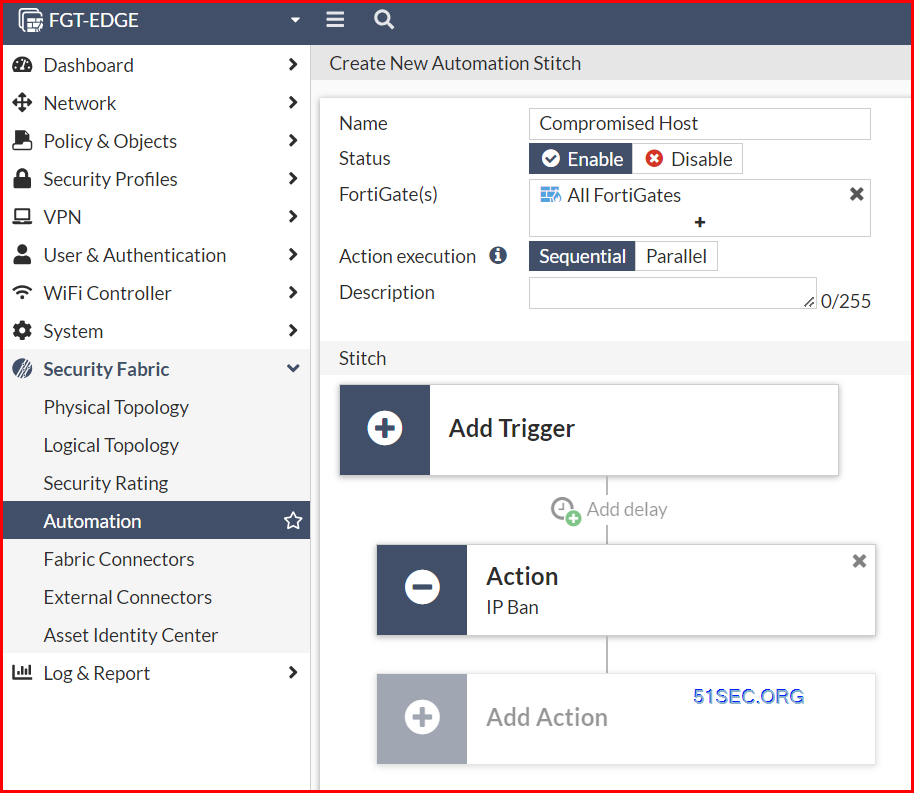
- Go to Safety Cloth > Automation.
- Click on Create New to create a brand new Automation Sew.
- Make the next modifications:
- Identify:
Compromised Host - Standing: Enabled
- FortiGate: All FortiGates
- Click on the Add Set off card.
- Within the slide out menu, click on the Create button within the higher proper nook.
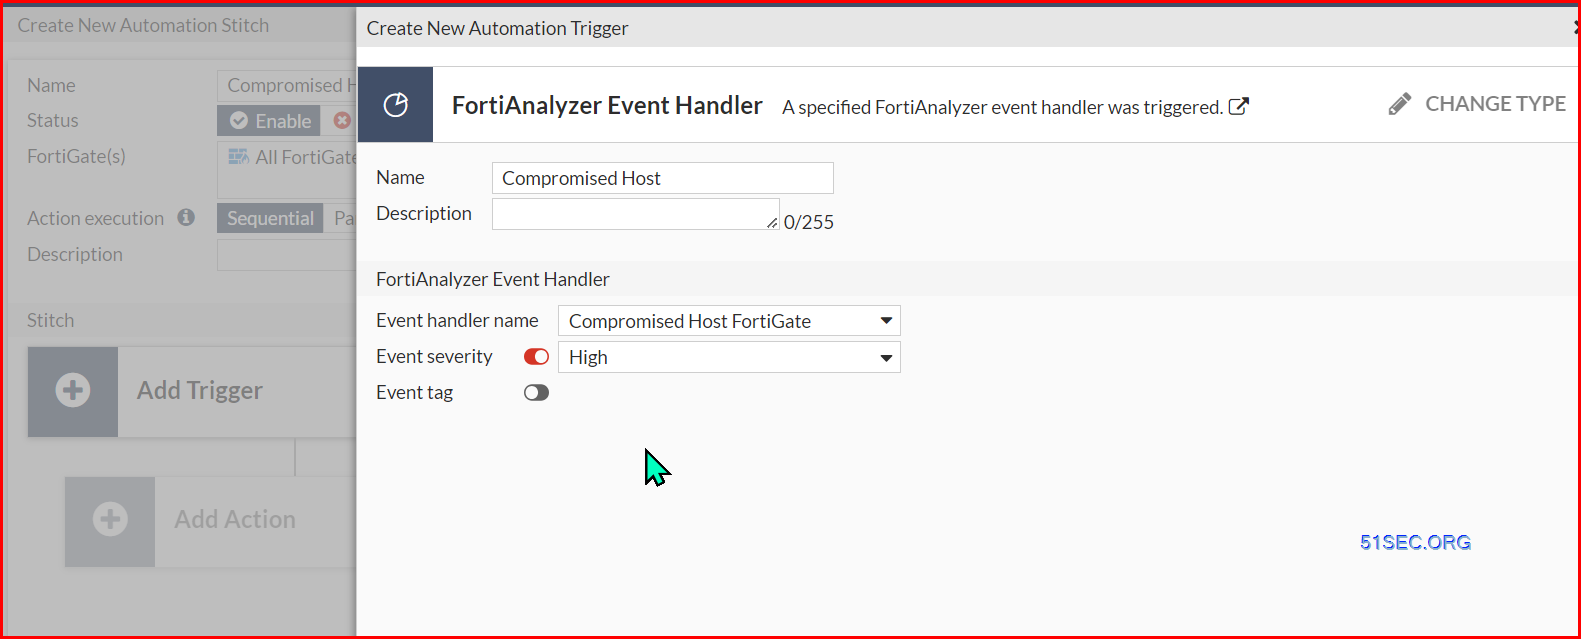
- Click on the FortiAnalyzer Occasion Handler card.
- Make the next modifications and click on OK.
- Identify:
Compromised Host - Occasion handler title: Compromised Host FortiGate
- Occasion severity: Excessive
- Click on “OK”.
- Choose the newly created entry and click on Apply.
- Click on the Add Motion card.
- Within the slide out menu, click on the Create button within the higher proper nook.
- Click on the IP Ban card.
- Make the next modifications and click on OK
- Click on “OK”.
- Choose the newly created entry and click on Apply.
- Click on OK to avoid wasting the Automation Sew.
2 Configure Internet Filter Profile
3 Execute Malicious BAT file
wget -i hi there.txt -t 1 -T 1 -w 1 –spider
4 Confirm the outcomes
FortiAnalyzer identifies compromised hosts by checking the logs of every finish person towards its menace database. When a menace match is discovered, a menace rating is given to the top person. When the test is full, FortiAnalyzer aggregates all of the menace scores of an finish person and offers its verdict.
- On the FGT-EDGE, go to Log & Report > Safety Occasions > Internet Filter.
- Take away the default 5 minutes log interval by Clicking the X subsequent to Date/Time filter.
- You will notice eight blocked occasions from Bob’s workstation with IP deal with 172.16.20.51.
- This validates that FortiGate blocked entry to those web sites as a result of they had been recognized throughout the Malicious Web sites and Phishing classes.
- Go to Log & Report > System Occasions.
- Click on the Basic System Occasions card.
- Take away the default 5 minutes log interval by Clicking the X subsequent to Date/Time filter.
- Change the Interval Time from 5 minutes to 1 hour.
- You’ll find latest occasions with the Log Description of ‘Automation sew triggered’ and the Message of ‘sew:Compromised Host is triggered’.
This occasion signifies the Internet Filter logs had been despatched to the FortiAnalyzer which decided the host to be compromised. FortiAnalyzer then despatched the ‘Compromised host detected’ alert again to the foundation FortiGate within the Safety Cloth which triggered the Automation Sew you configured within the earlier workout routines.
Word: It might take as much as 5 minutes for the logs to be despatched to FortiAnalyzer and the alert to return to FortiGate.
- Go to the Dashboard > Customers & Gadgets.
- Within the Quarantine widget, one system might be listed.
- Click on wherever within the Quarantine widget to increase the outcomes to the complete display.
- Go to Bob’s workstation tab
- Open a browser and check out looking any web site (e.g. google.com) to confirm the host has been banned from accessing the web.
- Return to the FGT-EDGE tab
- Within the Quarantine widget, click on the Take away All button to take away the IP Ban for Bob’s workstation.
ADVPN
If a buyer’s head workplace and department workplaces all have two or extra web connections, they will construct a dual-hub ADVPN community. Mixed with SD-WAN expertise, the shopper can load-balance visitors to different workplaces on a number of dynamic tunnels, management particular visitors utilizing particular connections, or select better-performance connections dynamically.
Within the following goal, you’ll configure some primary BGP settings after which deploy a easy one-hub and two-spoke IPsec VPN topology utilizing the VPN Wizard which incorporates the required ADVPN settings. As soon as the topology is constructed, you’ll set up the shortcut tunnel, learn to manually teardown the tunnels, and configure the required settings to auto-flush tunnels after a interval of inactivity.
Earlier than constructing the VPN topology, just a few BGP settings have to be configured. Specifically, you will have to assign a Native AS and Router ID for the hub and every spoke. To simplify increasing this topology to many extra websites, additionally, you will use a Neighbor Group on the hub moderately than statically defining every spoke neighbor.
1 Configure BGP
Configure BGP Settings on FGT-EDGE:
- On FGT-EDGE, go to Community > BGP.
- Within the Native AS area, enter
65400. - Within the Router ID area, enter
0.0.0.101. - Underneath Neighbor Teams, click on Create New.
- Enter the next settings:
- Identify:
Department-Friends - Distant AS:
65400 - Activate IPv4: Allow
- Attribute unchanged: Disable
- Route reflector consumer: Allow
- Functionality: route refresh: Allow
- Click on OK.
- Click on Apply to avoid wasting the BGP settings.
- On the Lab Exercise Tab, entry FGT-BR1, select the HTTPS possibility, and log in with the usual credentials:
Username:
adminPassword:Fortinet1! - Go to Community > BGP.
- Within the Native AS area, enter
65400. - Within the Router ID area, enter
0.0.0.111. - Click on Apply to avoid wasting the BGP settings.
Configure BGP Settings on FGT-BR1:
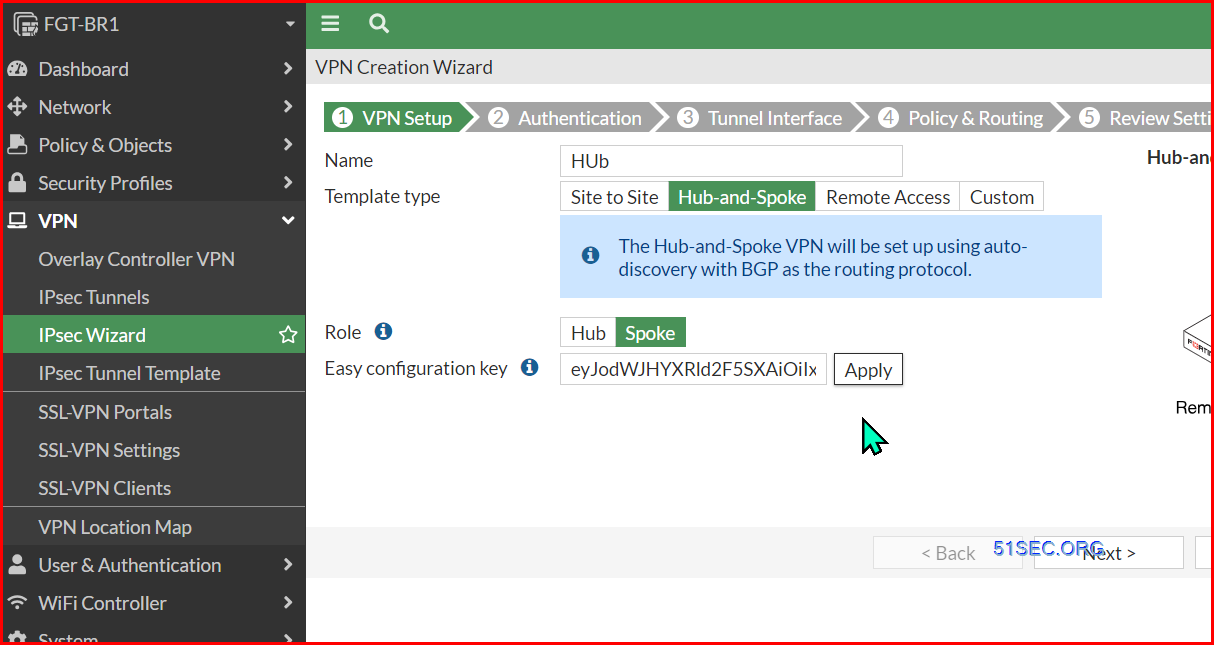
2 Construct IPSec HUB & Spoke VPN
The IPsec VPN Wizard, by default, consists of the required parts to make the most of ADVPN when selecting the Hub-and-Spoke template sort. On this train, you’ll use the VPN Wizard to construct the VPN topology on FGT-EDGE, FGT-BR1, and FGT-BR2.
Configure VPN on FGT-EDGE with the IPsec Wizard:
- On FGT-EDGE, navigate to VPN > IPsec Wizard.
- On the VPN Setup web page, use the next settings:
- Identify:
Branches - Template sort: Hub-and-Spoke
- Function: Hub
- Identify:

- Click on Subsequent >
- On the Authentication web page, use the next settings:
- Incoming Interface: ISP1 (port6)
- Authentication Technique: Pre-shared Key
- Pre-shared key:
Fortinet1! - Click on Subsequent >
- On the Tunnel Interface web page, use the next settings:
- Tunnel IP:
10.10.1.101 - Distant IP/netmask:
10.10.1.1/24 - Click on Subsequent >
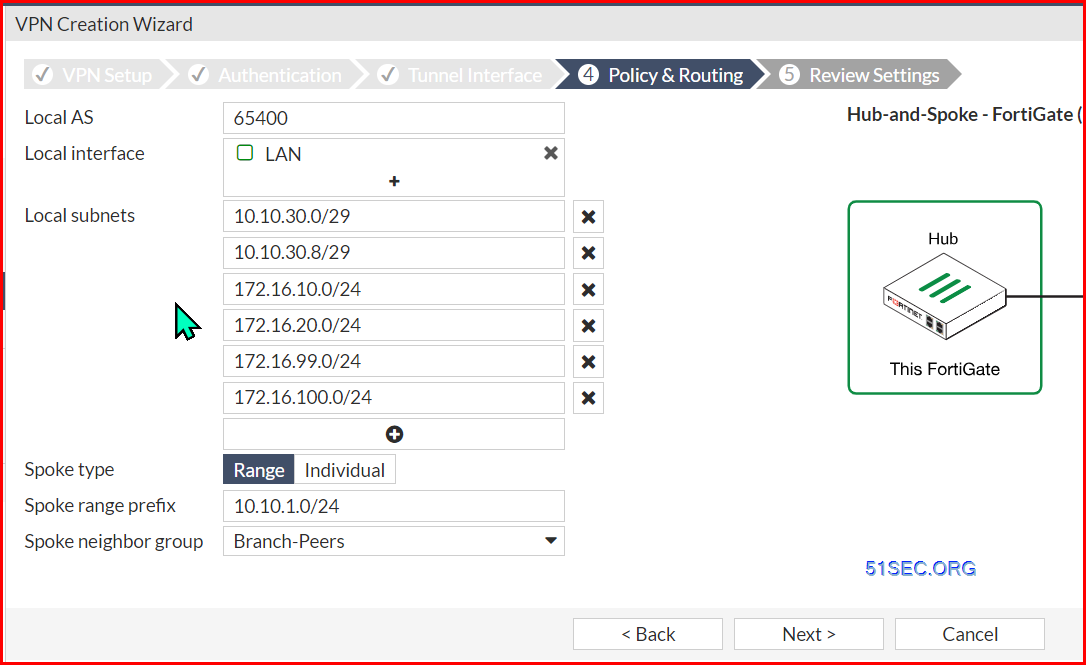
- On the Coverage & Routing web page, use the next settings:
- Native AS:
65400 - Native interface: LAN
- Native subnets. Click on the + button so as to add extra subnets:
10.10.30.0/2910.10.30.8/29172.16.10.0/24172.16.20.0/24172.16.99.0/24172.16.100.0/24
- Spoke sort: Vary
- Spoke vary prefix:
10.10.1.0/24 - Spoke neighbor group: Department-Friends
- Native AS:
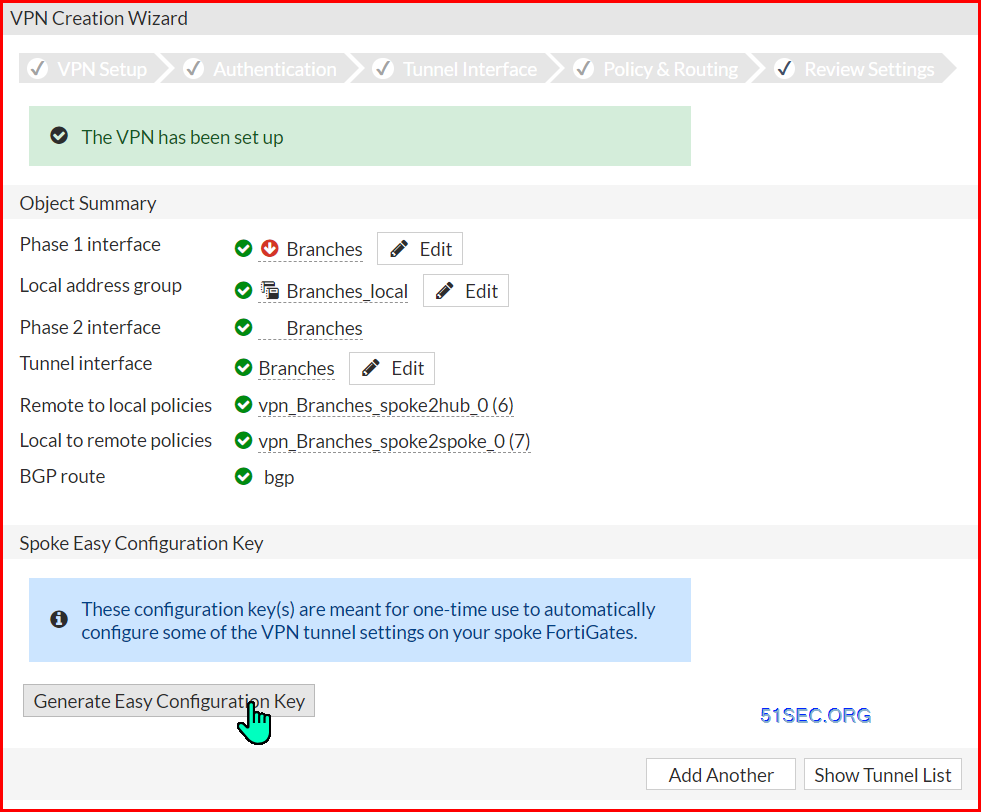
Click on subsequent , click on create
Underneath the Spoke Straightforward Configuration Key, click on the Generate Straightforward Configuration Key button.
- Create two spoke entries:
- Spoke #1 tunnel IP:
10.10.1.111 - Spoke #2 tunnel IP:
10.10.1.112
- Spoke #1 tunnel IP:
- Click on the Generate Straightforward Configuration Key button.
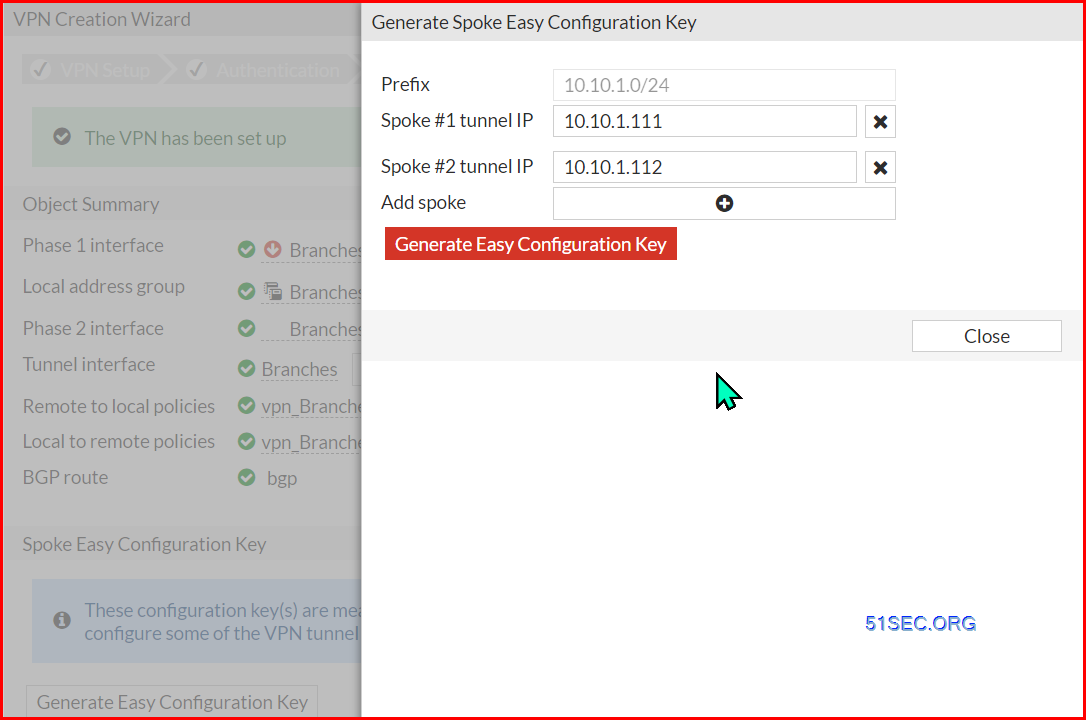
- Click on Shut.
Configure VPN on FGT-BR1 with the IPsec Wizard:
- On FGT-BR1, navigate to VPN > IPsec Wizard.
- On the VPN Setup web page, enter the next settings:
- Identify:
Hub - Template sort: Hub-and-Spoke
- Function: Spoke
- Straightforward configuration key: Enter the important thing you copied within the steps above for 10.10.1.111 and click on Apply.
- Identify:
On Spoke1
- Click on Subsequent >
- On the Tunnel Interface web page, confirm the next settings:
- Tunnel IP:
10.10.1.111 - Distant IP/netmask:
10.10.1.101/24 - Click on Subsequent >
- On the Coverage & Routing web page, enter the next settings:
- Native AS:
65400 - Native interface: Department 1 (port4)
- Native subnets:
172.20.1.0/24 - Click on Subsequent >
- On the Evaluation Settings web page, click on Create.
Similar factor on Brach2
If you want to be taught extra about utilizing ADVPN mixed with SD-WAN, ask your teacher concerning the Quick Monitor Program’s Establishing a Safe SD-WAN Structure workshop.
Organizations’ community topologies are considerably impacted as they transition to a digital enterprise mannequin. The adoption of cloud providers, the virtualization of the normal community, and an more and more cellular workforce accessing purposes within the cloud are accelerating developments in wide-area networking applied sciences. The normal extensive space community (WAN) is struggling to maintain up as a result of it depends on a static infrastructure of gadgets that may’t accommodate shifting, and sometimes momentary useful resource allocation and workloads.
Contributors who attend this workshop will learn to:
- Apply software-defined networking (SDN) to wide-area networks in an enterprise atmosphere
- Implement software management and visitors shaping over SD-WAN
- Use FortiManager to allow unified coverage throughout a number of enterprise branches
- Configure virtualized merchandise supporting WAN aggregation whereas gaining hands-on expertise
- Mix the redundancy of SD-WAN with the complete mesh capabilities of ADVPN for a extremely dynamic enterprise WAN answer.
NGFW Coverage-based Inspection
Coverage-based NGFW mode permits directors so as to add purposes and internet filter classes on to a Safety Coverage with out having to first create and configure an Utility Management or Internet Filter profile.
When Coverage-based NGFW mode is enabled, the FortiGate will routinely be configured to make use of Central NAT and Stream-based inspection safety profiles. These two modes mix to make administrating a FortiGate easy and straightforward whereas offering excessive efficiency.
Within the following set of workout routines, we are going to discover a FortiGate (FGT-EDGE) configured in Coverage-based NGFW mode and configure insurance policies to guard finish customers and implement firm insurance policies.
In a conventional hub-and-spoke VPN topology, all visitors from one spoke to a different travels fully by means of the hub. In an ADVPN configuration, the primary packet is distributed by means of the Hub at which level the Hub coordinates with every Spoke to construct the shortcut tunnel and replace the dynamic routing desk for every spoke permitting them to speak straight.
On this train, you’ll use ICMP visitors between a number at Branch_1 to a number at Branch_2 to set off the ADVPN shortcut tunnel creation, monitor the packet movement, and at last teardown the shortcut tunnel manually.
1 Purpose
Allow SSL Deep Packet Inspection to examine encrypted community visitors.
2 Ensure that system is in Coverage-based.
go to System > Settings part and confirm that NGFW Mode is ready to Coverage-based.
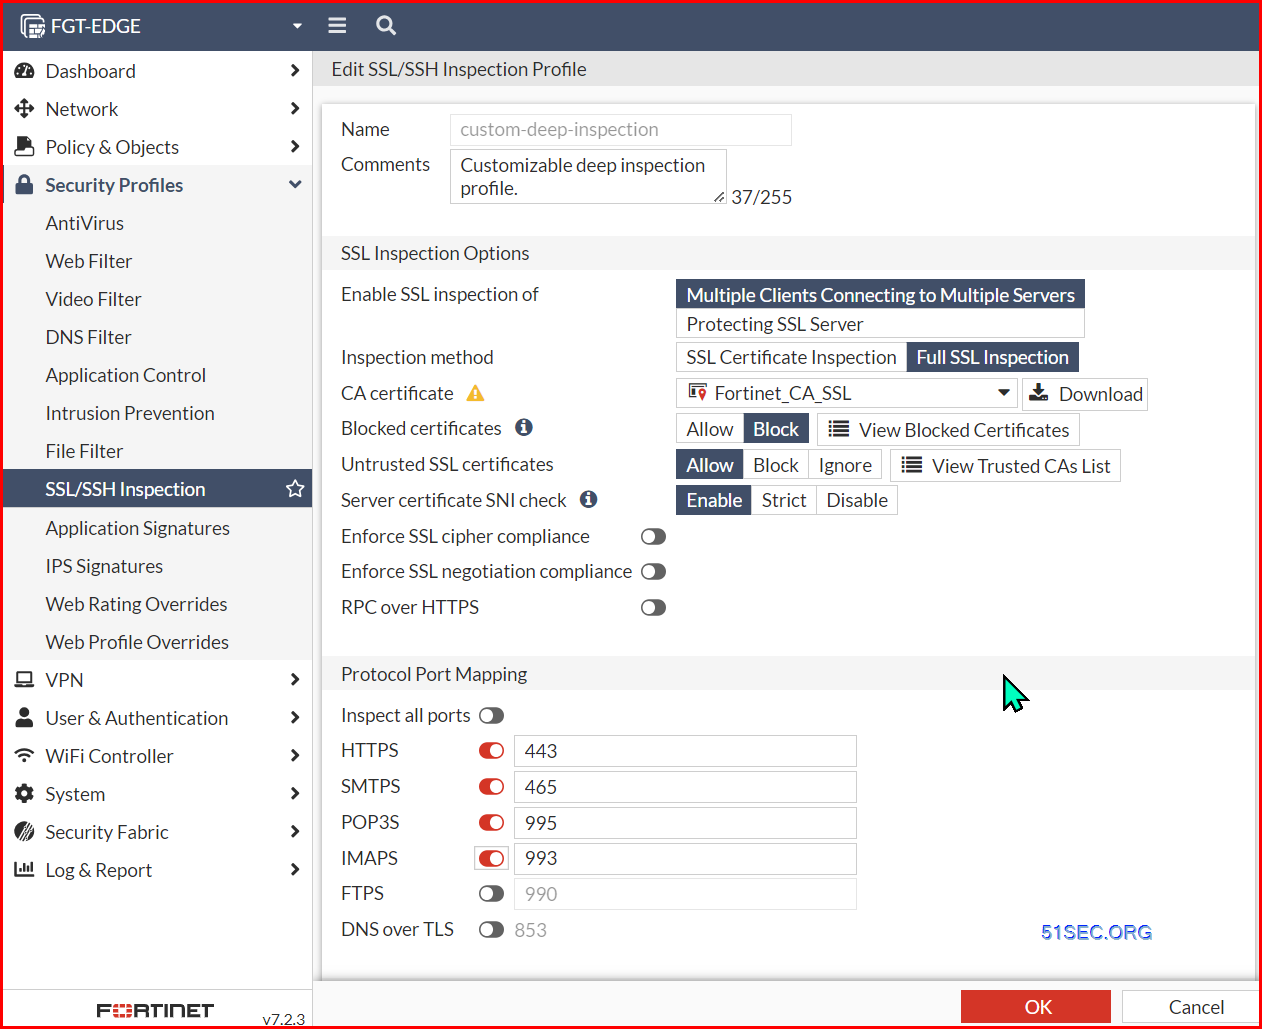
3 Configure SSL/SSH Inspection Profile
To finish this goal, you’ll must allow SSL Inspection on HTTPS, SMTPS, POP3S, and IMAPS ports utilizing the ‘custom-deep-inspection‘ SSL/SSH inspection profile.
After you might have configured the SSL/SSH Inspection profile, go to Coverage & Objects > SSL Inspection & Authentication. Click on and Edit LAN-WAN coverage to confirm if the proper SSL Inspection profile ‘custom-deep-inspection’ has been utilized for encrypted community visitors inspection.
4 Configure NGFW Coverage to Block Purposes
For continued studying concerning the FortiGate NGFW product utilized on this workshop, please take into account trying on the following NSE coaching programs:
Extra assets and instruments might be discovered on the following places:
Ask your teacher for extra details about the next Quick Monitor workshops:
- Establishing a Safe SD-WAN Structure
- SD-Department: LAN Edge Wired and Wi-fi
- Making a Complete Fortinet Safety Cloth
- What’s New in FortiOS?


