
Title the shared folder/drive obtainable on the Home windows Server 2019 machine.
Lab 2: Carry out SNMP Enumeration
Lab State of affairs
As an expert moral hacker or penetration tester, the next step is to hold out SNMP enumeration to extract details about community assets (similar to hosts, routers, units, and shares) and community info (similar to ARP tables, routing tables, device-specific info, and visitors statistics).
Utilizing this info, you possibly can additional scan the goal for underlying vulnerabilities, construct a hacking technique, and launch assaults.
Lab Goals
- Carry out SNMP enumeration utilizing SnmpWalk
Overview of SNMP Enumeration
SNMP (Easy Community Administration Protocol) is an utility layer protocol that runs on UDP (Consumer Datagram Protocol) and maintains and manages routers, hubs, and switches on an IP community. SNMP brokers run on networking units on Home windows and UNIX networks.
SNMP enumeration makes use of SNMP to create a listing of the person accounts and units on a goal pc. SNMP employs two varieties of software program parts for communication: the SNMP agent and SNMP administration station. The SNMP agent is situated on the networking system, and the SNMP administration station communicates with the agent.
Activity 1: Carry out SNMP Enumeration utilizing SnmpWalk
SnmpWalk is a command line instrument that scans quite a few SNMP nodes immediately and identifies a set of variables which are obtainable for accessing the goal community. It’s issued to the basis node in order that the data from all of the sub nodes similar to routers and switches could be fetched.
Right here, we’ll use SnmpWalk to carry out SNMP enumeration on a goal system.
-
Click on Parrot Safety to modify to the Parrot Safety machine. Login with attacker/toor, open a Terminal window and execute sudo su to run the packages as a root person (When prompted, enter the password toor).
The password that you just sort won’t be seen.
-
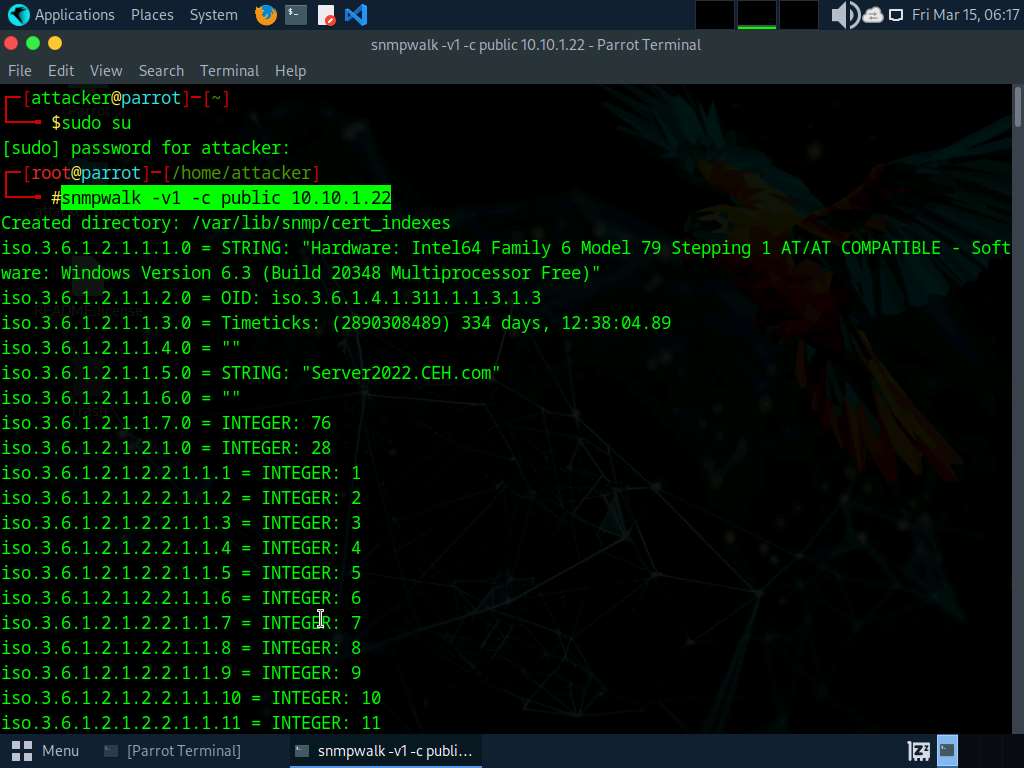
Run snmpwalk -v1 -c public [target IP] command (right here, the goal IP handle is 10.10.1.22).
-v: specifies the SNMP model quantity (1 or 2c or 3) and -c: units a group string.
-
The end result shows all of the OIDs, variables and different related info.
-
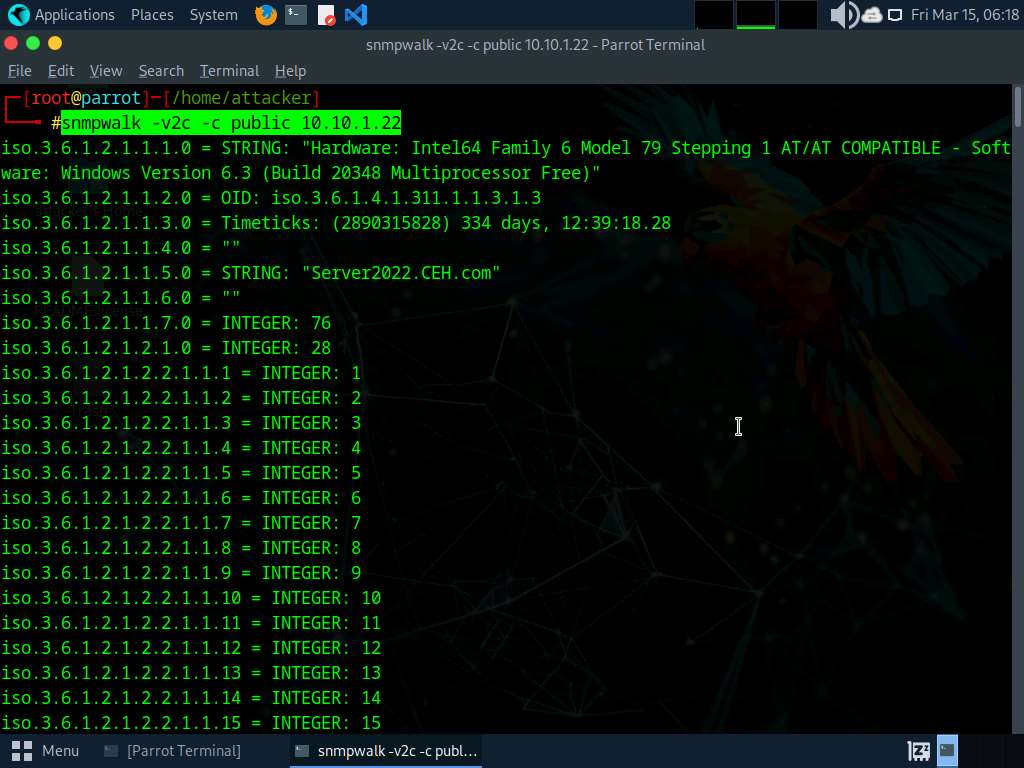
Run snmpwalk -v2c -c public [Target IP Address] command to carry out SNMPv2 enumeration on the goal machine (right here, the goal IP handle is 10.10.1.22). – Server 2022
-v: specifies the SNMP model (right here, 2c is chosen) and -c: units a group string.
-
The end result shows knowledge transmitted from the SNMP agent to the SNMP server, together with info on server, person credentials, and different parameters.
-
This concludes the demonstration of performing SNMP enumeration utilizing the SnmpWalk.
-
Shut all open home windows and doc all of the acquired info.
Query 4.2.1.1
Lab 3: Carry out LDAP Enumeration
Lab State of affairs
As an expert moral hacker or penetration tester, the following step after SNMP enumeration is to carry out LDAP enumeration to entry listing listings inside Energetic Listing or different listing companies. Listing companies present hierarchically and logically structured details about the parts of a community, from lists of printers to company electronic mail directories. On this sense, they’re just like an organization’s org chart.
LDAP enumeration means that you can collect details about usernames, addresses, departmental particulars, server names, and many others.
Lab Goals
- Carry out LDAP enumeration utilizing Energetic Listing Explorer (AD Explorer)
Overview of LDAP Enumeration
LDAP (Light-weight Listing Entry Protocol) is an Web protocol for accessing distributed listing companies over a community. LDAP makes use of DNS (Area Title System) for fast lookups and quick decision of queries. A shopper begins an LDAP session by connecting to a DSA (Listing System Agent), sometimes on TCP port 389, and sends an operation request to the DSA, which then responds. BER (Primary Encoding Guidelines) is used to transmit info between the shopper and the server. One can anonymously question the LDAP service for delicate info similar to usernames, addresses, departmental particulars, and server names.
Activity 1: Carry out LDAP Enumeration utilizing Energetic Listing Explorer (AD Explorer)
Energetic Listing Explorer (AD Explorer) is a sophisticated Energetic Listing (AD) viewer and editor. It may be used to navigate an AD database simply, outline favourite places, view object properties and attributes with out having to open dialog containers, edit permissions, view an object’s schema, and execute subtle searches that may be saved and re-executed.
Right here, we’ll use the AD Explorer to carry out LDAP enumeration on an AD area and modify the area person accounts.
-
Click on Home windows Server 2019 to modify to the Home windows Server 2019 machine and click on Ctrl+Alt+Delete to activate the machine. Login with Administrator/Pa$$w0rd.
-
Navigate to Z:CEHv13 Module 04 EnumerationLDAP Enumeration ToolsActive Listing Explorer and double-click ADExplorer.exe.
-
The Energetic Listing Explorer License Settlement window seems; click on Agree.
-
The Hook up with Energetic Listing pop-up seems; sort the IP handle of the goal within the Hook up with area (right here, we’re concentrating on the Home windows Server 2022 machine: 10.10.1.22) and click on OK.

-
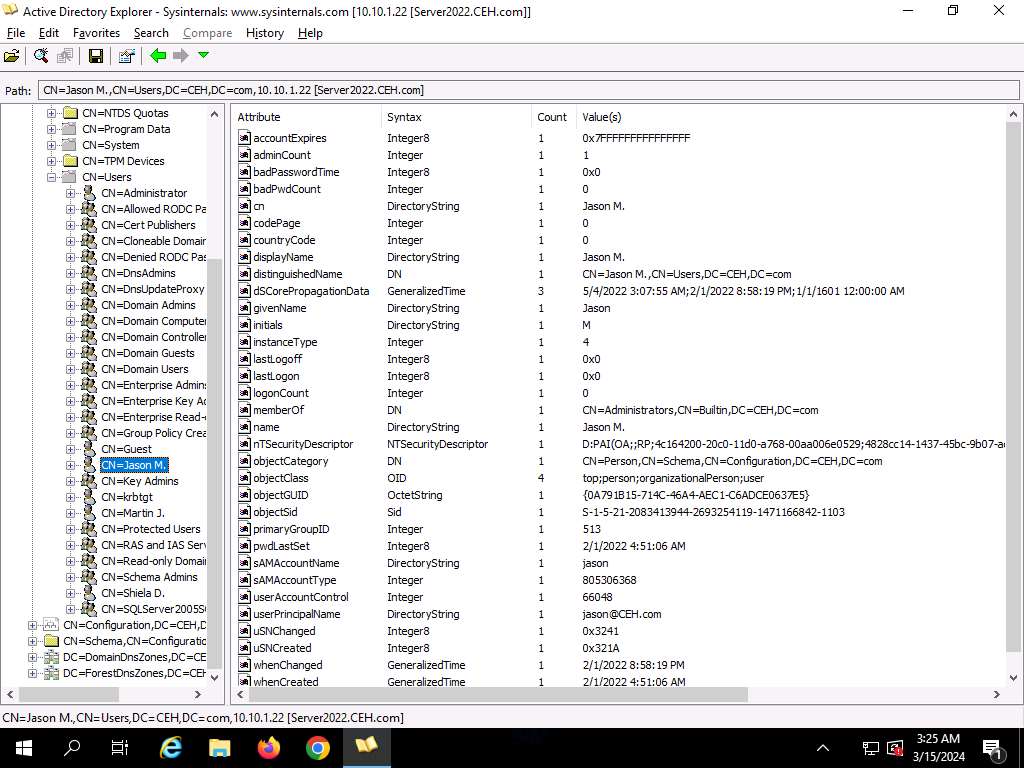
The Energetic Listing Explorer shows the lively listing construction within the left pane, as proven within the screenshot.
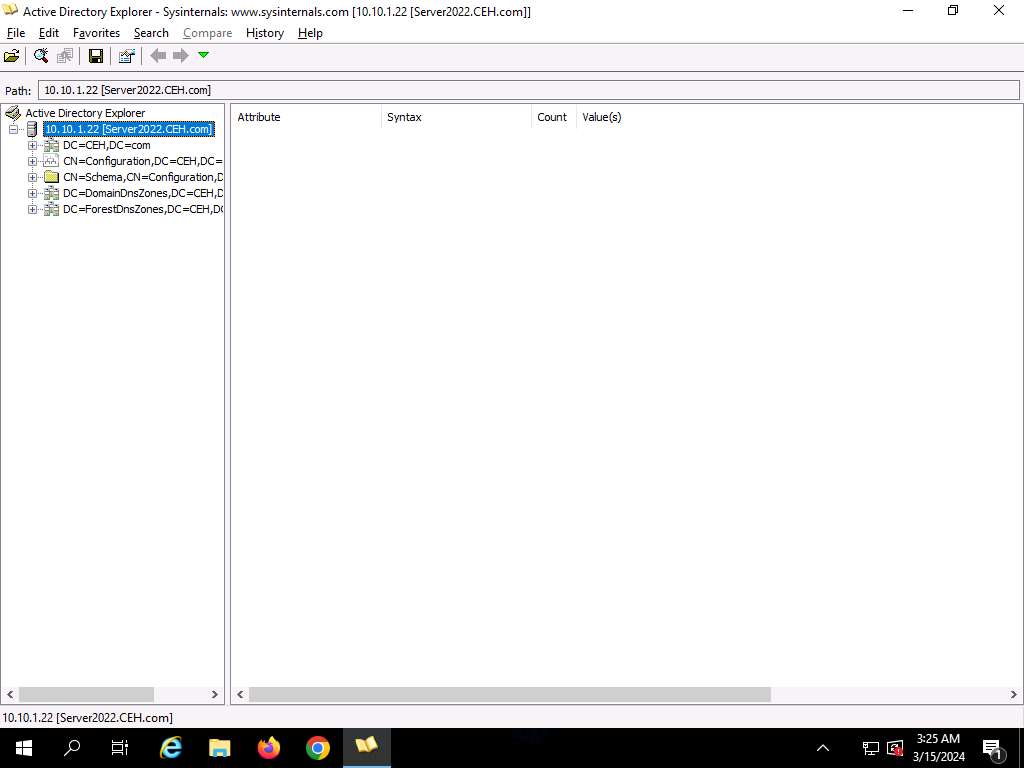
-
Now, broaden DC=CEH, DC=com, and CN=Customers by clicking “+” to discover area person particulars.
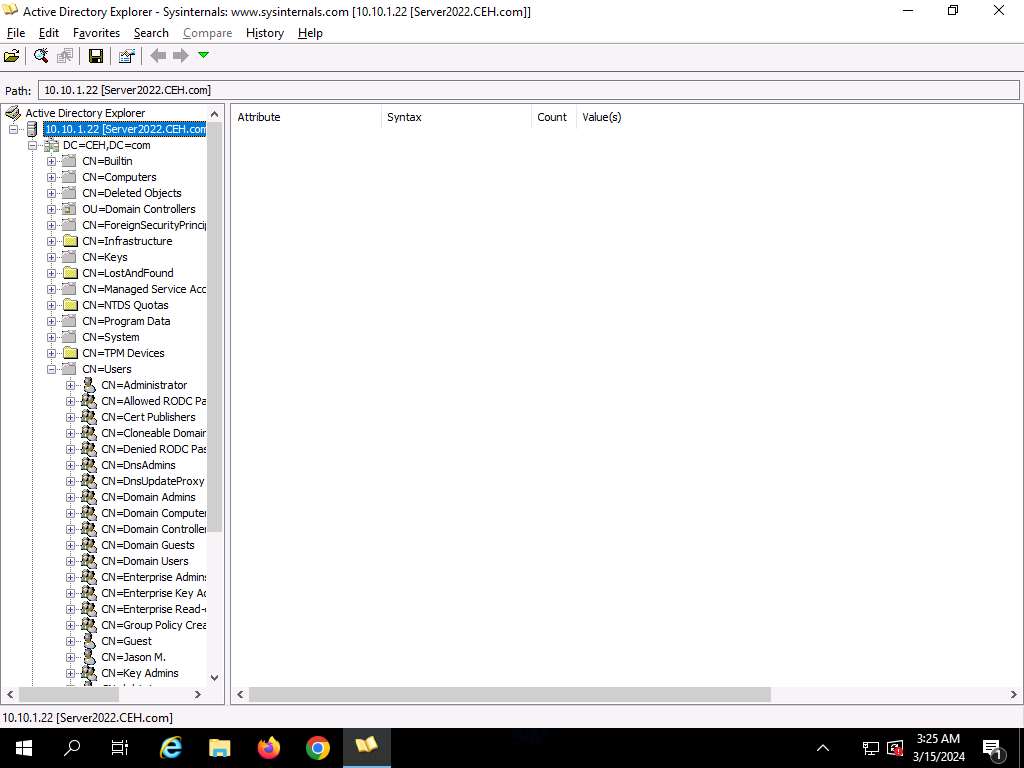
-
Click on any username (within the left pane) to show its properties in the fitting pane.
-
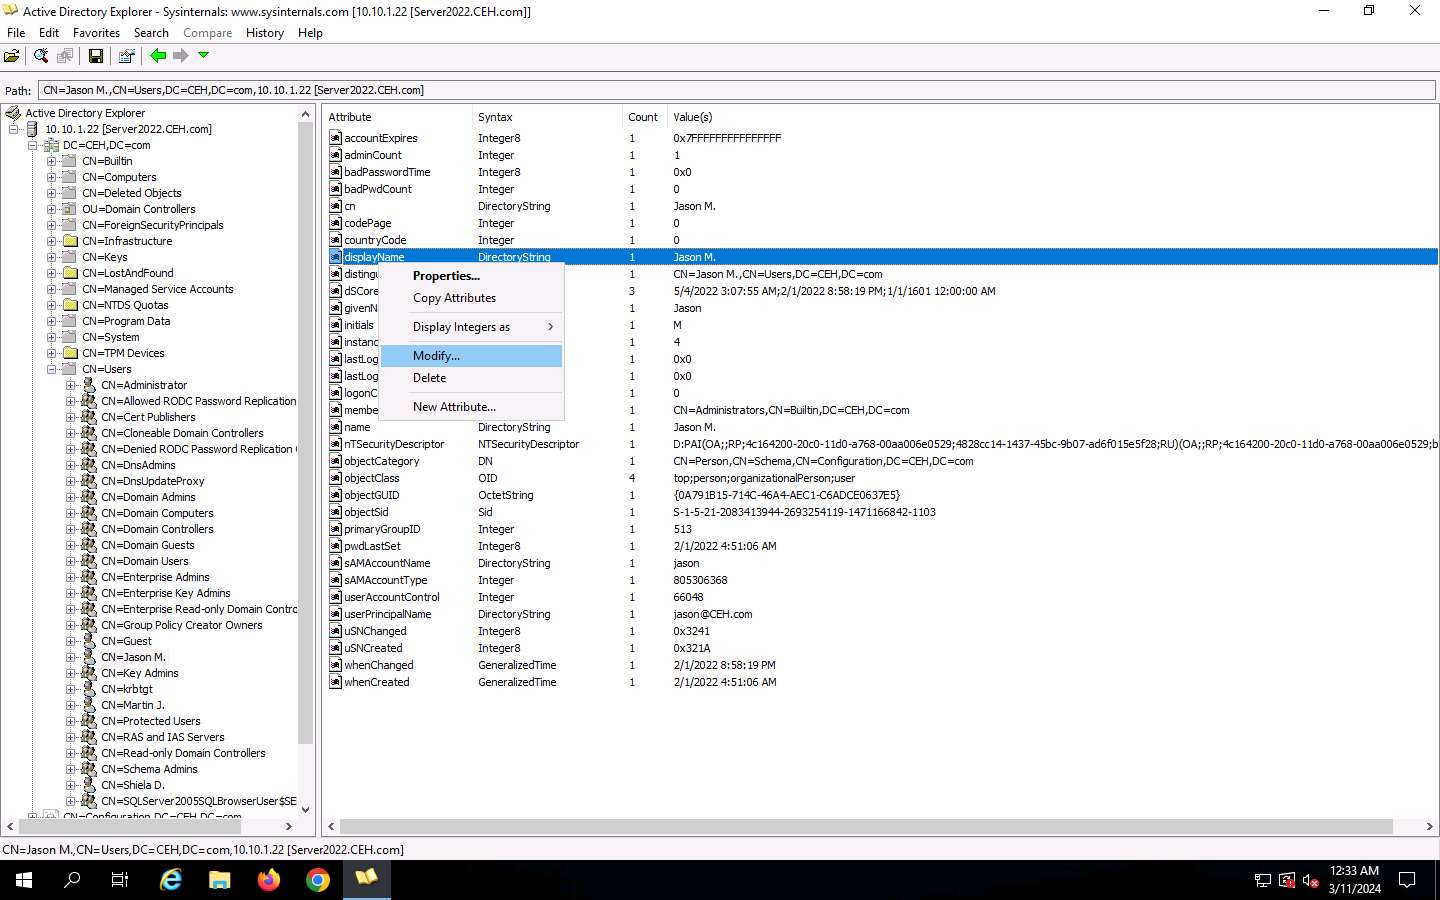
Proper-click any attribute in the fitting pane (right here, displayName) and click on Modify… from the context menu to switch the person’s profile.
-
The Modify Attribute window seems. First, choose the username underneath the Worth part, after which click on the Modify… button. The Edit Worth pop-up seems. Rename the username within the Worth knowledge area and click on OK to save lots of the adjustments.
-
You’ll be able to learn and modify different person profile attributes in the identical means.
-
This concludes the demonstration of performing LDAP enumeration utilizing AD Explorer.
-
You can too use different LDAP enumeration instruments similar to Softerra LDAP Administrator (https://www.ldapadministrator.com), LDAP Admin Device (https://www.ldapsoft.com), LDAP Account Supervisor (https://www.ldap-account-manager.org), and LDAP Search (https://securityxploded.com) to carry out LDAP enumeration on the goal.
-
Shut all open home windows and doc all of the acquired info.
Query 4.3.1.1
Query 4.3.1.2
Lab 4: Carry out NFS Enumeration
Lab State of affairs
As an expert moral hacker or penetration tester, the following step after LDAP enumeration is to carry out NFS enumeration to determine exported directories and extract a listing of shoppers related to the server, together with their IP addresses and shared knowledge related to them.
After gathering this info, it’s doable to spoof goal IP addresses to achieve full entry to the shared recordsdata on the server.
Lab Goals
- Carry out NFS enumeration utilizing RPCScan and SuperEnum
Overview of NFS Enumeration
NFS (Community File System) is a kind of file system that allows pc customers to entry, view, retailer, and replace recordsdata over a distant server. This distant knowledge could be accessed by the shopper pc in the identical means that it’s accessed on the native system.
Activity 1: Carry out NFS Enumeration utilizing RPCScan and SuperEnum
RPCScan communicates with RPC (distant process name) companies and checks misconfigurations on NFS shares. It lists RPC companies, mountpoints,and directories accessible through NFS. It will possibly additionally recursively record NFS shares. SuperEnum features a script that performs a fundamental enumeration of any open port, together with the NFS port (2049).
Right here, we’ll use RPCScan and SuperEnum to enumerate NFS companies working on the goal machine.
Earlier than beginning this activity, it’s essential to allow the NFS service on the goal machine (Home windows Server 2019). This will likely be achieved in Step#1-6.
-
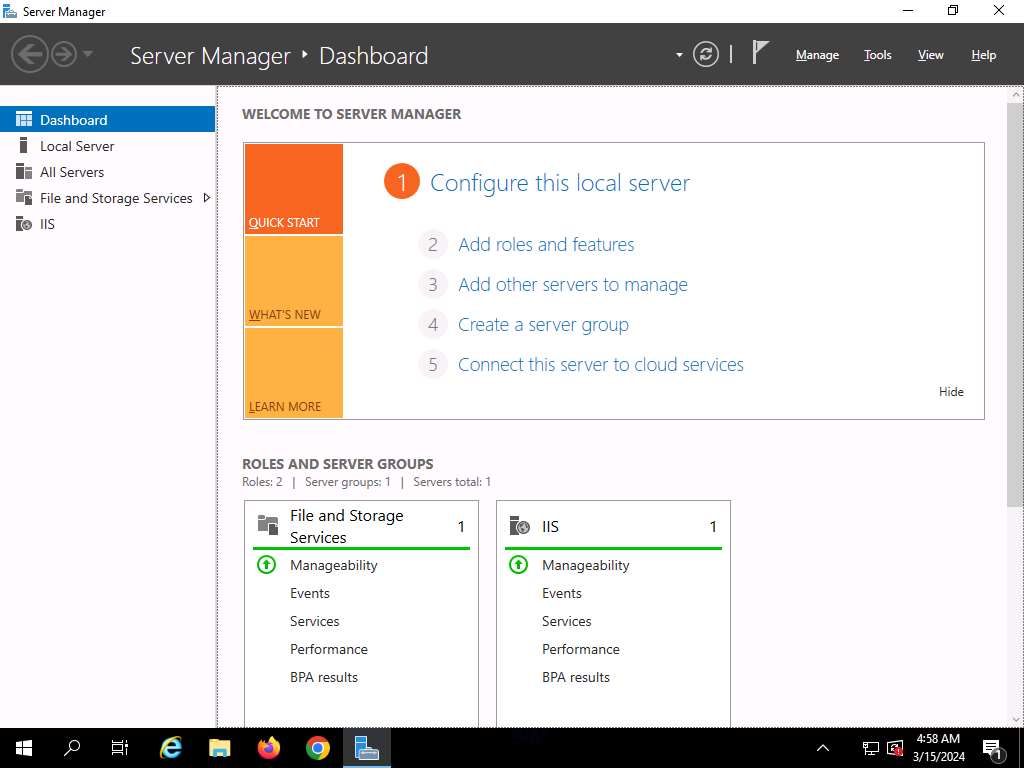
Click on Home windows Server 2019 to modify to the Home windows Server 2019 machine. Within the Home windows Server 2019 machine, click on the Begin button on the bottom-left nook of Desktop and open Server Supervisor.
If you’re logged out of the Home windows Server 2019 machine, click on Ctrl+Alt+Delete, then login with Administrator/Pa$$w0rd.
-
The Server Supervisor essential window seems. By default, Dashboard will likely be chosen; click on Add roles and options.
-
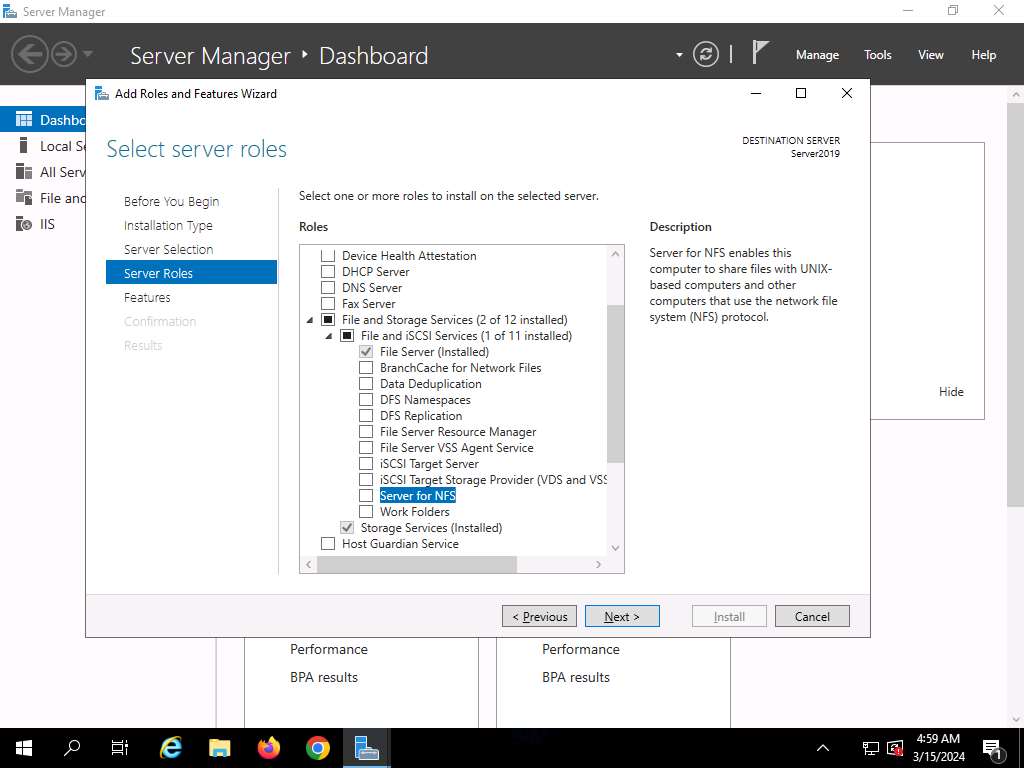
The Add Roles and Options Wizard window seems. Click on Subsequent right here and within the Set up Kind and Server Choice wizards.
-
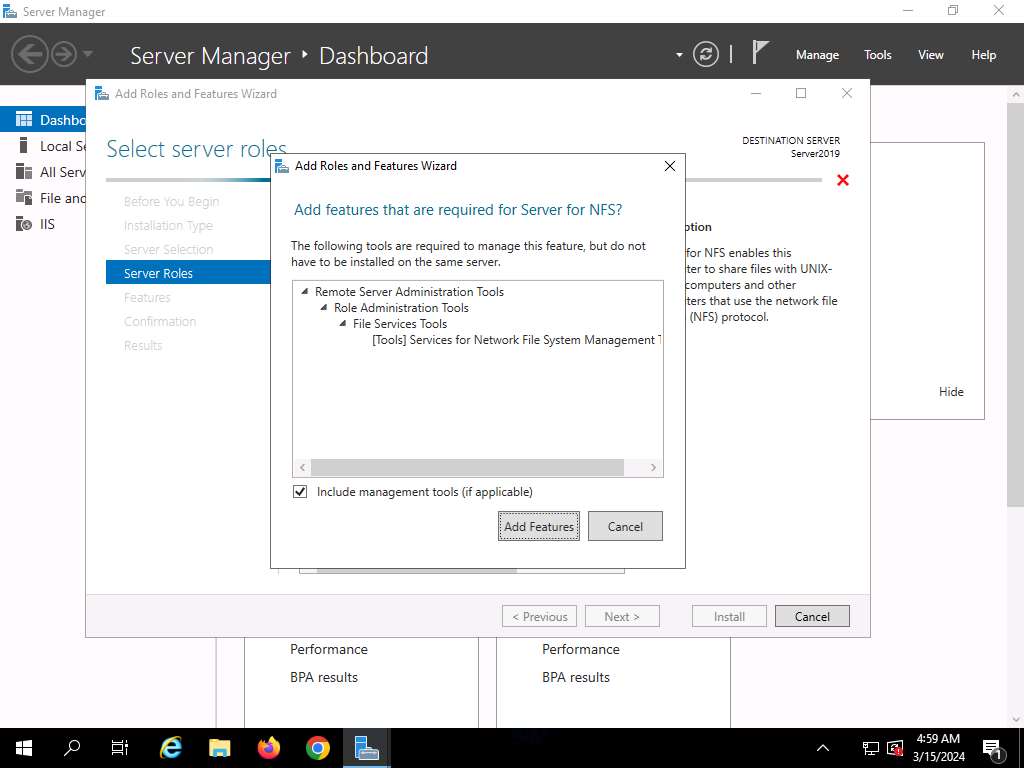
The Server Roles part seems. Broaden File and Storage Companies and choose the checkbox for Server for NFS underneath the File and iSCSI Companies choice, as proven within the screenshot. Click on Subsequent.
Within the Add options which are required for Server for NFS? pop-up window, click on the Add Options button.
-
Within the Options part, click on Subsequent. The Affirmation part seems; click on Set up to put in the chosen options.
-
The options start putting in, with progress proven by the Function set up standing bar. When set up completes, click on Shut.
-
Having enabled the NFS service, it’s essential to examine whether it is working on the goal system (Home windows Server 2019). With a view to do that, we’ll use Parrot Safety machine.
-
Click on Parrot Safety to modify to the Parrot Safety machine. Open a Terminal window and execute sudo su to run the packages as a root person (When prompted, enter the password toor).
The password that you just sort won’t be seen.
-
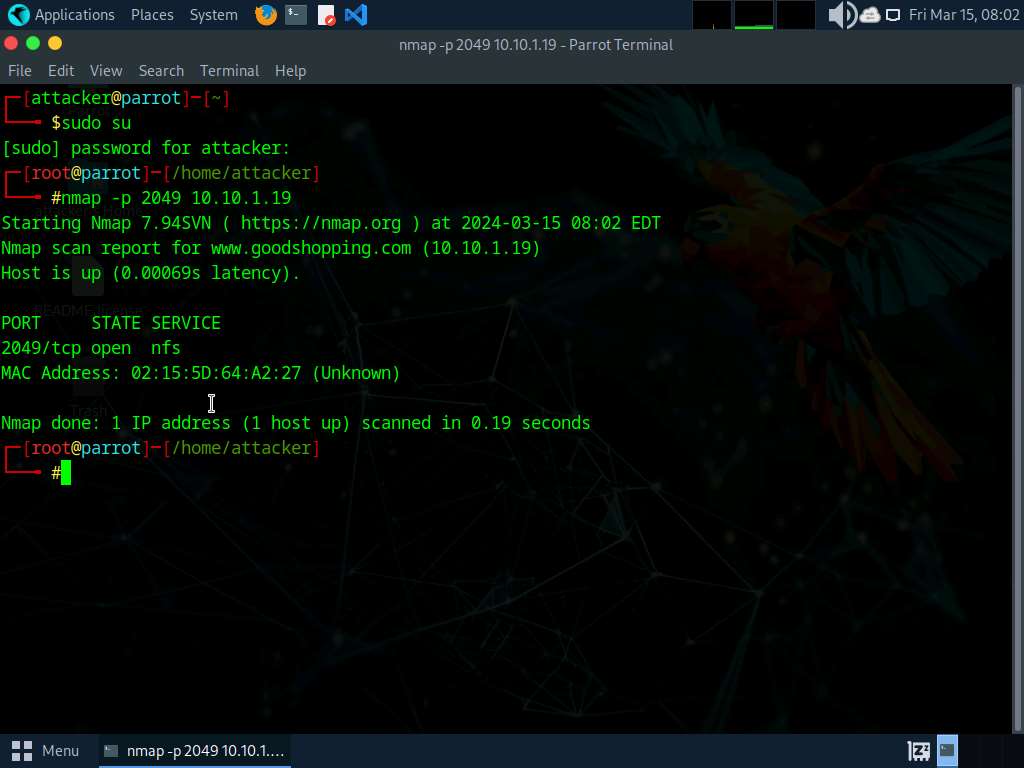
Execute nmap -p 2049 [Target IP Address] command (right here the goal IP handle is , 10.10.1.19).
-p: specifies port.
-
The scan end result seems indicating that port 2049 is opened, and the NFS service is working on it, as proven within the screenshot.
-
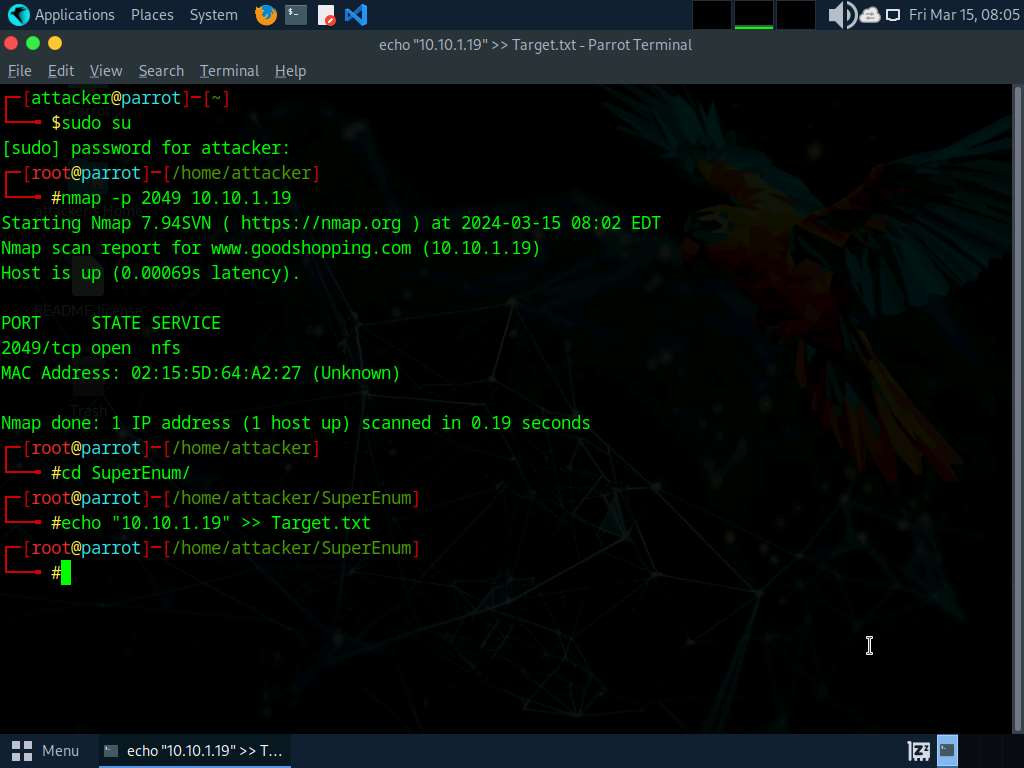
Run cd SuperEnum command to navigate to the SuperEnum folder.
-
Run echo “10.10.1.19” >> Goal.txt command to create a file having a goal machine’s IP handle (10.10.1.19).
It’s possible you’ll enter a number of IP addresses within the Goal.txt file. Nonetheless, on this activity we’re concentrating on just one machine, the Home windows Server 2019 (10.10.1.19).
-
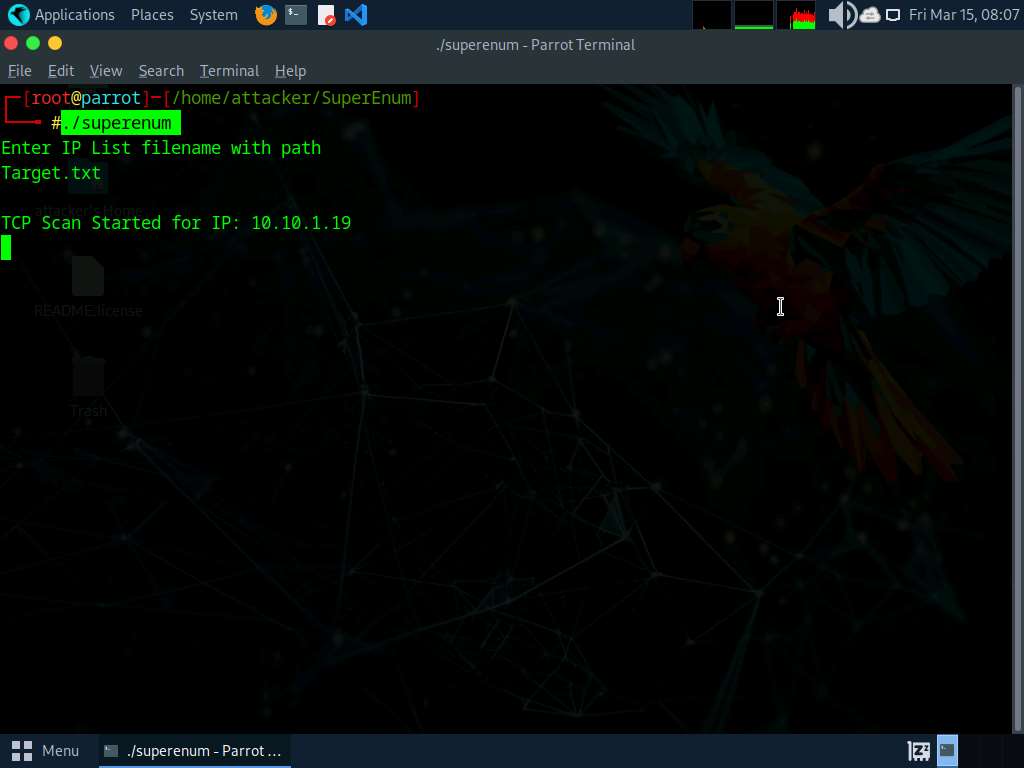
Execute ./superenum command. Below Enter IP Checklist filename with path, sort Goal.txt, and press Enter.
In case you get an error working the ./superenum script, execute chmod +x superenum command, then repeat Step#13.
-
The script begins scanning the goal IP handle for open NFS and different companies.
The scan will take roughly 15-20 minutes to finish.
-
After the scan is completed, scroll all the way down to assessment the outcomes. Observe that the port 2049 is open and the NFS service is working on it.

-
You can too observe the opposite open ports and the companies working on them.
-
Within the terminal window, run cd .. command to return to the basis listing.
-
Now, we’ll carry out NFS enumeration utilizing RPCScan. To take action, run cd RPCScan command.
-
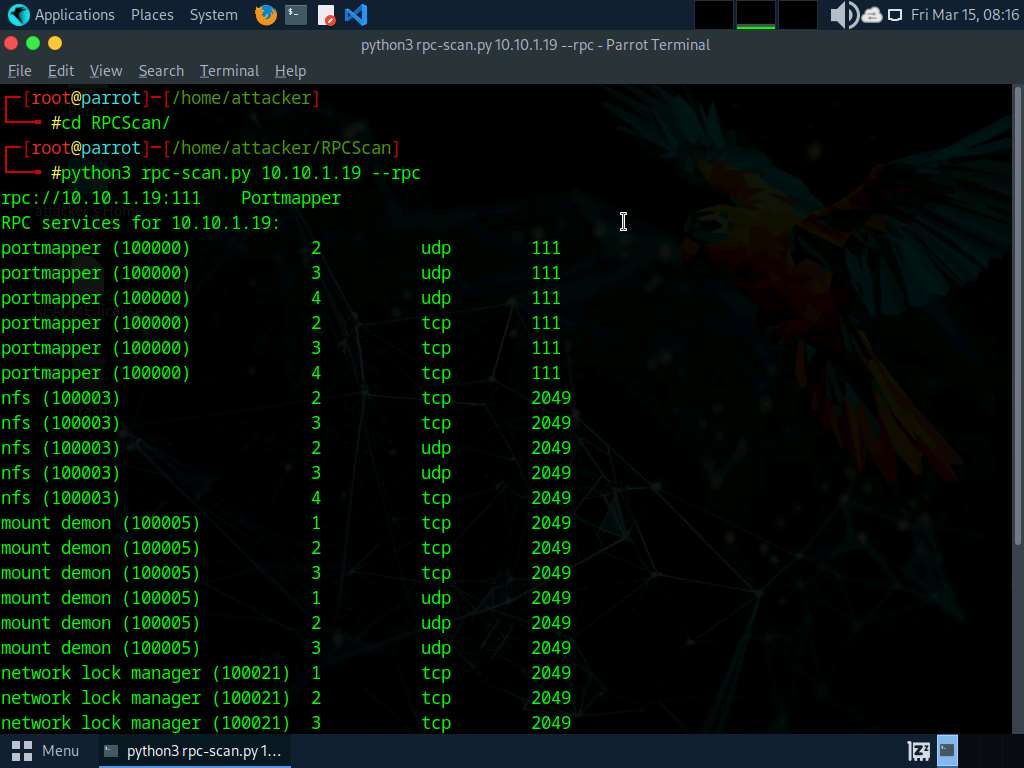
Execute python3 rpc-scan.py [Target IP address] –rpc command (right here, the goal IP handle is 10.10.1.19, the Home windows Server 2019 machine).
–rpc: lists the RPC (portmapper).
-
The end result seems, displaying that port 2049 is open, and the NFS service is working on it.
-
This concludes the demonstration of performing NFS enumeration utilizing SuperEnum and RPCScan.
-
Shut all open home windows and doc all of the acquired info.
Query 4.4.1.1
Lab 5: Carry out DNS Enumeration
Lab State of affairs
As an expert moral hacker or penetration tester, the following step after NFS enumeration is to carry out DNS enumeration. This course of yields info similar to DNS server names, hostnames, machine names, usernames, IP addresses, and aliases assigned inside a goal area.
Lab Goals
- Carry out DNS enumeration utilizing zone switch
Overview of DNS Enumeration
DNS enumeration methods are used to acquire details about the DNS servers and community infrastructure of the goal group. DNS enumeration could be carried out utilizing the next methods:
Activity 1: Carry out DNS Enumeration utilizing Zone Switch
DNS zone switch is the method of transferring a duplicate of the DNS zone file from the first DNS server to a secondary DNS server. Normally, the DNS server maintains a spare or secondary server for redundancy, which holds all info saved in the principle server.
If the DNS switch setting is enabled on the goal DNS server, it would give DNS info; if not, it would return an error saying it has failed or refuses the zone switch.
Right here, we’ll carry out DNS enumeration by means of zone switch through the use of the dig (Linux-based techniques) and nslookup (Home windows-based techniques) utilities.
-
We’ll start with DNS enumeration of Linux DNS servers. Click on Parrot Safety to modify to the Parrot Safety machine and login with attacket/toor.
-
Open a Terminal window and execute sudo su to run the packages as a root person (When prompted, enter the password toor).
The password that you just sort won’t be seen.
-
Now, run cd command to leap to the basis listing.
-
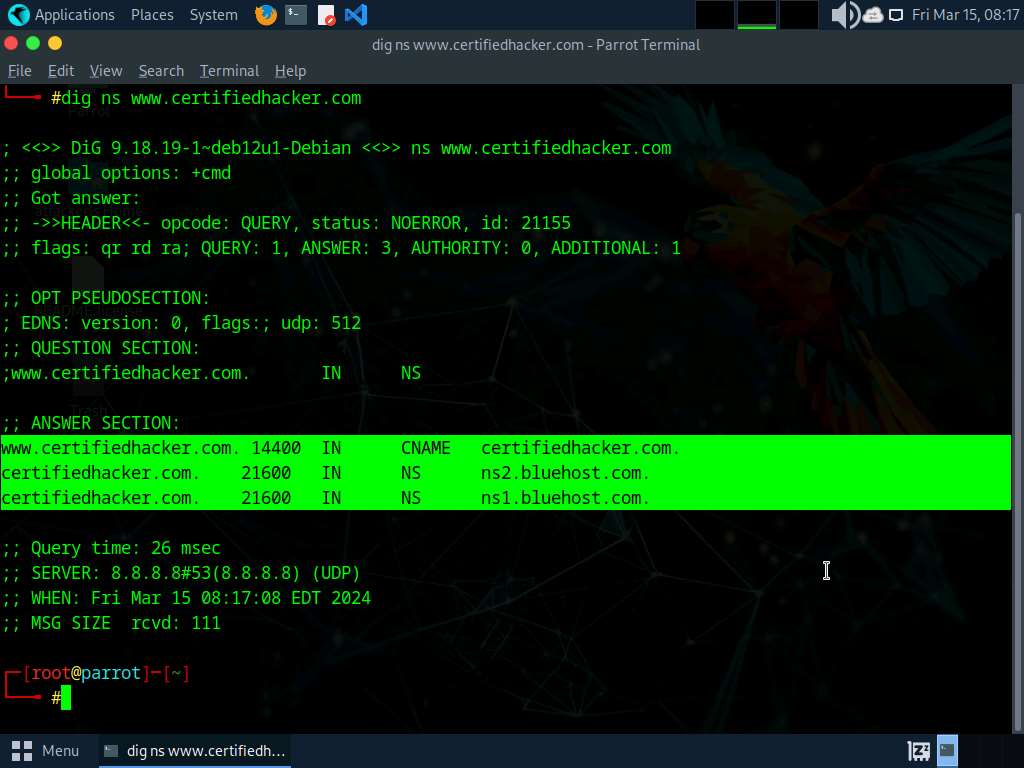
Run dig ns [Target Domain] command (right here, the goal area is www.certifiedhacker.com).
On this command, ns returns title servers within the end result
-
The above command retrieves details about all of the DNS title servers of the goal area and shows it within the ANSWER SECTION, as proven within the screenshot.
On Linux-based techniques, the dig command is used to question the DNS title servers to retrieve details about goal host addresses, title servers, mail exchanges, and many others.
-
Run dig @[NameServer] [Target Domain] axfr command (right here, the title server is ns1.bluehost.com and the goal area is www.certifiedhacker.com).
On this command, axfr retrieves zone info.
-
The end result seems, displaying that the server is out there, however that the Switch failed., as proven within the screenshot.
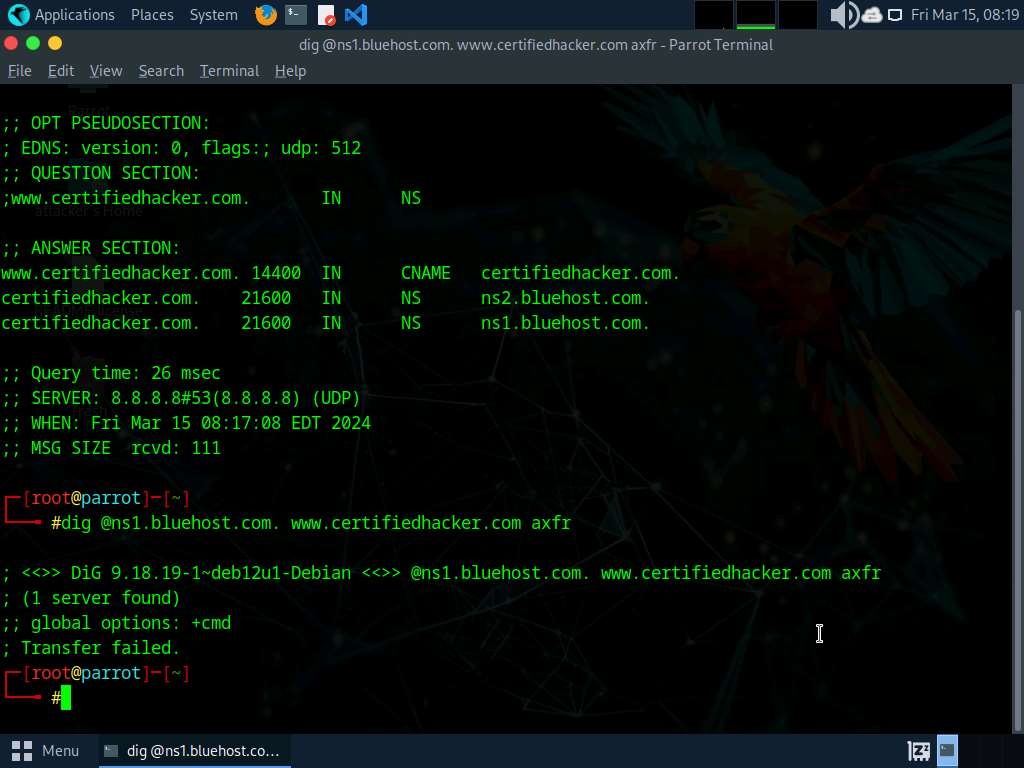
-
After retrieving DNS title server info, the attacker can use one of many servers to check whether or not the goal DNS permits zone transfers or not. right here, zone transfers will not be allowed for the goal area; for this reason the command resulted within the message: Switch failed. A penetration tester ought to try DNS zone transfers on completely different domains of the goal group.
-
Now, we’ll carry out DNS enumeration on Home windows DNS servers.
-
Click on Home windows 11 to modify to the Home windows 11 machine.
-
Click on home windows Search icon (
 ) on the Desktop. Seek for cmd within the search area, the Command Immediate seems within the outcomes, click on Open to launch it.
 -
The Command Immediate window seems; execute command nslookup.
-
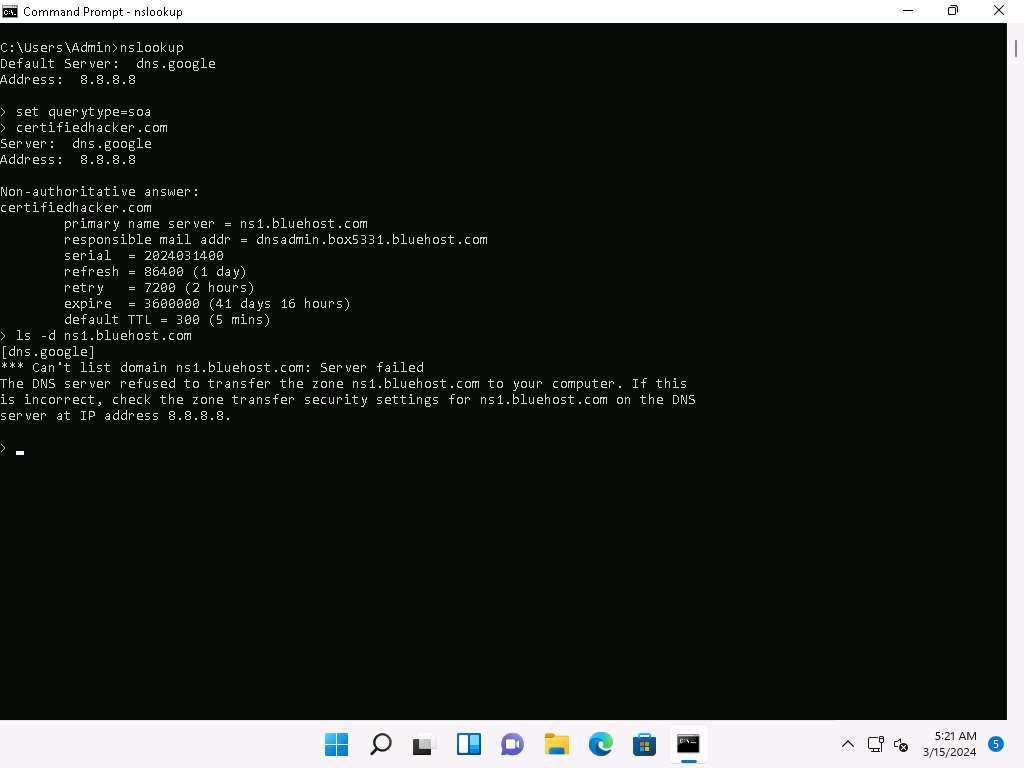
Within the nslookup interactive mode, execute command set querytype=soa.
-
Kind the goal area certifiedhacker.com and press Enter. This resolves the goal area info.
set querytype=soa units the question sort to SOA (Begin of Authority) report to retrieve administrative details about the DNS zone of the goal area certifiedhacker.com.
-
The end result seems, displaying details about the goal area such because the major title server and accountable mail addr, as proven within the screenshot.

-
Within the nslookup interactive mode, execute command ls -d [Name Server] (right here, the title is ns1.bluehost.com).
On this command, ls -d requests a zone switch of the desired title server.
-
The end result seems, displaying that the DNS server refused the zone switch, as proven within the screenshot.
-
After retrieving DNS title server info, the attacker can use one of many servers to check whether or not the goal DNS permits zone transfers or not. Right here, the zone switch was refused for the goal area. A penetration tester ought to try DNS zone transfers on completely different domains of the goal group.
-
This concludes the demonstration of performing DNS zone switch utilizing dig and nslookup instructions.
-
Shut all open home windows and doc all of the acquired info.
Query 4.5.1.1
Query 4.5.1.2