
You’ve come a good distance.
In Half I, you constructed and examined an ETL pipeline fully in your native machine utilizing Apache Airflow and Docker. You developed an actual DAG that simulated knowledge technology, remodeled it, and ready it for add — all inside a conveyable growth setup.
In Half II, you prolonged that pipeline into the cloud. You provisioned AWS infrastructure — together with an S3 bucket for storage, RDS for metadata, IAM roles, safety teams, and an Utility Load Balancer for future UI entry. You additionally reconfigured your Airflow setup to run the DAG domestically, whereas importing processed knowledge to S3 and utilizing RDS to persist state.
Now, it’s time to finish the transition.
On this ultimate a part of the tutorial, you’ll deploy your whole Airflow atmosphere to the cloud utilizing Amazon ECS (Fargate). No extra relying in your native machine — your workflows will now run in containers, totally managed by AWS and accessible from anyplace.
On this stage, you’ll construct a customized Docker picture together with your Airflow code and DAGs, outline how parts run utilizing an ECS activity definition, and launch a persistent webserver service. You’ll run one-time duties to initialize the metadata DB and create an admin consumer, spin up background employees just like the scheduler, triggerer, and DAG processor, and expose the Airflow UI by means of your current Utility Load Balancer.
By the tip, you’ll have a production-grade, cloud-native orchestration system that:
- Runs your workflows robotically and reliably — even when your laptop computer is off
- Logs and persists metadata in Amazon RDS
- Scales utilizing ECS and Fargate
- Eliminates the necessity for guide restarts or native dependencies
Each deployment step is damaged down clearly, with diagrams, explanations, and examined instructions.
Customise Your Airflow Docker Picture
In case you’ve adopted alongside within the earlier tutorials, your ETL pipeline is already operating domestically inside Docker utilizing docker-compose.yaml, and also you’ve efficiently examined it from finish to finish. Now, it’s time to arrange that challenge for deployment by packaging it right into a customized Docker picture — one which accommodates your DAGs, dependencies, and cloud-specific settings.
This picture is what we’ll later push to Amazon ECS Repository and run inside ECS utilizing Fargate.
Replace docker-compose.yaml to Use a Customized Picture
Open your docker-compose.yaml file and find the x-airflow-common part. Replace it to appear to be this:
x-airflow-common:
  &airflow-common
  construct: .
  picture: airflow-image:newest
Why this issues:
- The
construct: .line tells Docker Compose to search for aDockerfilewithin the present listing and construct a brand new picture from it.- The
picture: airflow-image:newestline assigns a particular title to the picture you’re constructing. This title might be used to tag and push the picture to Amazon ECR in a while.Collectively, these traces substitute the default Apache Airflow picture:
picture: ${AIRFLOW_IMAGE_NAME:-apache/airflow:3.0.1}and sign that we’re now working with a self-contained, production-ready picture that features all of the parts wanted to run your pipeline within the cloud. Be sure to remark it out.
Create Your Dockerfile
Now, within the identical folder as your docker-compose.yaml, create a file named Dockerfile (no extension) and paste within the following configuration:
FROM apache/airflow:3.0.1-python3.12

USER airflow

RUN pip set up --no-cache-dir "apache-airflow[webserver,auth]==3.0.1"
COPY necessities.txt .
RUN pip set up --no-cache-dir -r necessities.txt
RUN pip set up apache-airflow-providers-fab==2.0.2

ENV AIRFLOW__CORE__AUTH_MANAGER=airflow.suppliers.fab.auth_manager.fab_auth_manager.FabAuthManager
ENV AIRFLOW__CORE__EXECUTOR=LocalExecutor
ENV AIRFLOW__LOGGING__HOSTNAME_CALLABLE=socket.gethostname
ENV AIRFLOW__DATABASE__SQL_ALCHEMY_CONN=postgresql+psycopg2://**your-database-username**:**your-database-password**@**your-database-endpoint**/postgres
ENV AIRFLOW__API__BASE_URL=http://**your-alb-dns**
ENV AIRFLOW__LOGGING__BASE_URL=http://**your-alb-dns**

COPY dags/ /choose/airflow/dags/

RUN airflow db migrate
What Every Line Does, and What You Should Substitute
Let’s stroll by means of the important thing sections and atmosphere variables you simply added.
AIRFLOW__DATABASE__SQL_ALCHEMY_CONN
ENV AIRFLOW__DATABASE__SQL_ALCHEMY_CONN=postgresql+psycopg2://your-database-username:your-database-password@your-database-endpoint/postgresThis line tells Airflow how to hook up with your PostgreSQL database on Amazon RDS — the identical one you arrange in Half 2. Substitute the placeholders together with your precise RDS credentials and endpoint:
your-database-username: the username you specified when creating your RDS occasionyour-database-password: the password you usedyour-database-endpoint: the RDS endpoint (e.g.,your-db.abc123xyz.us-east-1.rds.amazonaws.com)postgres: the default database title AWS RDS assigns at creation
This connection string ensures that Airflow shops all of its metadata — together with activity states, logs, DAG runs, and consumer accounts — in a persistent, cloud-hosted database.
AIRFLOW__API__BASE_URL and AIRFLOW__LOGGING__BASE_URL
ENV AIRFLOW__API__BASE_URL=http://your-alb-dns
ENV AIRFLOW__LOGGING__BASE_URL=http://your-alb-dns
These two values ought to each level to your Utility Load Balancer DNS title, which you created in Half 2. It usually appears like:
http://my-airflow-alb-1234567890.us-east-1.elb.amazonaws.comThese settings ensure that:
- Hyperlinks within the Airflow UI appropriately route by means of your load balancer
- Logs are served from the best location when seen by means of the interface
If these URLs are improper or lacking, customers received’t be capable of entry the Airflow UI or activity logs reliably from the browser.
AIRFLOW__CORE__AUTH_MANAGER
ENV AIRFLOW__CORE__AUTH_MANAGER=airflow.suppliers.fab.auth_manager.fab_auth_manager.FabAuthManagerThis allows Flask AppBuilder (FAB) authentication and role-based entry management. It permits you to:
- Log into the Airflow UI with your individual credentials
- Create customers and assign roles (Admin, Op, Viewer, and so on.)
- Management entry to DAGs and delicate operations
With out this setting, authentication received’t work — and your UI could fall again to default conduct with out correct consumer controls.
AIRFLOW__CORE__EXECUTOR
ENV AIRFLOW__CORE__EXECUTOR=LocalExecutorThis units Airflow to make use of LocalExecutor, which permits it to run a number of duties in parallel throughout the identical container. That is good for ECS Fargate, the place every container acts as an remoted employee.
We switched from CeleryExecutor to LocalExecutor again in Half 1 to keep away from needing Redis or exterior employees. This retains our structure easy and scalable.
AIRFLOW__LOGGING__HOSTNAME_CALLABLE
ENV AIRFLOW__LOGGING__HOSTNAME_CALLABLE=socket.gethostnameThis tells Airflow to make use of the ECS container’s hostname when producing log paths.
Why it issues:
When your Airflow companies run on ECS behind a load balancer, every container has its personal hostname. Setting this explicitly ensures logs are appropriately linked to the best ECS activity and might be seen seamlessly within the UI.
COPY dags/ /choose/airflow/dags/
This command copies your whole dags/ folder out of your challenge into the container’s DAG listing.
COPY dags/ /choose/airflow/dags/
In native dev, Airflow reads DAGs from a mounted folder. However in ECS, there isn’t any shared quantity — so all DAGs should be included contained in the picture itself. This step ensures that when the container begins within the cloud, your workflows are already loaded and able to run.
RUN airflow db migrate
This ultimate line is the place Airflow initializes its metadata database by creating all the required inside tables in your related RDS occasion:
RUN airflow db migrate
This step should run efficiently and exit with code 0. If there are any errors, examine:
- That your database credentials are appropriate
- Your safety group permits site visitors on port
5432 - Your RDS occasion is within the “Accessible” state
With out this step, ECS will launch your containers — however Airflow will fail as a result of the metadata tables don’t exist but.
necessities.txt
Earlier than constructing your picture, make certain your challenge listing features a necessities.txt file with the next packages:
apache-airflow-providers-fab==2.0.2
pandas==2.1.1
boto3==1.38.21
This file lists the exterior Python dependencies your Airflow challenge must run correctly.
apache-airflow-providers-faballows authentication and function administration.pandasis used to construction and rework your occasion knowledge within the DAG.boto3permits your duties to work together with AWS companies like S3.
Be sure this file is within the identical folder as your Dockerfile, because it’s referenced throughout the picture construct course of.
As soon as your Dockerfile and docker-compose.yaml are appropriately configured, you are able to construct your picture domestically and push it to Amazon ECR — which we’ll cowl within the subsequent step.
Let’s go.
Pushing the Picture to Amazon ECS Repository
Now that your customized Airflow picture is prepared, it’s time to add it to the Amazon ECS personal registry — a safe container repository constructed into the ECS console.
However earlier than we are able to push something to ECS repository, there are just a few steps we have to take an,d just a few issues to be careful for.
Step 1: Construct the Picture Domestically
In your terminal, ensure you’re nonetheless in the identical challenge listing (together with your Dockerfile and docker-compose.yaml).
Then run the next command to construct your customized Airflow picture:
docker construct --no-cache -t airflow-image:newest .This command will:
- Construct your picture utilizing the directions within the
Dockerfile- Set up all required dependencies
- Embed your DAGs and atmosphere configuration
The construct ought to end with no errors and exit with code 0. If the construct fails, double-check your
Dockerfileand ensure Docker Desktop is operating.
The picture title airflow-image and the newest tag match precisely what you laid out in your docker-compose.yaml — this ensures consistency when tagging and later pushing the picture to your ECS repository.
Step 2: Create a Repository in Amazon
Earlier than you possibly can push the picture, you want a vacation spot for it inside AWS ,a non-public repository with the identical title as your picture.
Go to the AWS Console → Seek for Elastic Container Service (ECS) → Underneath Repositories (personal registry) → Click on Create repository.
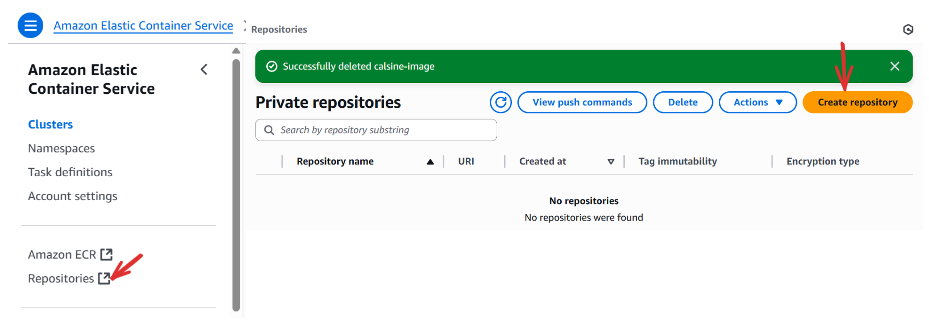
- Set Repository title to
airflow-image(this should match the picture title you utilized in yourdocker-compose.yaml) - Go away the opposite settings as default
- Click on Create
As soon as created, AWS provides you with a novel repository URI , one thing like:
123456789012.dkr.ecr.us-east-1.amazonaws.com/airflow-imageYou’ll use this within the subsequent step when tagging and pushing your picture.
Step 3: Authenticate Docker to ECS repository
To be able to push your picture securely, you should log in to ECR out of your terminal. Run:
aws configureThis may immediate you to enter your:
- AWS Entry Key ID
- Secret Entry Key
- Default area (e.g.,
us-east-1) - Output format (you should use
jsonor go away it clean)
Then, authenticate Docker to your ECR registry:
aws ecr get-login-password --region us-east-1 | docker login --username AWS --password-stdin 123456789012.dkr.ecr.us-east-1.amazonaws.comSubstitute
123456789012together with your precise AWS account IDand
us-east-1with the area you chose in your sources.
Step 4: Tag and Push the Picture
Now that Docker is authenticated, you possibly can tag your native picture with the complete URI of your ECS repository:
docker tag airflow-image:newest 123456789012.dkr.ecr.us-east-1.amazonaws.com/airflow-image:newestBe sure to interchange
123456789012together with your precise AWS account ID, and us-east-1 with the right area if completely different.
Then push the picture to your ECS personal registry:
docker push 123456789012.dkr.ecr.us-east-1.amazonaws.com/airflow-image:newest
This step uploads your customized Airflow picture to your ECS repository, making it obtainable when launching your containers in Amazon ECS.
That’s it!
You’ve efficiently constructed, tagged, and pushed your customized Airflow picture to your personal AWS repository inside ECS.
Now that your picture lives within the cloud, you’re able to deploy Airflow utilizing Amazon ECS (Fargate), and convey your pipeline to life. Let’s hold going.
Configuring ECS Sources
Now that we’ve moved your Airflow Docker challenge from native growth into the cloud by constructing and pushing a customized picture, it’s time to carry that picture to life. On this part, we’ll configure Amazon ECS to truly run your container; robotically, reliably, and at scale.
We’ll stroll by means of the three key items of ECS setup:
- Making a Cluster
- Defining a Activity Definition
- Making a Service to maintain your container operating
By the tip of this part, you’ll have a totally operational Airflow API server deployed and managed inside ECS, related to your database and accessible by means of your public-facing ALB.
Amazon ECS – Working Airflow in Containers
Amazon ECS (Elastic Container Service) permits you to run Docker containers in a managed, scalable atmosphere. Right here’s how the parts match collectively:
- A cluster is your container residence base — the place ECS sources are grouped.
- A activity definition is a blueprint in your containers — it tells ECS what picture to make use of, how a lot reminiscence to allocate, and learn how to begin the container.
- A service ensures that your container stays operating, and handles scaling and restoration if one thing fails.
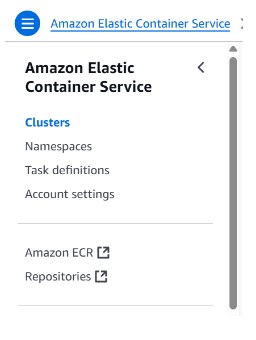
i. making a cluster;
Go to Amazon Elastic Container Service → Clusters → Create cluster → Cluster configuration → Cluster title → your-cluster-name (e.g., my-airflow-cluster)
ii. making a activity;
On ECS, click on on Activity definations → Create new activity definition;
Activity definition configuration;
- Activity definition household →
your-task-name(e.g., my-airflow-task)
Infrastructure necessities;
- Launch typeInfo →
AWS Fargate→ Activity function →ecsTaskExecutionRole→Activity execution function →ecsTaskExecutionRole - Remeber ,
ecsTaskExecutionRoleis the function we created in half two fo this tutorial, after we have been creating our S3 bucket.
Container – 1 part ;
- Container particulars → Title ****→
your-container-name(e.g., my-airflow-container) → Picture URL →enter-your-image-url:your-image-tag(get the picture url in your picture repository, and ensure so as to add the tag: it might be one thing like this; [123456789012.dkr.ecr.us-east-1.amazonaws.com/airflow-image](http://123456789012.dkr.ecr.us-east-1.amazonaws.com/airflow-image):newest) → Important container →Sure - Container port →
8080→ Protocol →TCP→ Port title →8080(any title right here will do)→ App protocol →HTTP -
Underneath, Atmosphere variables, add the next key-value pairs:
AIRFLOW__API__AUTH_BACKEND=airflow.api.auth.backend.session
AIRFLOW__API__BASE_URL=http://your-dns
AIRFLOW__CORE_AUTH_MANAGER=airflow.suppliers.fab.auth_manager.fab_auth_manager.FabAuthManager
AIRFLOW__CORE__DAGS_ARE_PAUSED_AT_CREATION=True
AIRFLOW__CORE__EXECUTOR=LocalExecutor
AIRFLOW__CORE__LOAD_EXAMPLES=False
AIRFLOW__DATABASE__SQL_ALCHEMY_CONN=postgresql+psycopg2://your-db-username:your-db-password@your-db-endpoint/postgres
AIRFLOW__LOGGING__BASE_URL=http://your-dns
AIRFLOW__LOGGING__HOSTNAME_CALLABLE=socket.gethostname
Substitute:
your-dnswith the DNS title of your Utility Load Balanceryour-db-username,your-db-password, andyour-db-endpointwith the credentials and endpoint of the PostgreSQL RDS occasion you created in Half 2
These atmosphere variables configure how Airflow behaves contained in the ECS container — together with the way it connects to the database, handles authentication, serves the API, and logs activity execution. Setting them throughout activity creation ensures that every container occasion runs with the right configuration for accessing companies like RDS and ALB, and follows your customized workflow settings.
Though these variables have been already outlined in your Dockerfile, ECS can generally override or ignore them except they’re explicitly declared within the activity definition. It’s a superb observe to stick the very same variables right here throughout activity setup to keep away from unpredictable conduct — particularly for API routing, logging, and database connectivity. You’ll be able to copy them straight out of your Dockerfile to maintain every thing constant.
- Docker configuration → Entry level →
airflow→ command →api-server. Go away every thing as default as they’re, and click onCreate.
And that’s it — you’ve efficiently created your first ECS activity, which on this case launches the airflow api-server. This could begin the Airflow UI, however notice that the duty won’t run independently till a service is created to handle and run it. Making a service prompts the duty definition and maintains the duty lifecycle throughout the ECS cluster.
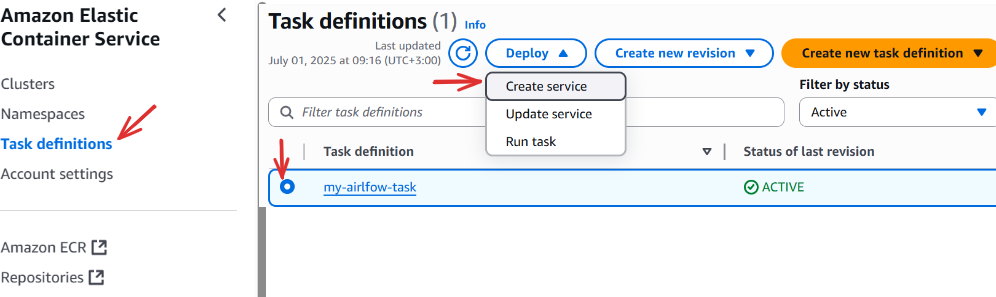
iii. Making a service;
Click on Activity definations → Choose your activity → Deploy → Create service;
Service particulars;
- Activity definition revision →
select your newest revision, for brand new duties it is 1(newest)→ Service title →your-service-name(e.g., my-airflow-service)
Atmosphere;
- Current cluster →
select-your-cluster-name(the one you created), this can robotically fill in particulars for related sources like community.
Networking
- VPC → Maintain it as default
- Subnets → hold all the chosen subnets related to the above vpc. If not chosen by default, selecte all of the availblle subnets.
- Safety group → Use an current safety group → Safety group title →
Choose your-security-group-name(We created this partially two of this tutorial). You may also add the default safety gropu to this part, although it’s non-compulsory.
Observe that, the community part might be robotically crammed for us as lengthy we embody the Current cluster we’re working, Nevertheless at all times double examine to make sure, your safety group is chosen within the safety group part, this doesn’t occur by default.
Load balancing;
Verify -Use load balancing
- VPC →
select-your-default-vpc; - Load balancer kind →
Utility Load Balancer; - Container →
select-your-existing-container; - Utility Load Balancer →
Use an current load balancer→ Load balancer ****→select-your-existing-load-balancer(we created this in a part of this tutorial) - Listener ****→ Use an current listener →
HTTP:80 - Goal group →
Use an current goal group→Goal group title →select-your-existing-target-group-name(we created this partially two of this tutorial
Scroll down and click on Create.
And that’s it — you’ve efficiently deployed your first ECS service for Airflow! Making a service robotically begins a activity — in our case, a activity known as api-server, which runs our Airflow app.
You need to now be capable of entry the Airflow UI at http://your-dns. It could take as much as 3 minutes for the service to totally begin and for the interface to grow to be obtainable.
What Precisely Occurs after we create a service:
- ECS pulls your customized Airflow picture out of your ECS repository
- It launches the container utilizing the duty definition you configured
- The container registers together with your Utility Load Balancer
- After a brief delay, we then entry the Airflow UI at:
http://your-dnsSubstitute your-dns with the precise DNS title of your ALB.
Working Duties in ECS
Chances are you’ll be questioning: What credentials ought to I exploit to log into the Airflow UI now that it’s operating? Once we labored domestically, Airflow got here with a default username and password (airflow / airflow). However in our ECS setup, that is not the case. Since we’re utilizing a distant PostgreSQL database on Amazon RDS (arrange in Half 2), we have to explicitly initialize the metadata tables and create our personal consumer.
This brings us to our subsequent step, operating one-time ECS duties.
Step 1: Migrate the Metadata Database
Earlier than something can run , together with DAGs or logins, Airflow must initialize its backend database (PostgreSQL). That is the place it shops every thing: DAG runs, consumer accounts, logs, connections, and extra.
We’ll run a one-time activity inside ECS to carry out the migration.
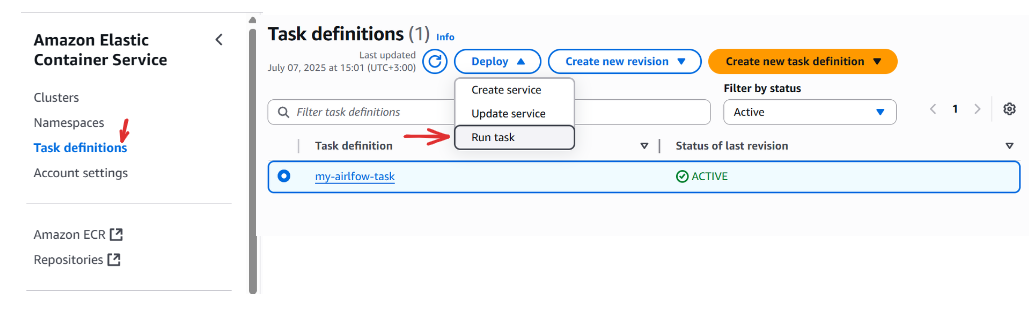
- Go to ECS Console →
Activity Definitions - Choose your Airflow activity definition(e.g.
my-ariflow-task) - Click on Deploy →
Run activity
Underneath Run Activity, fill in:
- Activity definition revision:
Choose the most recent(e.g. 1 (LATEST)) - Atmosphere:
Select your current cluster(e.g. my-airflow-cluster) -
Container overrides:
You don’t have to prefix with airflow — it’s already the default entry level outlined in your activity.
Then click on Create to run the duty.
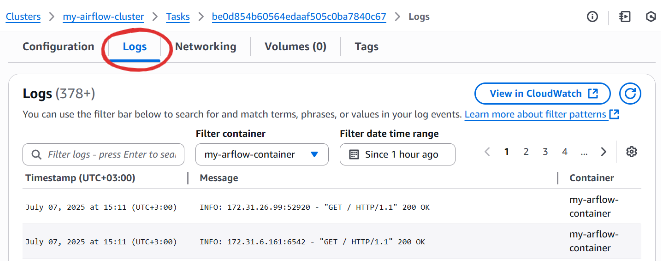
Now go to Clusters → Choose your cluster → Scroll all the way down to Duties → Click on the newly created activity → Go to the Logs tab.
After a minute or two, you must see one thing like:
Database migration completed!When you see that message, your PostgreSQL occasion now accommodates all Airflow’s inside tables and is able to energy your UI.
Earlier than You Run Any Activity…
Maintain these three key guidelines in thoughts. If one thing feels off, this guidelines will prevent:
- At all times choose the most recent activity definition revision
- At all times specify your current ECS cluster — in any other case networking and roles could fail
- At all times override the command — in case you skip this, ECS will run the default
api-serveronce more
Step 2: Create an Admin Person for the UI
Now that the database is prepared, we have to create a consumer to log into the Airflow internet interface.
Observe the identical course of as earlier than to run a brand new activity:
- Go to Activity Definitions → Choose your Airflow activity
- Click on Deploy →
Run activity - Choose the most recent revision and your current cluster
- Within the Container override, enter:
customers
create
--username
admin
--firstname
Brayan
--lastname
Opiyo
--role
Admin
--email
[email protected]
--password
admin123
Click on Create to run the duty. Then examine the Logs tab to substantiate the consumer was created efficiently.
You’ll be able to change the values above to fit your setup — simply make sure to give your self the Admin function so you possibly can handle every thing contained in the UI.
On this activity for instance, we’re making a consumer with first title Brayan and final title Opiyo, assigning them the username admin, the function of Admin, and setting their electronic mail and password to grant them entry to the Airflow internet interface with administrative privileges.
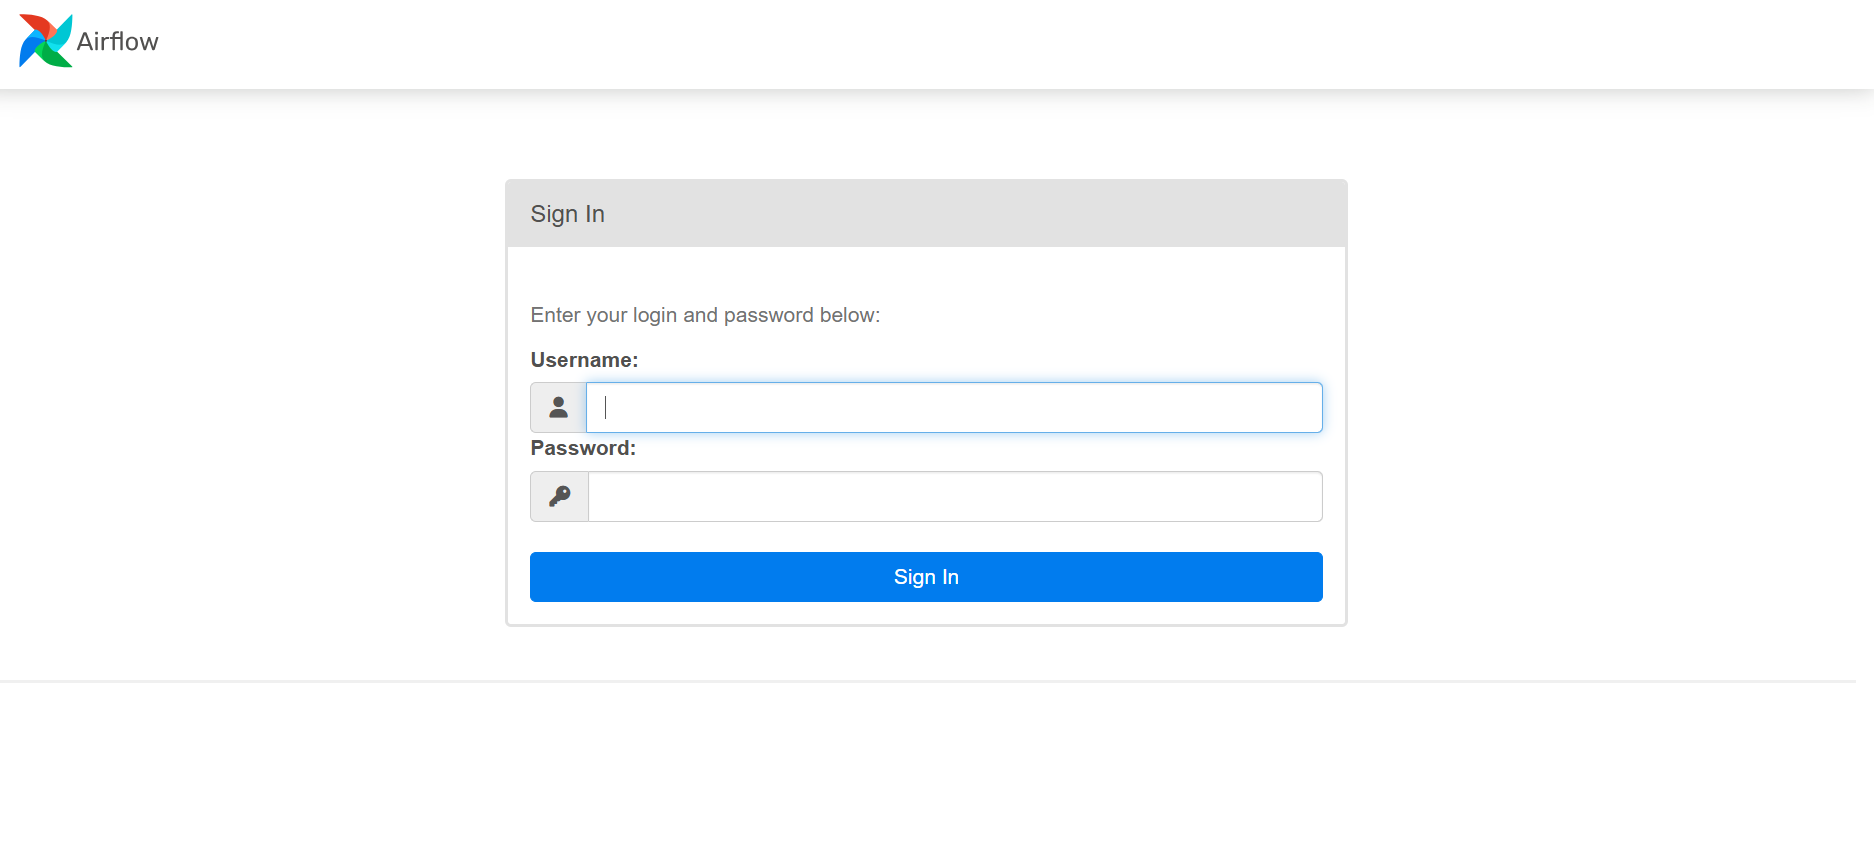
Login to the Airflow UI
Now head again to your browser and open:
http://your-dnsSubstitute your-dns with the precise DNS of your Utility Load Balancer.
Log in utilizing the credentials you simply created. When you’re in, you must see your Airflow dashboard, similar to you probably did domestically — however now operating fully within the cloud!

Up subsequent, we’ll launch the background parts that make every thing run: the scheduler, triggerer, and DAG processor. Let’s hold going.
Launching Background Duties: Scheduler, Triggerer, DAG Processor
While you open the UI, you could discover that the scheduler, triggerer, and DAG processor will not be operating but. That’s anticipated — these parts should be launched manually.
Similar to with the sooner duties:
- Go to Activity Definitions → Choose your activity
- Click on Deploy → Run activity
-
Underneath Container overrides, present the suitable command:
Keep in mind, simply earlier than this step, we have to choose the Activity Definition revision and in addition the atmosphere (current cluster).
To run the duty for the
Scheduler,- We’ll launch a activity with the command
scheduler.
For the
Triggerer;For the
DAG Processor;- The command is
dag-processor
- We’ll launch a activity with the command
Every of those needs to be run individually utilizing the identical course of. As soon as began, return to your ECS cluster and scroll all the way down to Duties. You need to see these duties listed as operating.
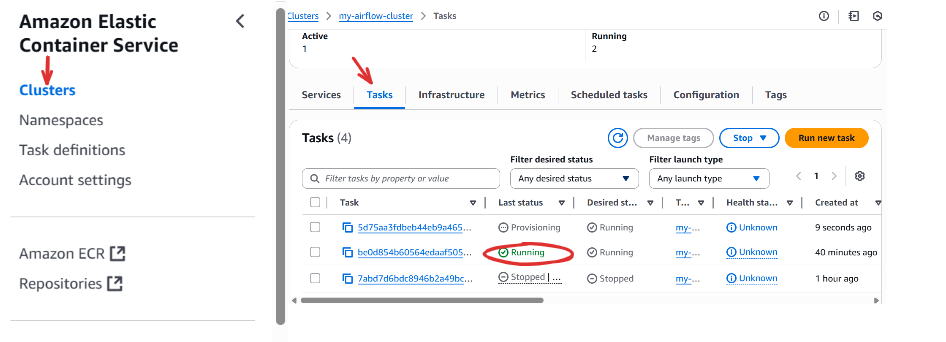
Refresh the Airflow UI to substantiate that the system parts are energetic (inexperienced checks).

You’ll be able to at all times examine logs if something fails — go to the operating activity, click on on it, then examine the Logs tab.
Why Some Duties Run Constantly
You’ll discover that duties like api-server(that is the default run we get any time we create or replace our service), scheduler, triggerer, and dag-processor hold operating — that’s intentional. These are background companies that should keep energetic for Airflow to perform correctly. Alternatively, duties like db migrate or customers create run as soon as after which cease — as a result of they’re one-time instructions.
Updating Your Activity Definitions
Everytime you replace your Docker picture, make sure to:
- Go to your activity definition → Click on Create new revision
- Select the prevailing Cluster
-
Scroll down and click on Create
Briefly, after we make an replace domestically; corresponding to including new DAGs — we first have to
constructthe brand new picture,tagit, andpushit to our ECS repository, which hosts the picture URL.By default, these adjustments will not be robotically picked up by the operating ecs container. We should create a brand new activity definition revision by clicking Create revision on that very same activity, then scrolling down and clicking
Create.Except you explicitly replace the picture URL (which isn’t the really helpful strategy), clicking Create will trigger your activity to drag the most recent picture model and cargo the adjustments into the prevailing container.
Then, we should be certain that our service is up to date to this new activity revision;
- Go to Activity definations → Choose your activity → Click on Deploy → Replace service
- Select the newest activity revision (e.g
2 (newest)) → Click on Create
To make sure all operating duties are utilizing the most recent model, it’s essential to additionally re-run every key activity manually (e.g., scheduler, triggerer, dag-processor) utilizing the Run activity possibility, with the most recent revision.
Remaining Step – Run Your DAG!
Now that every thing is up and operating, go to your Airflow UI and set off a DAG manually or look forward to the scheduled run. If every thing is configured appropriately, you must see a brand new file uploaded to your S3 bucket.
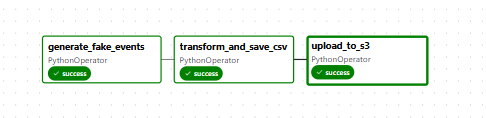
Congratulations! You’ve simply deployed a working, production-ready Airflow pipeline utilizing Amazon ECS and S3.
If one thing goes improper, make sure to examine the duty logs for useful error messages. Troubleshooting normally begins with inspecting activity particulars contained in the ECS cluster.
Debugging Frequent Airflow + ECS Points
Deploying Airflow to the cloud is a serious milestone, however when one thing goes improper, it may possibly really feel like a maze of transferring components. Don’t fear — this part is right here that can assist you spot and repair frequent points which may come up when operating your Airflow pipeline on Amazon ECS with Fargate.
Whether or not your UI received’t load, DAGs refuse to run, or every thing appears high quality however nothing occurs, we’ve been there. Let’s stroll by means of crucial issues to examine.
1. Your DAGs Fail Silently or By no means Load
Verify: Did you embody the next line in your Dockerfile?
RUN airflow db migrateWhy this issues:
With out this command, Airflow by no means creates the backend tables in your PostgreSQL database — and the system received’t know learn how to observe DAGs, customers, logs, or metadata. Even when your container begins, the UI will silently fail or the DAGs won’t ever seem.
Repair:
Rebuild your picture after guaranteeing the road is current, then push it and create a brand new ECS activity definition and replace your service.
2. Airflow UI Exhibits a Clean Display or 504 Gateway Timeout
Verify 1: Did you enter the right ALB DNS in your atmosphere variables?
ENV AIRFLOW__API__BASE_URL=http://your-alb-dns
ENV AIRFLOW__LOGGING__BASE_URL=http://your-alb-dns
If the DNS is inaccurate, the UI received’t be capable of route requests — and also you’ll both get a clean display screen or a gateway timeout.
Verify 2: Did you misspell your atmosphere variable names?
That is important:
Right:
AIRFLOW__API__BASE_URLIncorrect:
AIRFLOW_API_BASE_URL # (this might be ignored fully)Discover the double underscores () between config sections like AIRFLOWAPI__… and single underscores inside a piece. Airflow strictly depends on this naming conference.
Repair:
Replace your Dockerfile or ECS activity definition atmosphere part to make use of the right variable names and ALB DNS, then redeploy.
3. 503/504 Gateway Errors Even When the Activity is Working
Verify: Go to EC2 Console → Goal Teams, choose your goal group, and confirm the Well being Checks tab.
If the standing is unhealthy, your ALB received’t route any site visitors to your container — even when it’s operating.
Repair:
- Be sure the safety group utilized by the ALB can ship HTTP site visitors (
port 80) to the container’s safety group - Verify that the container’s activity is listening on port 8080 and routing site visitors appropriately through HTTP
Additionally, make certain each the ALB and ECS containers are utilizing the identical VPC and subnets.
4. Database Migration Fails or Freezes
Verify: Look carefully on the log in your db migrate activity.
One frequent trigger is a lacking database connection string or dangerous credentials in your atmosphere:
ENV AIRFLOW__DATABASE__SQL_ALCHEMY_CONN=postgresql+psycopg2://your-db-username:your-db-password@your-db-endpoint/postgresRepair:
Double-check your: Username, Password, RDS endpoint and, Safety group (port 5432 should be open between ECS and RDS)
Replace your credentials and activity definition if wanted, then run the duty once more.
5. Some ECS Duties Are Working a Totally different Picture Revision
Chances are you’ll discover one activity (like api-server) is utilizing the most recent picture, however others (like scheduler or dag-processor) will not be.
Repair:
- Go to the Activity Definitions tab
- Choose your activity
- Click on Deploy → Replace service and choose the newest revision
- Then re-run every ECS activity (scheduler, triggerer, and so on.) utilizing that very same revision
All Airflow parts should be on the identical activity definition revision to work collectively appropriately.
6. Picture URL or Tag Not Working
Verify: When defining your ECS activity, did you employ this format?
123456789012.dkr.ecr.us-east-1.amazonaws.com/airflow-image:newestIn case you forgot to append :newest (or no matter tag you used throughout docker construct), ECS won’t know what model to drag — and the duty will fail at launch.
Repair:
Return and edit your activity definition to embody the tag within the picture discipline.
Understanding Value: What You will Truly Pay For
Earlier than we wrap up, let’s discuss cash.
Airflow on ECS is highly effective — however what does it truly value to run? Whereas a lot of this setup makes use of the AWS Free Tier, there are nonetheless just a few companies that may generate prices if left operating long-term. Let’s break down every element so you possibly can handle your cloud spend properly.
1. Amazon RDS – Free for Improvement
In case you chosen the Free Tier when creating your PostgreSQL RDS occasion (e.g., db.t3.micro), you are entitled to:
- 750 hours/month of database utilization
- 20 GB of storage
As long as you are inside these limits and utilizing one occasion, your RDS database is basically free.
2. ECS Fargate – Charged per Activity per Second
Every ECS activity you run (like api-server, scheduler, dag-processor, triggerer) incurs a price based mostly on:
- vCPU used
- Reminiscence allotted
- Working time (billed per second, with a 1-minute minimal)
Right here’s a tough breakdown (as of 2025 pricing in us-east-1):
| Configuration | Approximate Value/hour |
|---|---|
| 0.25 vCPU, 0.5 GB | $0.0026 |
| 0.5 vCPU, 1 GB | $0.0052 |
| 1 vCPU, 2 GB | $0.0104 |
In case you’re operating 4 containers constantly (api-server, scheduler, triggerer, dag-processor) at 0.5 vCPU every, you’re ~$0.02/hour or ~$15/month if left operating 24/7.
To economize:
- Cease pointless duties when not in use
- Delete companies after testing
- Run background companies solely when wanted
3. Utility Load Balancer (ALB)
The ALB that exposes your Airflow UI is not free — pricing is dependent upon:
- $0.0225/hour base cost
- $0.008 per GB of knowledge processed
So, in case your ALB runs 24/7:
In case you’re not actively utilizing the UI, delete the ALB or cease the service to keep away from idle prices.
4. Goal Group – No Value (Type Of)
The goal group itself doesn’t generate prices — however it’s tied to your ALB, which does. So in case your ALB is operating, assume the price is accounted for.
5. Safety Teams – Free
Safety teams are digital firewalls, they don’t value something to create or preserve. Use them as freely as wanted for isolation and entry management.
6. ECR (Container Registry) – Free inside Limits
You get 500 MB/month of storage in Amazon ECR as a part of the free tier. Your customized Airflow picture is unlikely to exceed that except you’ve added enormous libraries.
In case you shut issues off when not in use (e.g., cease your ALB and duties), your month-to-month value can drop under $10 simply.
Remaining Tricks to Decrease Value
- Use the AWS Billing Dashboard to watch utilization in real-time
- Use Spot Situations for cheaper compute (superior use)
- Don’t overlook to delete companies you not want, particularly the ALB
- Think about auto-shutdown scripts in case you’re working in a dev atmosphere
You are not simply constructing Airflow within the cloud, you’re studying to handle scalable programs cost-effectively.
Wrap-Up
You’ve efficiently taken Apache Airflow from an area experiment to a production-grade, cloud-hosted orchestration system. Alongside the way in which, you constructed a customized Docker picture, pushed it to Amazon ECR, configured supporting companies in ECS, and uncovered a totally useful Airflow UI by means of an Utility Load Balancer, all backed by a persistent PostgreSQL database on RDS. You additionally discovered learn how to troubleshoot deployment points, handle ECS duties, and management cloud prices by understanding what sources incur prices and learn how to scale them properly. Your workflow now runs robotically, scales on demand, and operates independently within the cloud, steady, observable, and prepared for real-world knowledge workloads.
From right here, you may proceed by constructing extra DAGs and attempting to deploy them by means of new picture variations and ECS revisions. You could possibly discover extra superior Airflow options or refine your AWS setup. .


